Azure AD/Office 365 seamless sign-in – Implement single sign-on (SSO) with AD FS in Windows Server 2012 R2
Introduction
Microsoft Office 365 provides secure anywhere access to professional email, shared calendars, instant messaging (IM), video conferencing, document collaboration, etc. It represents the cloud version of the Microsoft communication and collaboration products with the latest version of the Microsoft desktop suite for businesses of all sizes.
Azure Active Directory (Azure AD) is the directory behind Office 365 used to store user identities and other tenant properties. Just like the on-premises Active Directory stores the information for Exchange, SharePoint, Lync and your custom Line of Business (LOB) apps, Azure AD stores the information for Exchange Online, SharePoint Online, Skype for Business Online, etc., and any custom applications built in the Microsoft's cloud.
Through the single sign-on feature, Azure AD provides organizations with the ability to authenticate against the organization's Active Directory (or other identity repositories), allowing their users to use their corporate credentials to access Azure AD/Office 365 and the services that they have been provisioned for.
Objectives of this paper
As previously noticed, this document complements the third part entitled Azure AD/Office 365 seamless Single Sign-in – Part 3 by providing an end-to-end walkthrough to rollout a working single sign-on configuration for Azure AD/Office 365 with AD FS.
Non-objectives of this paper
This document doesn't provide a full description of AD FS in Windows Server 2012 R2. It doesn't provide neither guidance for setting up and configuring AD FS in a production environment nor a complete technical reference for AD FS.
Note For information on AD FS, please refer to the product documentation, and the dedicated AD FS Q&A forum.
It doesn't neither provide an understanding of the different single sign-on deployment options with Azure AD/Office 365, how to enable single sign-on using corporate Active Directory credentials and AD FS to Azure AD/Office 365, and the different configuration elements to be aware of for such deployment. This is specifically the intent of the aforementioned first part that covers all the key aspects the readers should understand to successfully achieve single sign-on with Azure AD/Office 365 for their organization.
Organization of this paper
To cover the aforementioned objectives, this document is organized in the following 3 sections:
- Setting up base configuration test lab.Setting up single sign-on with the Azure AD/Office 365 tenant.Monitoring your on-premises deployment (Optional).
These sections provide the information details necessary to (hopefully) successfully build a working environment for the scenario. They must be followed in order.
About the audience
Identity federation − also known as (cross-domain) single sign-on − in general is a broad topic, with many facets, depths of understanding, protocols, standards, tokens, etc. This paper addresses the single sign-on topic only from the Azure AD/Office 365 perspective and from both conceptual and technical levels.
This document is thus intended for system architects and IT professionals who are interested in understanding this capability of Azure AD/Office 365 from a hand-practice perspective.
Setting up base configuration test lab
By following the instructions outlined hereafter, you should be able to successfully prepare your on-premises test lab environment based on virtual machines (VMs) running in Azure to later deploy and configure the test environment, install and configure it.
In order to complete the document's walkthrough, you need an environment that consists of the following components for the Azure-based test lab infrastructure:

- Two computers running Windows Server 2012 R2 (named DC1 respectively DC2 by default) that will be configured as a domain controller with a test user and group accounts, and Domain Name System (DNS) servers. DC1 will host Azure AD Connect for the sync between the Azure-based test lab infrastructure and the Azure AD/Office 365 subscription. Alternatively, DC2 will be configured as an enterprise root certification authority (PKI server),Two intranet member server running Windows Server 2012 R2 (named ADFS1 respectively ADFS2 by default) that will be configured as an AD FS farm.Two Internet-facing member server running Windows Server 2012 R2 (named WAP1 respectively WAP2 by default) that is configured as Web servers for the Web Application Proxy (WAP) farm.
Note Windows Server 2012 R2 offers businesses and hosting providers a scalable, dynamic, and multitenant-aware infrastructure that is optimized for the cloud. For more information, see the Microsoft TechNet Windows Server 2012 R2 homepage.
If you've already followed the walkthrough of Part 2, all the components that pertains to the above Azure-based test lab infrastructure should already be in place with the six VMs running Windows Server 2012 R2. If you haven't yet conducted this rollout, this is the time to do so.
The rest of this document makes the assumption that such an evaluation environment is in place.
The above Azure VMs will enable you to:
- Connect to the Internet to install updates, and access Internet resources in real time.Later configure them with Azure AD Connect to finally get a relevant Azure-based test infrastructure.Remotely managed those using a Point-to-Site (P2S) connection and then Remote Desktop (RDP) connections by your computer that is connected to the Internet or your organization network.
Note You must be logged on as a member of the Domain Admins group or a member of the Administrators group on each computer to complete the tasks described in this guide. If you cannot complete a task while you are logged on with an account that is a member of the Administrators group, try performing the task while you are logged on with an account that is a member of the Domain Admins group.
- Create snapshots so that you can easily return to a desired configuration for further learning and experimentation.
For illustration purposes, we've opted to configure the domain litware369.com (LITWARE369). You will have to choose in lieu of a domain name of yours. For checking purpose, you can for instance use the domain search capability provided by several popular domain name registrars.
Whenever a reference to litware369.com
is made in a procedure, it has to be replaced by the DNS domain name of your choice to reflect accordingly the change in naming. Likewise, any reference to LITWARE369 should be substituted by the NETBIOS domain name of your choice.For the sake of simplicity, the same password "Pass@word1!?" is used throughout the procedures detailed in this document. This is neither mandatory nor recommended in a real world scenario.
To perform all the tasks in this guide, we will use the local administrator account AzureAdmin or alternatively the LITWARE369 domain administrator account AzureAdmin for each VM, unless instructed otherwise.
Accessing the various machines of the test lab environment
See eponym section in Part 2 of this whitepaper.
Finalizing the configuration of the domain controllers
To finalize the configuration of the domain controllers in our test lab environment, you will need to create a group Managed Service Account (gSMA).
A gMSA account will be required during the AD FS installation and configuration. The benefit of using a gMSA is its auto-negotiated password update feature.
To create the gMSA account, proceed with the following steps:
- Open a remote desktop connection on the DC1 computer. Follow the instructions as per section § Accessing the various machines of the test lab environment and specify in step 2 "10.0.0.101" for the DC1 computer. Log on as the LITWARE369 domain administrator account AzureAdmin with "Pass@word1!?" as password.Open an elevated Windows PowerShell or PowerShell Integrated Scripting Environment (ISE) prompt, and then run the following command to verify whether the KDS Root Key has been created in the LITWARE369 domain to enable gMSA in your domain:
PS C:\> Get-KdsRootKey
-
If it has not been created (the output displays no information), run the following command to create the key:
PS C:\> Add-KdsRootKey –EffectiveTime (Get-Date).AddHours(-10)
Guid
----
99490123-7d38-c01e-05c7-539224fa88ea
PS C:\>-
Run the following command:
PS C:\> New-ADServiceAccount FsGmsa -DNSHostName adfs.litware369.com -ServicePrincipalNames http/adfs.litware369.com
Configuring the AD FS farm
The AD FS farm is constituted by the ADFS1 and ADFS2 computers along with the internal load balancer.
Deploying the primary federation server in the AD FS farm
This section walks you through the deployment of the primary federation server on the ADFS1 computer with the following steps:
-
Issuing a SSL/TLS certificate.Installing and configuring the AD FS role service.Activating the Device Registration Service (DRS).
Note For more information, see article Windows Server 2012 R2 AD FS Deployment Guide.
Important note You must have domain administrator permissions to deploy the AD FS role service.
The following subsections describe each of these steps in the context of our test lab environment.
Issuing a SSL/TLS certificate
The AD FS role service will require a server SSL/TLS certificate. The certificate MUST have the following attributes:
-
Subject Name (CN): adfs.litware369.com
Subject Alternative Name (DNS): adfs.litware369.com
Subject Alternative Name (DNS): enterpriseregistration.litware369.com
Note For more information about setting up SSL/TLS certificates, see article Configure SSL/TLS on a Web site in the domain with an Enterprise CA.
To issue the SSL/TLS certificate, proceed with the following steps:
-
Open a remote desktop connection on the ADFS1 computer. Follow the instructions as per section § Accessing the various machines of the test lab environment and specify in step 2 "10.0.0.201" for the ADFS1 computer. Log on as the LITWARE369 domain administrator account AzureAdmin with "Pass@word1!?" as password.Open an elevated Windows PowerShell or PowerShell Integrated Scripting Environment (ISE) prompt, and then run the following command:
PS C:\> Get-Certificate -Template SSLCertificates -SubjectName CN=adfs.litware369.com
			 `
        –DnsName adfs.litware369.com, enterpriseregistration.litware369.com -CertStoreLocation cert:\LocalMachine\My<
Status Certificate                               Request
                                     ------ -----------                               -------
                                     Issued [Subject]…
PS C:\> _
Note If you have not configured a new certificate template (e.g. the SSLCertificates in our configuration), you can use the WebServer certificate template in lieu of in the above command.
Note For more information, see article AD CS Administration Cmdlets in Windows PowerShell.
-
The SSL/TLS certificate should now be imported into the Local Computer\My Store on the ADFS1 computer. Verify whether the SSL/TLS certificate has been imported by running the following command:
PS C:\> dir Cert:\LocalMachine\My
Directory: Microsoft.PowerShell.Security\Certificate::LocalMachine\My
Thumbprint                                Subject
----------                                -------
FADB4FDF7C5006D45011B5E9DF0C2DA8C624FD2F  DC=Windows Azure CRP Certificate Generator
3361995F9929C7269886A9DC276122B493D3C4A5  CN=8848a529-9d69-4049-8469-8218547a61e2
12D5C5C12A4E432061B383ACCBA17241ADE0CE02  DC=Windows Azure CRP Certificate Generator
1FA2AE7473841BAFCB2460735EE3EF4CAE22F6C0  CN=adfs.litware369.com
PS C:\> _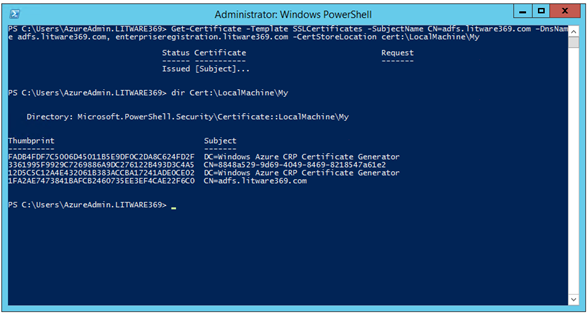
The certificates are listed by their thumbprint in the Local Computer\My Store. We will be later interested in the thumbprint of the newly issued certificate, i.e. the one whose CN equals adfs.litware369.com, for example in our configuration: 1FA2AE7473841BAFCB2460735EE3EF4CAE22F6C0.
-
Export
the issued certificate with its private key for later use on the ADFS2 computer:
-
From the previous elevated Windows PowerShell or PowerShell Integrated Scripting Environment (ISE) prompt, and open mmc.exe.Click File | Add/Remove Snap-in… Select Certificates in Available snap-ins and then click Add. A Certificates snap-in dialog opens up.Select Computer account, click Next, and then click Finish. Click OK to close the dialog.Right-click the adfs.litware369.com certificate, click All Tasks, and then click Export. The Certificate Export Wizard opens up.Click Next, select Yes, export the private key, and then click Next.On Export File Format, leave Personal Information Exchange – PKCS #12 (.PFX) selected, and then click Next.On Security, check Password, and type "Pass@word1!?" twice. Then click Next.On File to Export, browse to the location to which you want to export the SSL/TLS certificate. For File name, name the certificate file, for example "ADFSLitware369" in our configuration. Then click Next.Click Finish to export the certificate. Click OK to close the dialog.
Installing and configuring the AD FS role service
To install and configure the AD FS role service, proceed with the following steps:
-
From the previous elevated Windows PowerShell or PowerShell Integrated Scripting Environment (ISE) prompt, run the following command:
PS C:\> Install-windowsfeature adfs-federation –IncludeManagementTools
Success Restart Needed Exit Code      Feature Result
------- -------------- ---------      --------------
True    No             Success        {Active Directory Federation Services}
WARNING: To finish configuring this server for the federation server role using Windows PowerShell, see
http://go.microsoft.com/fwlink/?LinkId=224868.
PS C:\> _
-
Run the following commands to create a Windows Internal Database (WID) along with the required gMSA account:
PS C:\> Import-Module ADFS
PS C:\> $certificateThumbprint = (Get-ChildItem cert:\LocalMachine\MY -DnsName "*adfs*" | Select-Object  `
        -First 1).Thumbprint
PS C:\> Install-AdfsFarm –CertificateThumbprint $certificateThumbprint -FederationServiceDisplayName "Litware369"  `
        -FederationServiceName "adfs.litware369.com" –GroupServiceAccountIdentifier "LITWARE369\FsGmsa$"
WARNING: The root key for the group Managed Service Account was created at 1/3/2017 9:39:52 AM. If you have more than
one domain controller in your Active Directory forest, the key may not yet have replicated to all domain controllers
and therefore the service may not successfully install or start.  To avoid service startup problems, wait 10 hours to
ensure the key has replicated to all DCs before completing the Active Directory Federation Services Configuration
Wizard, executing Install-AdfsFarm or Add-AdfsFarmNode on any other servers in your network, or restarting any AD FS
service.
Message                                 Context                                                              Status
-------                                 -------                                                              ------
The configuration completed successf... DeploymentSucceeded                                                  Success
PS C:\> _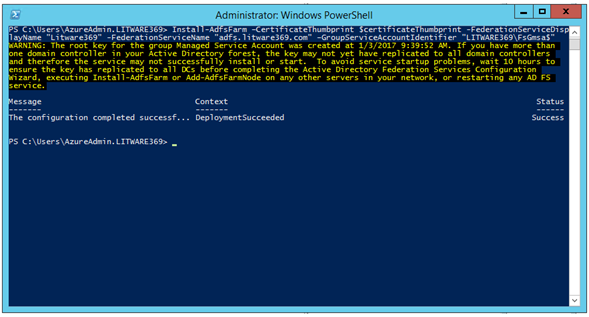
Important note The '$' at the end of the gMSA account is required.
Note If this is NOT the first time you run this command, add –OverwriteConfiguration.
Activating the Device Registration Service (DRS)
As discussed in the first part of the whitepaper, the AD Workplace Join capability allows users to join their devices with the organization's workplace to access company resources and services. When a device is joined by Workplace Join, it becomes a known device. Attributes of the device can then be retrieved from AD to drive conditional access to authorize issuance of security tokens for the targeted applications. Windows 8.1, Android 4.0+, and iOS 6+ devices can be joined by using Workplace Join.
Workplace Join is made possible by Device Registration Service (DRS) that is included with AD FS. When a device is joined by Workplace Join, DRS provisions a device object in AD and sets a certificate on the consumer device that is used to represent the device identity. DRS is meant to face both internal and external resources. Organizations that deploy DRS along with WAP can join devices that use Workplace Join from any Internet-connected location.
Note For more information, see article Join to Workplace from Any Device for SSO and Seamless Second Factor Authentication Across Company Applications.
The DRS capability has to be initialized and enabled on the AD FS farm.
To enable the DRS capability on the ADFS1 computer, proceed with the following steps:
-
From the previous elevated Windows PowerShell or PowerShell Integrated Scripting Environment (ISE) prompt, run the following command:
PS C:\> Initialize-ADDeviceRegistration -ServiceAccountName "LITWARE369\FsGmsa$"
-
When prompted for a confirmation, press "Y" to validate.
PS C:\> Initialize-ADDeviceRegistration
This command will prepare Active Directory to host Device Registration Service in the current forest.
Do you want to continue with this operation?
[Y] Yes  [A] Yes to All  [N] No  [L] No to All  [S] Suspend  [?] Help (default is "Y"): Y
WARNING: The Active Directory forest has been prepared for Device Registration.  To use the AD FS Device Registration
Service, run the Enable-AdfsDeviceRegistration cmdlet on each node in your AD FS farm.
Message                                 Context                                                               Status
-------                                 -------                                                               ------
The configuration completed successf... DeploymentSucceeded                                                   Success
PS C:\> _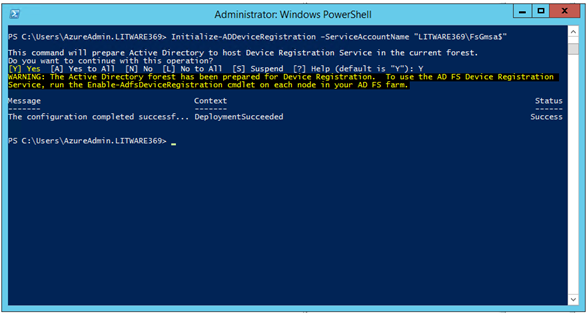
-
Next, run the following Enable-AdfsDeviceRegistration cmdlet to enable DRS. This should be run on each node in an AD FS farm, for the moment on the ADFS1 computer and later on the ADFS2 computer.
PS C:\> Enable-AdfsDeviceRegistration
Message                                 Context                                                               Status
-------                                 -------                                                               ------
The configuration completed successf... DeploymentSucceeded                                                   Success
PS C:\> _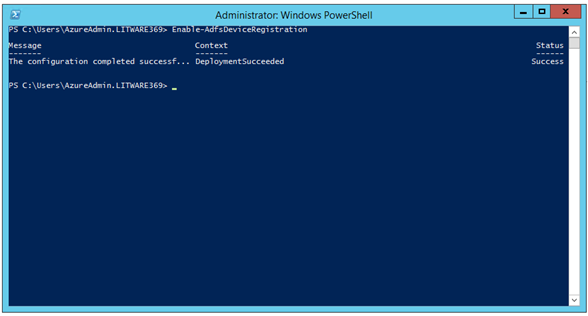
You should see a message about device registration being successful.
Note For more information, see article Step 5: Configure a federation server with Device Registration Service.
Configuring the secondary federation server in the AD FS farm
This section walks you through the deployment of the secondary federation server on the ADFS2 computer with the following steps:
-
Importing the SSL/TLS certificate issued on ADFS1.Installing and configuring the AD FS role service for the second node.Activating the Device Registration Service (DRS).
The following subsections describe each of these steps in the context of our test lab environment.
Importing the SSL/TLS certificate issued on ADFS1
As mentioned earlier, the AD FS role service will require a server SSL/TLS certificate. To import the certificate previously issued on the ADFS1 computer, proceed with the following steps:
-
Open a remote desktop connection on the ADFS2 computer. Follow the instructions as per section § Accessing the various machines of the test lab environment and specify in step 2 "10.0.0.202" for the ADFS2 computer. Log on as the LITWARE369 domain administrator account AzureAdmin with "Pass@word1!?" as password.Open a Windows PowerShell or PowerShell Integrated Scripting Environment (ISE) prompt.Copy the ADFSLitware369.pfx file from the ADFS1 computer to the ADFS2 computer.Double-click the file. A Certificate Import Wizard opens up.
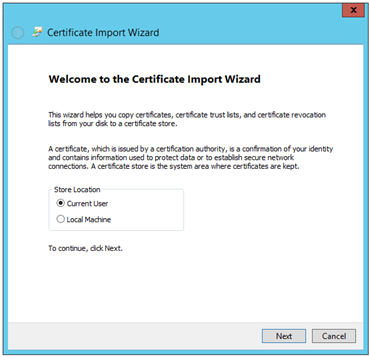
-
Select Local Machine and click Next twice.On Private key protection, type the password, i.e. "Pass@word1!?" in our illustration, and then click Next twice.Click Finish. Click OK to close the message box that confirms a successful import.
Installing and configuring the AD FS role service for the second node
To install and configure the AD FS role service on the ADFS2 computer, proceed with the following steps:
-
Open an elevated Windows PowerShell or PowerShell Integrated Scripting Environment (ISE) prompt, and then run the following command:
PS C:\> Install-windowsfeature adfs-federation –IncludeManagementTools
Success Restart Needed Exit Code      Feature Result
------- -------------- ---------      --------------
True    No             Success        {Active Directory Federation Services}
WARNING: To finish configuring this server for the federation server role using Windows PowerShell, see
http://go.microsoft.com/fwlink/?LinkId=224868.
PS C:\>-
Run the following commands to add the ADFS2 computer as node of the existing AD FS farm:
PS C:\> Import-Module ADFS
PS C:\> $certificateThumbprint = (Get-ChildItem cert:\LocalMachine\MY -DnsName "*adfs*" | Select-Object -First 1).Thumbprint
PS C:\> Add-AdfsFarmNode -GroupServiceAccountIdentifier "LITWARE369\FsGmsa$"  `
        -PrimaryComputerName "adfs1.litware369.com" –CertificateThumbprint $certificateThumbprint
Message                                 Context                                                              Status
-------                                 -------                                                              ------
The configuration completed successf... DeploymentSucceeded                                                  Success
PS C:\>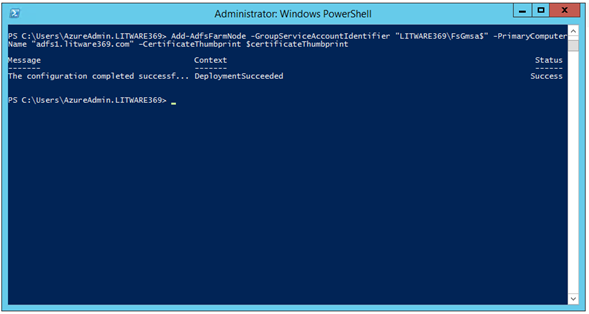
Important note The '$' at the end of the gMSA account is required.
Note If this is NOT the first time you run this command, add –OverwriteConfiguration.
Activating the Device Registration Service (DRS)
As mentioned before, the DRS capability has to be initialized and enabled on the AD FS farm.
To enable the DRS capability on the ADFS2 computer, from the previous elevated Windows PowerShell or PowerShell Integrated Scripting Environment (ISE) prompt, run the following command:
PS C:\> Enable-AdfsDeviceRegistration
Message                                 Context                                                               Status
-------                                 -------                                                               ------
The configuration completed successf... DeploymentSucceeded                                                   Success
PS C:\> _
You should see a message about device registration being successful.
Note For more information, see article Step 5: Configure a federation server with Device Registration Service.
Testing the AD FS configuration
Depending upon how Internet Explorer is configured you will either be prompted to provide credentials or be automatically signed-in.
Before testing the configuration, if you want to have users be automatically signed-in, you will then need to configure your browser settings to trust the AD FS farms by adding your federation service name (for example in our configuration, https://adfs.liteware369.com) to the browser's local intranet zone. This will enable seamless sign-in using Windows Integrated Authentication (WIA).
To test the AD FS configuration, proceed with the following steps:
-
Open a remote desktop connection on the ADFS1 computer. Follow the instructions as per section § Accessing the various machines of the test lab environment and specify in step 2 "10.0.0.201" for the ADFS1 computer. Log on as the LITWARE369 domain administrator account AzureAdmin with "Pass@word1!?" as password.Open a Windows PowerShell or PowerShell Integrated Scripting Environment (ISE) prompt.Start Internet Explorer and select Internet Options on the Tools menu. An Internet Options dialog pops up.Click the Security tab, select the Local intranet zone, and then click Sites. A Local intranet dialog appears.
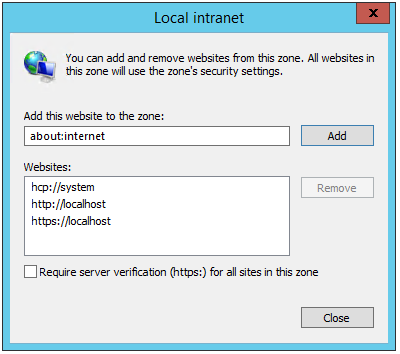
-
In Add this website to the zone, type "https://adfs.litware369.com", and then click Add. You should replace litware369.com by your own domain as already mentioned.Click Close, and then click OK.
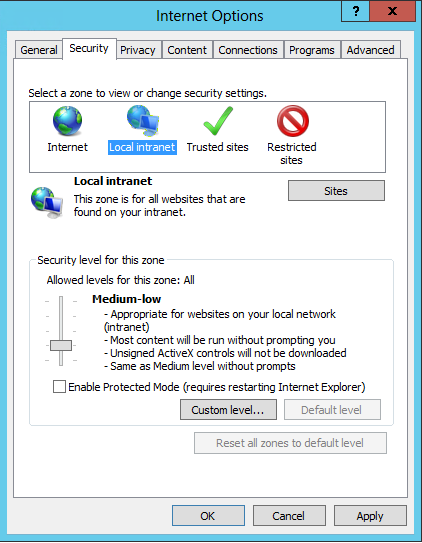
-
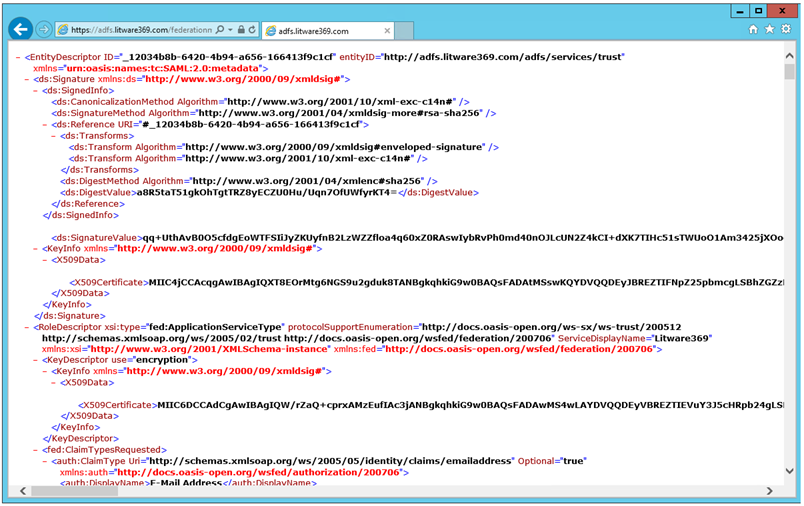
Verify that the security level for the zone is set to the default setting of Medium-low which enables Windows integrated authentication for Intranet zones.Click OK to close the Internet Options dialog.Open a browsing session and navigate to the federation service metadata endpoint, for example, in our configuration:
https://adfs.litware369.com/federationmetadata/2007-06/federationmetadata.xml
If in your browser window you can see the federation server metadata without any TLS errors or warnings, your federation server is operational.
-
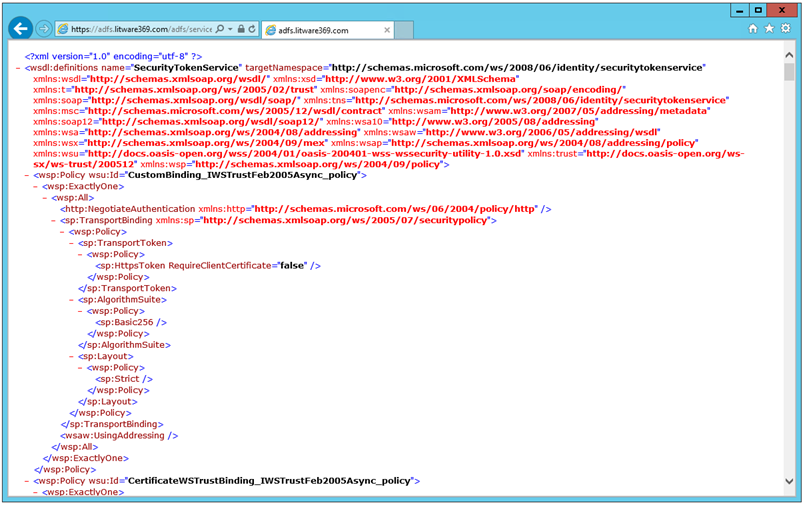
You can alternatively navigate to the metadata exchange endpoint, which offers an XML service description:
https://adfs.litware369.com/adfs/services/trust/mex
-
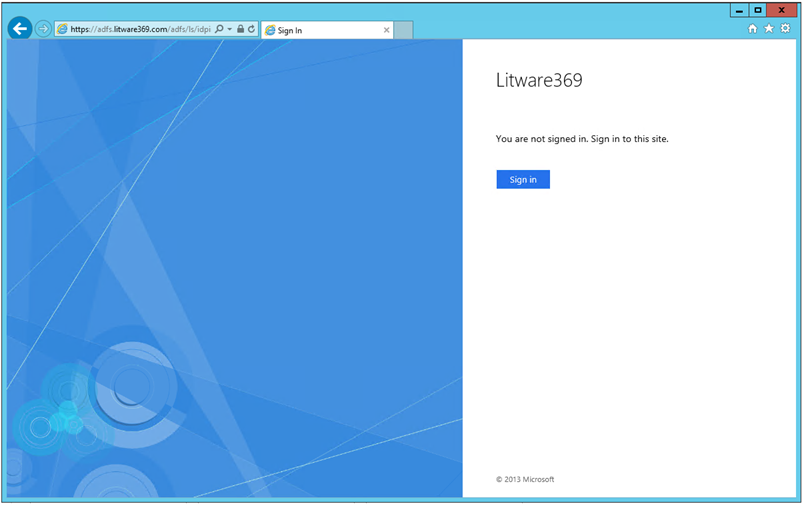
You can alternatively navigate to the AD FS sign-in page, for example in our configuration:
https://adfs.litware369.com/adfs/ls/idpinitiatedsignon.aspx
This displays the AD FS sign-in page where you can sign in with the domain credentials.
-
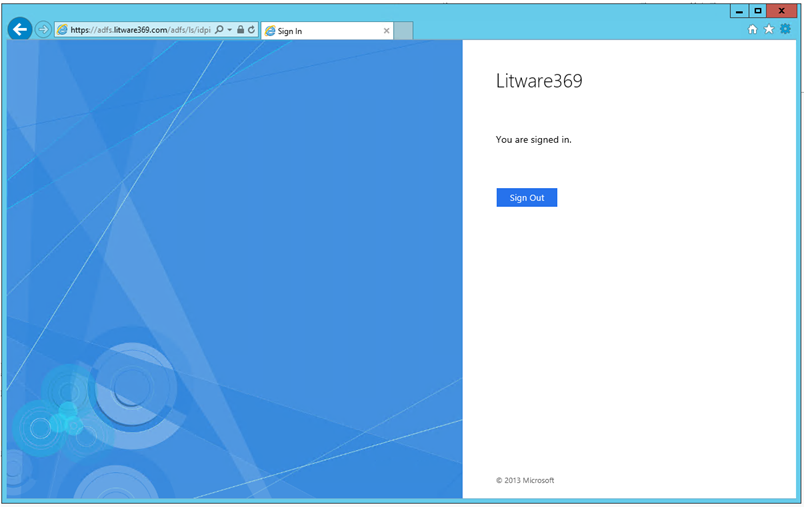
Click Sign in to verify that the user is successfully and seamlessly authenticated thanks to the Windows Integrated Authentication. You shouldn't see any Windows Security dialog if AD FS has been properly configured.
-
Repeat steps 1 to 12 on the ADFS2 computer (10.0.0.202). Log on as the LITWARE369 domain administrator account AzureAdmin with "Pass@word1!?" as password.
Testing AD FS farm high availability
To test the AD FS farm high availability, shutdown the AD FS federation servers in the AD FS farm one at a time and check that you can still access AD FS with each computer offline: ADFS1 and ADFS2. This will test the failure of losing one of the servers in the internal load balancer.
At this stage, you are now setup with a highly available AD FS solution for all internal users of the LITWARE369 domain. Let's setup the Web Application Proxy (WAP) farm so that the external users have access too.
Configuring the WAP farm
The WAP farm is constituted by the WAP1 and WAP2 computers along with the Internet load balancer.
Configuring the first server in the WAP farm
To prepare the first server in the WAP farm, proceed with the following steps in order:
-
Updating the HOSTS file.Issuing a SSL/TLS certificate.Installing and configuring the Web Server (IIS) role service.Configuring HTTPS on the default web site.Deploying the Web Application Proxy (WAP).
The following subsections describe each of these steps in the context of our test lab environment.
Updating the HOSTS file
The WAP servers need to make contact back to the AD FS servers, So, you need to tell the WAP servers how to get to them. The simplest way of doing this consists in editing the local HOSTS file on the WAP1 computer. Keep in mind that we don't have connectivity or the ability to route to the internal IP address, so we need to route to the external IP of the internal load balancer that holds the two AD FS computers ADFS1 and ADFS2.
To update the HOSTS file, proceed with the following steps:
-
Launch the text editor of your choice, navigate to C:\Windows\System32\drivers\etc and open the HOSTS file.Add the following line at the end of the file. This will ensure that all communication regarding adfs.litware369.com end up at the internal load balancer (ILB) adfs-lb and are appropriately routed to the AD FS farm.
10.0.0.200 adfs.litware369.com
-
Save the file and close the editor.
Issuing a SSL/TLS certificate
The default web site will require a server SSL/TLS certificate. The certificate MUST have the following attributes:
-
Subject Name (CN): www.litware369.com
Subject Alternative Name (DNS): adfs.litware369.com
Subject Alternative Name (DNS): enterpriseregistration.litware369.com
Subject Alternative Name (DNS): www.litware369.com
For demonstration purpose, you can issue such a SSL/TLS certificate with the test lab certification authority litware369-DC2-CA as illustrated hereafter.
You can instead use a SSL/TLS certificate issued from a public certification authority is required. The exact method depends on the chosen public certification authority. Please refer to their instructions.
With the exception of the SSL/TLS certificate import into the Local Computer\My Store on the WAP1 computer, the rest of the suggested configuration doesn't differ from the one illustrated in this document.
To issue the SSL/TLS certificate with the test lab certification authority, proceed with the following steps:
-
Open a remote desktop connection on the WAP1 computer. Follow the instructions as per section § Accessing the various machines of the test lab environment and specify in step 2 "10.0.1.101" for the WAP1 computer. Log on as the LITWARE369 domain administrator account AzureAdmin with "Pass@word1!?" as password.Open a Windows PowerShell or PowerShell Integrated Scripting Environment (ISE) prompt, and then run the following command:
PS C:\> Get-Certificate -Template SSLCertificates -SubjectName CN=www.litware369.com –DnsName adfs.litware369.com, enterpriseregistration.litware369.com, www.litware369.com -CertStoreLocation cert:\LocalMachine\My
                                     Status Certificate                               Request
                                     ------ -----------                               -------
                                     Issued [Subject]…
PS C:\> _
Note If you haven't previously configured a new certificate template (e.g. the SSLCertificates in our configuration), you can use the WebServer certificate template in lieu of in the above command.
-
Export
the issued certificate with its private key for later use on the WAP2 computer:
-
From the previous elevated Windows PowerShell or PowerShell Integrated Scripting Environment (ISE) prompt, and open mmc.exe.Click File | Add/Remove Snap-in… Select Certificates in Available snap-ins and then click Add. A Certificates snap-in dialog opens up.Select Computer account, click Next, and then click Finish. Click OK to close the dialog.Right-click the www.litware369.com certificate, click All Tasks, and then click Export. The Certificate Export Wizard opens up.Click Next, select Yes, export the private key, and then click Next.On Export File Format, leave Personal Information Exchange – PKCS #12 (.PFX) selected, and then click Next.On Security, check Password, and type "Pass@word1!?" twice. Then click Next.On File to Export, browse to the location to which you want to export the SSL/TLS certificate. For File name, name the certificate file, for example "WAPLitware369" in our configuration. Then click Next.Click Finish to export the certificate. Click OK to close the dialog.
Installing and configuring the Web Server (IIS) role service
To install the Web Server (IIS) role service on the WAP1 computer, from the previous Windows PowerShell or PowerShell Integrated Scripting Environment (ISE) prompt, run the following command:
PS C:\> Install-windowsfeature web-server –IncludeManagementTools
Success Restart Needed Exit Code      Feature Result
------- -------------- ---------      --------------
True    No             Success        {Common HTTP Features, Default Document, D...
PS C:\> _
Configuring HTTPS on the default web site
To configure HTTPS on the default web site, proceed with the following steps:
-
Open an elevated Windows PowerShell or PowerShell Integrated Scripting Environment (ISE) prompt if none, and run the following command to add a SSL/TLS binding to the default web Site:
PS C:\> New-WebBinding -Name "Default Web Site" -IP "*" -Port 443 -Protocol https
-
Run the following commands to associate the imported SSL/TLS certificate to the newly created SSL/TLS binding:
PS C:\> Get-ChildItem cert:\LocalMachine\MY | where { $_.Subject -match "CN\=www.litware369.com" } | select -First 1 | New-Item IIS:\SslBindings\0.0.0.0!443
IP Address          Port   Host Name        Store            Sites
----------          ----   ---------        -----            -----
0.0.0.0             443                     MY               Default Web Site
PS C:\> _
-
Open a browsing session and navigate to the default web site at https://www.litware369.com:

Deploying the Web Application Proxy (WAP)
The Web Application Proxy (WAP) is the proxy for AD FS in Windows Server 2012 R2.
Note For more information, see the article Web Application Proxy Overview as well as the section Deploying Federation Server Proxies of the Windows Server 2012 R2 AD FS Deployment Guide also available on Microsoft TechNet.
To install and configure the Web Application Proxy role service, proceed with the following steps:
-
Open an elevated Windows PowerShell or PowerShell Integrated Scripting Environment (ISE) prompt if none, and run the following command:
PS C:\> Install-WindowsFeature Web-Application-Proxy –IncludeManagementTools
Success Restart Needed Exit Code      Feature Result
------- -------------- ---------      --------------
True    No             Success        {RAS Connection Manager Administration Kit...
WARNING: To finish configuring this server for the Web Application Proxy role service using Windows PowerShell, see
http://go.microsoft.com/fwlink/?LinkId=294322.
PS C:\> _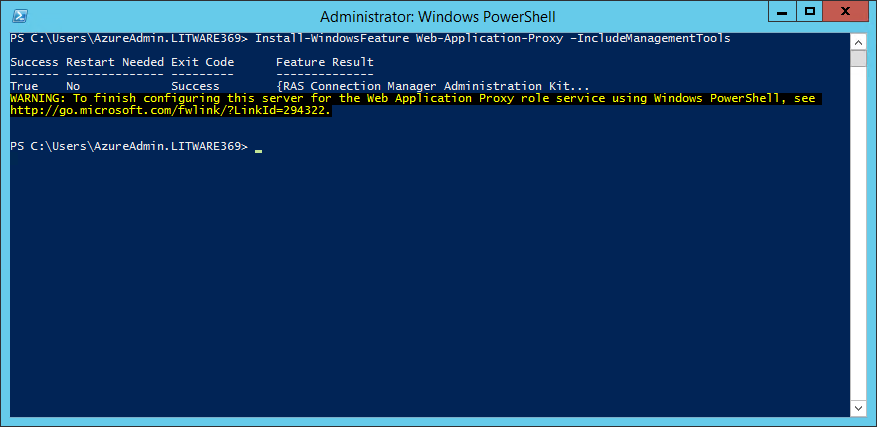
-
Run the following commands to set the credential of the LITWARE369\AzureAdmin user:
PS C:\> $domain = "litware369.com"
PS C:\> $password = "Pass@word1!?" | ConvertTo-SecureString -asPlainText -Force
PS C:\> $username = "$domain\AzureAdmin"
PS C:\> $credential = New-Object System.Management.Automation.PSCredential($username,$password)-
Run the following commands to install and configure the Web Application Proxy (WAP):
PS C:\> $certificateThumbprint = (Get-ChildItem cert:\LocalMachine\MY -DnsName "*adfs*" | Select-Object -First 1).Thumbprint
PS C:\> Install-WebApplicationProxy -FederationServiceTrustCredential $credential -CertificateThumbprint $certificateThumbprint -FederationServiceName "adfs.litware369.com"
Message                                 Context                                                               Status
-------                                 -------                                                               ------
The configuration completed successf... DeploymentSucceeded                                                   Success
PS C:\> _
Note For more information, see article Web Application Proxy Cmdlets.
Configuring the second server in the WAP farm
This section walks you through the deployment of the web application proxy on the WAP2 computer with the following steps:
-
Importing the SSL/TLS certificate issued on WAP1.Installing and configuring the Web Server (IIS) role service.Configuring HTTPS on the default web site.Deploying the Web Application Proxy (WAP).
The following subsections describe each of these steps in the context of our test lab environment.
Importing the SSL/TLS certificate issued on WAP1
As mentioned earlier, the Web Application proxy (WAP) role service will require a server SSL/TLS certificate. To import the certificate previously issued on the WAP1 computer, proceed with the following steps:
-
Open a remote desktop connection on the WAP2 computer. Follow the instructions as per section § Accessing the various machines of the test lab environment and specify in step 2 "10.0.0.201" for the WAP2 computer. Log on as the local administrator account AzureAdmin with "Pass@word1!?" as password.Open a Windows PowerShell or PowerShell Integrated Scripting Environment (ISE) prompt.Copy the WAPLitware369.pfx file from the ADFS1 computer to the ADFS2 computer.Double-click the file. A Certificate Import Wizard opens up.
-
Select Local Machine and click Next twice.On
-
-
-
-
-
-
-
-
-
-
-
-
-
-
-
-
-
-
-
-
-
-
-
-