Azure Management Tools
In earlier chapters in this book, you have explored several prominent features of the Microsoft Azure platform. You have learned how to create Azure web applications, cloud services, virtual machines, storage accounts, Azure SQL database instances, and much more. The majority of examples have demonstrated using the Azure portal. Although the portal is a great way to work with Azure resources, other tools will also prove useful during development and management of those resources.
Management tools overview
There are many excellent tools available to aid in the development and management of Azure solutions—in fact, too many to cover in this chapter. Microsoft Visual Studio, PowerShell, and the Azure cross-platform command-line (also commonly referred to as the Azure CLI) tools are covered in this chapter. To assist in your awareness, Table 8-1 lists a few Azure features and related tools.
Table 8-1 Various tools for Azure management
| Azure Feature | Tool Options |
| Azure SQL Database |
|
| Azure Virtual Machines |
|
| Azure Storage |
|
| Azure Service Bus |
|
| Azure Management APIs |
|
For developers, Visual Studio provides a rich, integrated experience to develop, deploy, and maintain applications in Azure. For IT professionals, the Azure PowerShell cmdlets and Azure CLI provide a robust and powerful scripting environment to manage resources deployed in Azure. Some advanced features are only available via PowerShell. The Azure CLI tools provide a simple yet powerful way to manage Azure resources regardless of your operating system because the Azure CLI works equally well across Windows, Linux, and Mac systems.
Visual Studio 2015 and the Azure SDK
Visual Studio is likely to be an Azure developer's primary interface for the development and management of Azure resources. This is especially the case for those developers creating solutions on the Microsoft technology stack (Windows, .NET, and so on). Developers using Linux or Mac systems will focus primarily on the Azure CLI. Any developer or IT professional can use either of the Azure management portals.
Install the Azure SDK
As an Azure developer, one of the first things you will want to do (after installing Visual Studio) is install the Microsoft Azure SDK for .NET. You can obtain the Azure SDK from the Azure Downloads page at http://azure.microsoft.com/downloads/, as shown in Figure 8-1. Install the SDK appropriate for your version of Visual Studio.

You likely will want to bookmark this page. You will come back to it often because it is the source for various language SDKs (Java, PHP, Ruby, and so on) and the PowerShell and Azure command-line interface tools.
Installing the Microsoft Azure SDK for .NET is done by using the Microsoft Web Platform Installer
(Web PI), as shown in Figure 8-2. The SDK includes any necessary client libraries required to work with Azure services such as Storage, Service Bus, Cloud Services, and so on. The SDK installation will also configure Visual Studio for full development and debugging support in Azure Web Apps and Cloud Services. Additionally, the SDK includes the Storage and Compute emulators—great for developing projects when you cannot be connected to the Internet (and thus Azure). Web PI will also take care of installing any necessary dependencies. The entire process will take several minutes.

Figure 8-2 Microsoft Azure SDK for .NET (Visual Studio 2015).
When finished, you should see a dialog box like that shown in Figure 8-3, showing the various products installed as part of Microsoft Azure SDK for .NET.

See Also For release notes on the various Azure SDK for .NET versions, please refer to http://msdn.microsoft.com/library/azure/dn627519.aspx.
Manage resources with Cloud Explorer
Cloud Explorer is a new tool in Visual Studio that enables you to manage various Azure resources supported under the Azure Resource Manager (ARM) model. It is installed as part of the Azure SDK installation and is available as a dockable pane in Visual Studio (similar to the Sever Explorer or Toolbox panes).
Note Visual Studio contains two tools for managing Azure resources: Cloud Explorer and Server Explorer. Cloud Explorer, introduced in Azure SDK 2.7, is the preferred tool for managing Azure resources based on Resource Manager. Server Explorer works with Azure classic resources, but it does not work with all Resource Manger–based resources. For the purposes of this chapter, the focus will be on Cloud Explorer.
The first thing you need to do is connect to your Azure subscription(s), which you can do by clicking the gear icon near the top of Cloud Explorer and then selecting the Add An Account link, as seen in Figure 8-4.

Figure 8-4 Add a new account to Cloud Explorer.
This opens a dialog box, as seen in Figure 8-5, prompting for the email address of the account used to sign into Azure. This should be the same email address used when signing into the Azure portal.

Figure 8-5 Sign into your Azure subscription.
After authenticating, Visual Studio will automatically download all the necessary configuration details to connect to any Azure subscriptions to which the provided account has access.
After authenticating, you will be able to view all Azure subscriptions to which you have access. From here, you can filter the Azure subscriptions, as seen in Figure 8-6. If you want to filter out certain subscriptions so that you do not see them (or the related Azure resources) while working with Azure resources in Visual Studio, just clear the appropriate check boxes.

Figure 8-6 Manage Microsoft Azure subscriptions.
To manage an Azure resource, just expand the node for that resource. Expanding the node lists all the resources under the selected type, as seen in Figure 8-7.
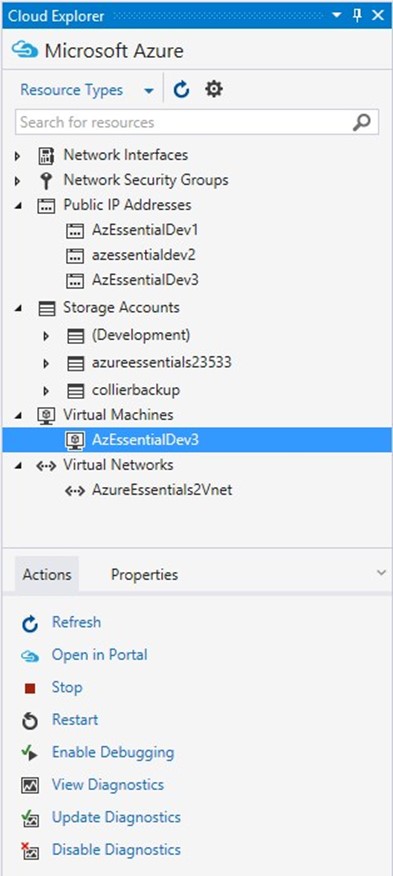
Figure 8-7 Expanding Azure resources.
To work with a specific resource, select it from the list. An Actions tab and a Properties tab will list additional information about the selected resource. The available actions will vary by resource. For example, if you select a virtual machine (VM), you will be able to start or stop the VM or work with its diagnostics. For other resources, such as a storage account, the only available option is to launch into the Azure portal.
Cloud Explorer also allows you to filter resources by Resource Groups or Resource Type (the default). By selecting the drop-down arrow next to Resource Type (at the top of the Cloud Explorer window), you can change between views. As can be seen in Figure 8-8, the Resource Groups view will collate resources according to their respective resource groups.

Figure 8-8 View Azure resources by resource group.
Create an Azure resource
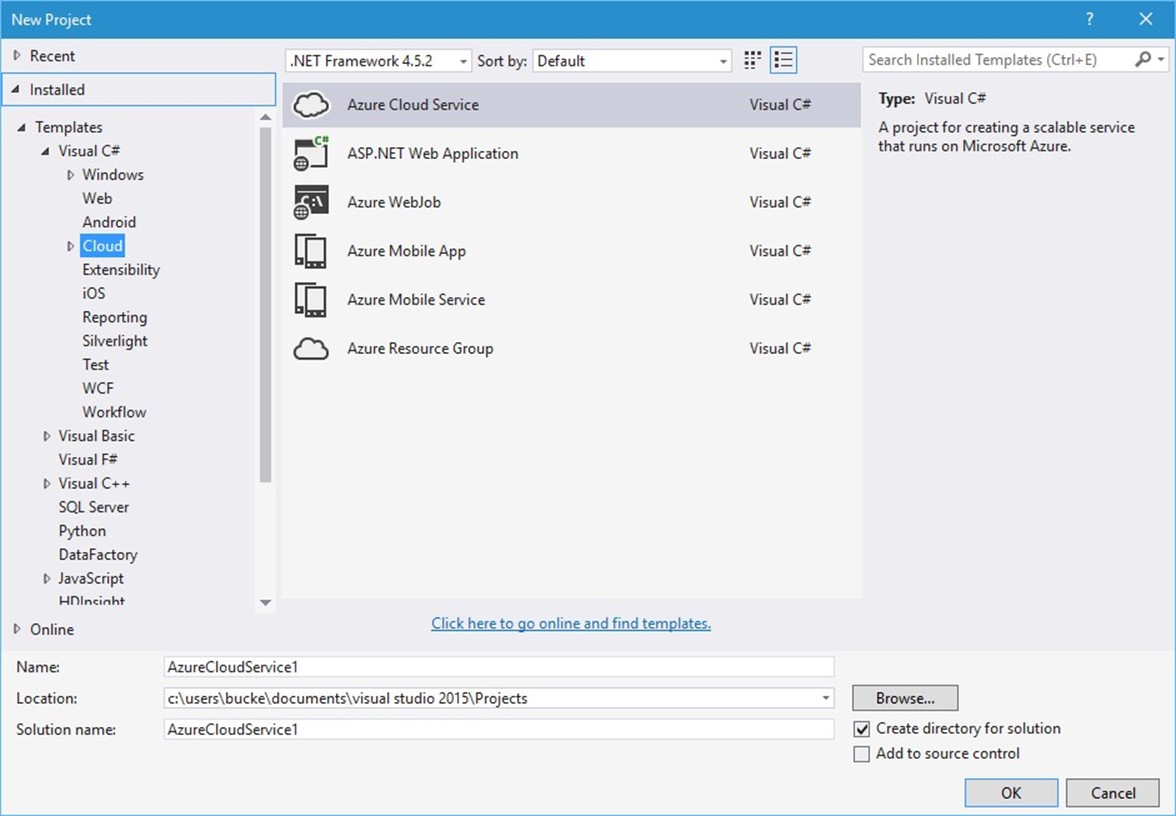
When the time comes to create a new Azure resource and write code to go with it, Visual Studio and the Azure SDK can be helpful tools. When creating a new Visual Studio project, navigate to the Cloud template section in the New Project Wizard, as shown in Figure 8-9. From there, you can select the appropriate option, such as create a new Azure Cloud Service, an Azure Mobile App, a new Azure Resource Group, and so on.
The QuickStarts section, shown in Figure 8-10, provides a list of Microsoft-provided sample projects for specific Azure technologies. This can be a great way to learn basic features of a new or unfamiliar technology.

Windows PowerShell
Visual Studio is an incredibly powerful tool for creating and managing solutions hosted in Azure. As great as it is, Visual Studio might not be the right tool for all scenarios. Instead, a scripting tool such as PowerShell could be the right choice. Scenarios in which PowerShell might be preferred include the following:
- Tool for IT professionals Many IT professionals do not use Visual Studio for management of on-premises assets. It makes sense that they would not want to use Visual Studio for Azurehosted assets, either. Instead, PowerShell is often one of the preferred tools, especially for managing Windows environments.
- Automating provisioning and deployment of Azure resources PowerShell provides a rich scripting environment for automating the provisioning and deployment of Azure resources. By using PowerShell scripts, you can automate the provisioning and management of Azure Virtual Machines, Azure Storage accounts, Azure Web Apps, Azure Virtual Networks, Azure Cloud Services, and much more.
Using PowerShell scripts to automate common tasks in Azure is also a great way to reduce potential errors. The scripts can be tested thoroughly, secured in a source control system, and repeatedly used with confidence that the same results will always be achieved. Azure Resource Manager (ARM) templates are often invoked via a PowerShell script.
If you have a task that you are going to perform repeatedly, it is beneficial to automate the task. It might take a greater time commitment initially to develop the script, but doing so will save a substantial amount of time every time you reuse it.
- Accessing advanced or new Azure features not included in the Azure tools for Visual Studio or the Azure portal The Azure PowerShell cmdlets provide features that may not currently be available in Visual Studio. The update and release frequency for Azure PowerShell cmdlets is faster than that of the Azure SDK for Visual Studio. Because of this, you will often see new features appear in the PowerShell cmdlets (and REST API) before they appear in Visual Studio.
Additionally, new features are often released that are surfaced in the Azure PowerShell cmdlets but are not surfaced in the Azure portal (at least initially). This allows the Microsoft Azure product team to release the feature—and in some cases, fine-tune it—before releasing the feature to the Azure portal and any related UI elements.
Azure PowerShell cmdlet installation
The Azure PowerShell cmdlets can be obtained one of two ways: either via the Web Platform Installer (Web PI) or the PowerShell Gallery.
Starting with Azure PowerShell 1.0, both Azure management interfaces (Azure Service Management and Azure Resource Manager) are supported without the need to explicitly switch between Azure PowerShell modes. Previously, it was necessary to execute a special command, Switch-AzureMode, to switch between Azure Service Management and Azure Resource Manager modes.
The coexistence of Azure Service Management and Azure Resource Manager (via PowerShell) is enabled via distinct PowerShell modules that support specific management operations. Azure Service Management features are enabled via the Azure module, while Azure Resource Manager features are enabled via one or more AzureRM modules, as can be seen in Figure 8-11.

Figure 8-11 Listing of the available Azure modules in PowerShell.
You may notice in Figure 8-11 that the version number of the modules may be different among the Azure Resource Manager modules. This is intentional. The various Azure feature product teams release the modules independently. Releasing individually allows the teams to update at a much faster pace—enabling them to release new features or fix defects without waiting for a full release of the Azure PowerShell cmdlet package/installer. The proceeding sections will discuss some of the pros and cons associated with the two installation mediums, which are related to the versioning and release cadence of the various modules.
Installing Azure PowerShell from Web PI
Earlier in this chapter, you saw the Azure Downloads page at http://azure.microsoft.com/downloads/, from which you were able to download the Azure SDK for .NET (Visual Studio). You can initiate the Web PI installation from this same location, as seen in Figure 8-12.

One of the advantages of installing the Azure PowerShell cmdlets via the Web PI process is you are guaranteed that the cmdlets (as part of the various modules) will work well together. It should be noted that if you previously installed the Azure modules via the PowerShell Gallery, the Web PI–based installer will automatically remove them. This is done to ensure the modules are at a known version related to the installer.
Installing Azure PowerShell from the PowerShell Gallery
Starting with Azure PowerShell 1.0, it is possible to install various modules from the PowerShell Gallery. One of the reasons to do so would be to get the latest, or a specific, version of a module. As mentioned previously, the modules installed as part of the Web PI installation process are of a set, known version. By installing via the PowerShell Gallery, it is possible to obtain a specific version— perhaps a module version that is not yet available in the Web PI–based installer.
Note To use the PowerShell Gallery, you will need the latest version of the PowerShellGet module, which is available in Windows 10, in Windows Management Framework (WMF) 5.0, or via an MSIbased installer for PowerShell 3 and PowerShell 4. For more information, please reference https://www.powershellgallery.com/.
To install the Azure modules, you will need to execute a series of PowerShell commands, as seen below.
Installing the Azure PowerShell modules
# Install the Azure Resource Manager modules from the PowerShell Gallery
Install-Module AzureRM
Install-AzureRM
# Install the Azure Service Management module from the PowerShell Gallery
Install-Module Azure
# Import AzureRM modules for the given version manifest in the AzureRM module
Import-AzureRM
# Import Azure Service Management module
Import-Module Azure
Tip Be sure to read the detailed documentation available in the Azure PowerShell project repository available on GitHub at https://github.com/Azure/azure-powershell. The page contains a wealth of information on getting started with the Azure cmdlets, various features, and much more.
Connecting to Azure
To connect to Azure, you must have an Azure subscription. To sign up for a free trial (at http://azure.microsoft.com), you need a Microsoft account or a work or school (formerly organizational) account.
After installing the Azure PowerShell cmdlets, you will connect PowerShell to your Microsoft Azure subscription(s) by using either a Microsoft account (such as hotmail.com, outlook.com, and so on), or a work or school account (formerly organizational account; for example, contoso.com). Azure Resource Manager does not support client certificate authentication.
Tip Although Azure Resource Manager does not support client certificate authentication, it does support certificate authentication for a service principle (for example, for use with an automated process or service). Please reference the article at https://azure.microsoft.com/documentation/articles/resource-group-authenticate-service-principal/ for detailed instructions.
You can use your Microsoft account or a work or school account to access your Microsoft Azure subscription(s). For this method of connecting, Azure Active Directory (Azure AD) is used. This is the preferred method in many cases because it is easier to manage access to a subscription (especially for a shared subscription that many people use). Additionally, using the Azure AD approach is required to work with the Azure Resource Manager API.
To connect to your Microsoft Azure subscription, follow these steps:
- Open a Windows PowerShell console or the Windows PowerShell ISE.
- Enter the Login-AzureRmAccount command.
- A dialog box prompts you for your email address and password. Your credentials are authenticated via Azure AD, and your subscription details are saved in your roaming user profile. An access token is also retrieved that allows PowerShell to access your Azure resources. This token is not permanent and will expire, at which point you will need to reauthenticate by using LoginAzureRmAccount.

To view all available subscriptions for the specified account, use the Get-AzureRmSubscription cmdlet. To change to a different subscription, use the Select-AzureRmSubscription cmdlet.
If you are using PowerShell for an automation script and you are not using a service principal (see the previous note in this chapter), you will want to avoid the pop-up window. In this case, use the Credential parameter to provide your credentials, as seen in the following example. The Credential parameter works for work or school accounts only.
$userName = "<your work or school account user name>"
$securePassword = ConvertTo-SecureString -String "<your work or school account password>" AsPlainText -Force
$cred = New-Object System.Management.Automation.PSCredential($userName, $securePassword)
Login-AzureRmAccount -Credential $cred
Note For additional details on configuring the Azure PowerShell cmdlets, please refer to the Microsoft documentation at https://azure.microsoft.com/documentation/articles/powershell-installconfigure/.
Usage
There are many cmdlets available for working with the various Azure resources. To get a list of all the cmdlets, enter the command Get-Help azure, although it would be helpful to filter by a specific module (such as Azure, AzureRM.Compute, AzureRM.Network, and so on) or cmdlet name because there is a large number of Azure cmdlets. You can get help for specific cmdlets by executing the command Get-Help followed by the name of the desired cmdlet, such as Get-Help New-
AzureRmResourceGroup -Full (passing -Full is not necessary, but it is often helpful). It is also often helpful to get a list of all the possible cmdlets for a specific resource type, and the PowerShell command Get-Command can be useful, as seen in Figure 8-13.

Figure 8-13 Executing Get-Command against a specific resource type.
Creating a new Azure Web App is a common task that can be simplified by using the Azure PowerShell cmdlets, as seen in the following example.
Creating a new Azure App Service Plan and Azure Web App
$resourceGroupName = "AzureEssentials2"
$location = "eastus"
$appServicePlanName = "azure-essential-plan"
New-AzureRmAppServicePlan -Location $location -ResourceGroupName $resourceGroupName -Name
$appServicePlanName -Tier Free -WorkerSize Small
New-AzureRmWebApp -Location $location -ResourceGroupName $resourceGroupName -Name "azureessential-web" -AppServicePlan $appServicePlanName
For a more complex deployment or one requiring detailed configuration, an Azure Resource Manager (ARM) template can be used. You can find a wealth of templates at https://github.com/Azure/azurequickstart-templates (and searchable at https://azure.microsoft.com/documentation/templates/). These templates also serve as a great example for starting to create your own templates. The following example demonstrates one approach for deploying an Azure VM using one of the templates available on GitHub.
Creating a new VM using an ARM template
New-AzureRmResourceGroupDeployment -TemplateUri "https://raw.githubusercontent.com/Azure/azurequickstart-templates/master/101-vm-simple-windows/azuredeploy.json" `
-ResourceGroupName "AzureEssentials2" `
-TemplateParameterObject @{"adminUsername"="mcollier"; "dnsLabelPrefix" = "az-ez-2"}
When finished, you should see output similar to that in Figure 8-14.

Figure 8-14 Creating a new Azure VM by using an ARM template.
Tip Set the PowerShell preference variable $DebugPreference to Continue to see the debug statements when executing an Azure PowerShell cmdlet, including the HTTP Request and HTTP Response. This can aid in debugging efforts.
Tip For more information about and examples of using Azure PowerShell with Azure Resource Manager, please reference https://azure.microsoft.com/documentation/articles/powershell-azureresource-manager/. The Azure Script Center at https://azure.microsoft.com/documentation/scripts/ can also be helpful in learning more about how to work with Azure PowerShell for a variety of Azure services.
Cross-platform command-line interface
For Windows users, the PowerShell cmdlets discussed in the previous section are your best option for automating tasks and working from the command line, especially if you are scripting the provisioning of several Azure resources. However, for mixed environments, the Azure cross-platform command-line interface provides a consistent experience for Linux, Mac OS, and Windows users.
Just like the Azure PowerShell project repository, the repository for the Azure CLI is available on GitHub, at https://github.com/Azure/azure-xplat-cli. Please refer to this GitHub page for additional
installation instructions.
Installation
The Azure CLI is a Node.js application implemented by using the Azure SDK for Node.js. Therefore, you will need to ensure Node.js is installed on your system.
See Also Additional installation instructions can be found at https://azure.microsoft.com/documentation/articles/xplat-cli-install/.
Installing on Windows
If you do not have Node.js installed on your system, you can use Windows install from the Microsoft Azure Downloads page (http://azure.microsoft.com/downloads/), as seen in Figure 8-15. Web PI will handle installing Node.js and the Azure CLI.

Figure 8-15 Install Azure command-line interface using Windows install.
Alternatively, you can install Node.js from the http://nodejs.org site. Just click Install, as shown in Figure 8-16, to begin the process of installing the latest version.

Figure 8-16 Install Node.js from the http://nodejs.org site.
Once Node.js is installed on your system, you can use npm to install the Azure CLI. npm install azure-cli –g
All the necessary dependencies will be installed by npm. When finished, you should see something similar to the results in Figure 8-17.

When the installation is finished, you can launch the Azure CLI by entering azure at the command prompt. At this point, the Azure CLI will launch (although it might take a few seconds) and you will see AZURE in ASCII art, along with the version number and some basic help information, as shown in Figure 8-18.

Installing on Linux
Installing the Azure CLI on a Linux system is functionally similar to installing it on a Windows system. You will need to ensure you have Node.js installed. You can use the appropriate package manager for your Linux distribution (see https://nodejs.org/en/download/package-manager/).
For example, on Ubuntu 15.10, execute the following commands:
Installing the Azure CLI on Ubuntu
sudo apt-get install nodejs-legacy sudo apt-get install npm sudo npm install -g azure-cli
When finished, execute the azure command, as shown in Figure 8-19, which will yield the same results as executing the command on a Windows system.

Connecting to Azure
Before you can begin to use the Azure CLI, you will need to connect to your Microsoft Azure subscription(s). The options for doing so with the Azure CLI are similar to doing so with the Azure PowerShell cmdlets. There are two options: you can use a management certificate, or you can use a work or school account or a Microsoft account identity.
Connect using a management certificate
If you are working with the Azure Service Management classic interface, you will need to connect using a management certificate. The easiest way to get a management certificate is to let the Azure classic portal create one. The management certificate comes in the form of a .publishsettings file.
If you do not already have a .publishsettings file, execute the following command to download one. This will open the Azure classic portal and prompt you to sign in.
azure account download
Import the .publishsettings file by executing the following command (after changing the path to use the file on your system):
azure account import [path to your .publishsettings file]
Tip The .publishsettings file contains sensitive information about your Microsoft Azure subscriptions, including the subscription ID and management certificate. Unauthorized users should not access the file. It is recommended that you delete the file after importing.
Connect using a work or school account
You can also use a work or school account (formerly organizational account) via Azure AD to connect to your Microsoft Azure subscription(s). Starting with Azure CLI versions 0.9.10 and above, you can use either a work or school account or a Microsoft account identity. Azure CLI versions prior to 0.9.10 work only with a work or school account.
The process for authenticating varies depending on whether you are using a work or school account or using a Microsoft account—one is an interactive approach, the other is more simplistic (noninteractive). You can connect using an interactive approach using either a work or school account (especially one that requires multi-factor authentication) or using a Microsoft account. The interactive approach is as follows:
Execute the following command to log in:
azure login
You will be prompted to complete the authentication process by opening a web browser to the page at http://aka.ms/devicelogin and entering a specific code. You will also be prompted to authenticate using your username and password for the desired account identity (for example, your work or school account or your Microsoft account).
When the process is complete, you should see a result similar to the following:
Output of the interactive login approach
C:\Users\bucke>azure login info: Executing command login
|info: To sign in, use a web browser to open the page https://aka.ms/devicelogin. Enter the code xxxxxxx to authenticate.
/info: Added subscription Visual Studio Ultimate with MSDN info: Added subscription Collier - Personal - Pay-as-you-Go
+ info: login command OK
The non-interactive approach works only with a work or school account and is as follows:
Execute the following command to log in using a work or school account:
azure login -u <username>
Output of the non-interactive login approach
C:\Users\bucke>azure login -u admin@mcollier.onmicrosoft.com
info: Executing command login
Password: ********
/info: Added subscription Visual Studio Ultimate with MSDN info: Setting subscription "Visual Studio Ultimate with MSDN" as default
+ info: login command OK
To log out, execute the following command:
azure logout -u <username>
See Also For more information on connecting to Azure by using the Azure CLI, please reference https://azure.microsoft.com/documentation/articles/xplat-cli-connect/.
Usage
The Azure CLI supports working with both Azure Service Management (classic) resources, and Azure
Resource Manager resources. You will need to switch between Azure Service Management (asm) and Azure Resource Manager (arm) modes to work with the necessary resources. To switch, execute the following command: azure config mode <name>
You can tell which mode you're currently in by executing the azure command or any other topic-level command, such as azure config, as seen in Figure 8-20.

Figure 8-20 The Azure CLI configuration commands.
Using the Azure CLI follows an intuitive azure [topic] [verb] [options] syntax; for example, azure account list or azure vm start web-fe-1.
Entering just the azure command will show you the top-level list of topics available (account, vm, service, and so on). To learn more about a specific topic, just enter azure followed by the topic. For example, azure vm will show the commands available for working with Azure Virtual Machines, as shown in Figure 8-21.

Figure 8-21 Options for working with Azure Virtual Machines in Azure Resource Manager mode.
You can perform many tasks with the Azure CLI. For example, to create a new Azure Web App and App Service Plan, you would execute the following commands:
Creating a new App Service Plan and Azure Web App
azure resource create AzureEssentials2 azure-essential-plan2 "Microsoft.Web/ServerFarms" -l
"centralus" -o "2015-06-01" -p "{\"sku\":{\"tier\": \"Standard\"}, \"numberOfWorkers\": 1,
\"workerSize\": \"Small\"}" azure webapp create AzureEssentials2 azure-essential-web22 centralus azure-essential-plan2
When complete, you should see a result similar to that shown in Figure 8-22 that indicates the web app and plan were created successfully.

Figure 8-22 The result of creating a new Azure Web App and App Service Plan from the Azure CLI.
It is also possible to deploy an ARM template by using the Azure CLI, similarly to how it is done by using the Azure PowerShell cmdlets (as seen earlier in this chapter).
Creating a new VM by using an ARM template
azure config mode arm azure group create -n AzureEssentials2-vm2 -l "centralus"
azure group deployment create -g "AzureEssentials2-vm2" --template-uri
"https://raw.githubusercontent.com/Azure/azure-quickstart-templates/master/101-vm-simplewindows/azuredeploy.json" -p "{\"adminUsername\":{\"value\": \"mcollier\"}, \"dnsLabelPrefix\" : {\"value\": \"azure-ez-5\"}, \"adminPassword\":{\"value\": \"test!123\"}}"
When complete, you should see a result similar to that shown in Figure 8-23 that indicates the Azure VM was deployed successfully to the newly created resource group.

Figure 8-23 The result of creating the new resource group and Azure VM from the Azure CLI.
See Also
- For additional information on using the Azure CLI with Azure Resource Manager, please refer to https://azure.microsoft.com/documentation/articles/xplat-cli-azure-resource-manager/.
- For additional information on using the Azure CLI with Azure Service Management, please refer to https://azure.microsoft.com/documentation/articles/virtual-machines-command-line-tools/.