-Role "ConnectorAdministrator"
-or-
PS C:\Windows\System32> Add-AadrmRoleBasedAdministrator -SecurityGroupDisplayName -Role "ConnectorAdministrator"
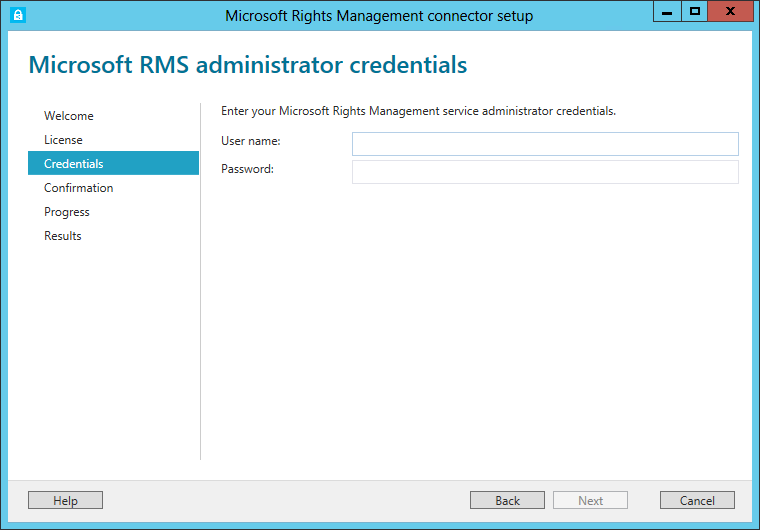
Enter valid credentials and then click Next .
You are now asked to confirm that you want to perform the installation on the local computer. Click Install . A User Account Control dialog opens up.
Click Yes to confirm the installation of the Rights Management connector. All pre-requisite software is validated and installed, Internet Information Services (IIS) is installed if not present already and the Rights Management connector software is installed and configured.
The wizard configures the IIS Web server and then registers the various Web services identical to those exposed by an on-premises AD RMS server (e.g. certification.asmx , license.asmx ). All the required pages are created under the path "_wmcs " in the Default Web site.
Also, during this step, the necessary configurations are performed in the online Azure Rights Management service. The Azure Rights Management service is queried for pre-existing service authorization configuration and the configuration is downloaded from the tenant. For that purpose:
If configuration information is not already existing, the wizard will create on the tenant an empty table of servers authorized to utilize the Rights Management connector to communicate with the tenant.
If the table of authorized servers is already present, the connector configuration is instead automatically downloaded from the corresponding Azure Rights Management service tenant. This corresponds to the situation where a Rights Management connector node has already been previously installed for this tenant.
After authenticating the provided Azure Rights Management service tenant administrator, a set of authorization certificates are created and downloaded from the Azure Rights Management service, and installed in the local computer, protected via DPAPI under the Local System account.
An authorization symmetric key (ServicePrincipalKey ) is also downloaded from the Azure Rights Management service for service-to-service (S2S) authentication and configured in the Rights Management connector. The authorization symmetric key is stored locally in the Registry and also protected with DPAPI under the Local System account.
Note All the configuration settings are on the registry at the following location: HKLM\Software\Microsoft\AADRM\Connector .
After setup is finished, a confirmation screen opens.
Note During the setup, a log file is generated and stored under %USERPROFILE%\AppData\Local\Temp .
You are presented with the option to configure the connection. Clicking Finish with that option enabled will launch the Rights Management connector administration tool. The tool will create the necessary accounts in the Azure AD/Office 365 tenant and grant them the necessary rights (depending of the type of the server). Further explanation and details are given in the next section.
Click Finish .
Configuring the Rights Management connector
Configuring the Rights Management connector for high availability
In order for your servers to be able to connect to the Azure Rights Management service reliably, you should deploy at least two connector servers and load balance them.
Installation of a second connector node is exactly as that the first node. Once installed you need to define a connector URL server name and configure a load balancing system.
The connector service URL server name can be any name under a namespace that you control. For example, you could create an entry in your DNS system for connector.yourdomain.com and point it to an IP address in your load balancing system. There are no special requirements for this name and it doesn't need to be configured on the connector servers themselves. This name doesn't need to be resolvable on the Internet unless your Exchange and SharePoint servers are going to be communicating with the Rights Management connector over the Internet. It is recommended that you don't change this name once you have configured Exchange or SharePoint servers to utilize it since that would require that the servers are cleared of all IRM configurations and reconfigured.
Once the name is created in DNS and pointed to an IP address, you will need to configure load balancing for that address, pointing it to the connector servers. Any IP-based load balancer can be utilized for this purpose, including the Network Load Balancing (NLB) component in Windows Server.
Note For more information on how to configure NLB, see Microsoft TechNet article Network Load Balancing .
The load balancing system needs to be configured according to the following criteria:
If your connector server is installed in a network that doesn't have direct Internet connectivity and needs the manual configuration of a proxy server for outbound Internet access, you can add the following registry value in each connector server to direct the RMS connector to utilize a proxy.
[HKEY_LOCAL_MACHINE\SOFTWARE\Microsoft\AADRM\Connector]
Where:
After making this change, you will need to reboot the server or perform an iisreset command to make the change effective.
Configuring the Rights Management connector to use HTTP/SSL
While the use of Transport Layer Security (SSL/TLS) is optional for the connector, it is generally recommended for any HTTP-based security-sensitive service.
In order to enable communications to the connector using TLS, you need to simply install a server authentication certificate valid for the name you are going to be utilizing for the connector in IIS in each of the connector nodes, and bind it to the default web site.
If you configure the Exchange and SharePoint servers to utilize an HTTPS URL to talk to the connector (via the registry keys indicated below), the connector will automatically use HTTPS for its communications. There's no need to modify the connector configuration to use HTTPS. You only need to ensure that all connector nodes have a valid SSL certificate if you choose to utilize this option.
In order to request and install a certificate in IIS follow the steps indicated in the article Configuring Internet Server Certificates (IIS 7) . There are no special requirements for this certificate, other than it must include as a subject the name by which you will be calling the connector from the Exchange and SharePoint servers.
Authorizing servers to use the Rights Management connector
The only configuration operation necessary to utilize the Rights Management connector is the authorization of servers that are allowed to use it. You do that by launching the Rights Management connector administration tool in either a connector server or in a separate computer where the Rights Management connector administration tool has been installed and adding entries to the Servers allowed to utilize the connector list.
It is important to note that servers added to the Allowed Servers list may be granted special privileges. All servers configured as Exchange servers will be granted SuperUser privileges on all the content for this Azure Rights Management service tenant. You must be careful not to grant this privilege to accounts that are not going to be used by your organization's Exchange servers. All other servers will be granted regular user privileges.
Also of importance is the fact that different servers authorized as a single entry (i.e. by authorizing an Active Directory group or a Service account utilized by multiple servers, instead of an individual server account) will share the same RMS certificates, which means that all servers in that group will be considered owners for content protected by any of the servers in the group. Thus, when authorizing Exchange servers in an organization it is highly recommended that you authorize all Exchange servers via a single group that contains them all instead of authorizing them individually. Similarly, when authorizing a SharePoint server farm, all servers in the farm should be authorized as a group.
In order to add a group of servers to the list of allowed servers, click Add .You will be offered with the option of entering the name of an object in Active Directory to authorize or to browse your directory to identify the objects to authorize.
It is important to ensure that the right account is authorized. In order for the server to be allowed to use the Connector, the account utilized by the service to communicate to the connector service needs to be authorized. In general, if the service is running as a service account, the service account needs to be authorized. If it is running as Local System, the computer object (e.g. SERVERNAME$ ) needs to be authorized. In general, groups containing the corresponding servers should be used instead of authorizing individual server names.
In the case of Exchange Servers a group containing all the server objects running Exchange must be utilized. By default, Exchange creates an Exchange Servers group that contains all Exchange servers in the forest, this group should be utilized instead of individual servers being authorized separately.
For SharePoint servers, in a default installation of SharePoint the service runs as Local System, so for such servers you should create a group in Active Directory that contains all the computer objects for the SharePoint servers in the farm and add that group to the allowed Servers list.
In the recommended configuration, SharePoint runs under a manually configured service account. The service account utilized to run the SharePoint Central Administration service should be authorized in order to enable SharePoint to be configured from its admin console. Also, the account configured for the SharePoint App Pool needs to be authorized for the SharePoint servers themselves to be able to be able to be activated. Creating a group containing both these accounts, if they are different, may ease the administration of the configuration.
Configuring servers to use the Rights Management connector
Once the Rights Management connector is ready to run and servers are allowed to utilize the Rights Management connector, the SharePoint and Exchange servers need to be configured to utilize IRM.
This section describes the pre-requisites and steps utilized to configure Exchange and SharePoint servers to utilize the Rights Management connector.
Important Note Once a server is configured to use the Rights Management connector, client applications that may be installed locally in that same server won't work against the Azure Rights Management service since they will try to utilize the connector as well and fail. For example, if Office 2010 is installed locally on an Exchange server, the client application's IRM features may work from that computer once the server is configured to use the connector. This is not a supported scenario, and the client applications should be installed in separate computers and not configured to use the connector, they should use the Azure Rights Management service directly.
Configuring an Exchange server to utilize the Rights Management connector
In order to connect to the Azure Rights Management service utilizing the Rights Management connector an Exchange server must be running one of the following software versions:
The server running Exchange Server requires to use the advanced mode known as "Cryptographic Mode 2" for rights management operations which might require an update to the RMS client in your server.
Note To enable the use of this Cryptographic Mode 2 for computers not running Windows Server 2012, the computer must have the appropriate hotfix applied to the operating system. For computers running Windows Server 2008, install the hot fix associated with the article 2627272 RSA key length is increased to 2048 bits for AD RMS in Windows Server 2008 R2 and in Windows Server 2008 . For computers running Windows Server 2008 R2, install the hotfix package associated with the article 2627273 RSA key length is increased to 2048 bits for AD RMS in Windows 7 or in Windows Server 2008 R2 .
Exchange 2010 SP3 adds support for Active Directory Rights Management Services (AD RMS) in Cryptographic Mode 2 .
With the Cryptographic Mode 2 operations, RSA encryption is enhanced from 1024 bit encryption to 2048 bit encryption. In addition, hashing is enhanced from using SHA-1 (128 bits) to using SHA-256 (256 bits).
Note For additional information on Cryptographic Mode 2, please refer to the Microsoft TechNet article Active Directory Rights Management Service Cryptographic Modes and the post AD RMS and cryptographic support for SHA-2/RSA 2048 on the RMS Team blog.
Once the right software is installed, the server needs to be configured to utilize the Rights Management connector and then IRM needs to be enabled.
In order to utilize the connector, the following registry values need to be added to the server running the Exchange environment.
For Exchange Server 2010, the following registry values need to be added to configure the server to utilize the connector:
HKLM\Software\Microsoft\MSDRM\ServiceLocation\Activation/_wmcs/certification
HKLM\Software\Microsoft\MSDRM\ServiceLocation\EnterprisePublishing/_wmcs/Licensing
HKLM\SOFTWARE\Microsoft\ExchangeServer\v14\IRM\CertificationServerRedirection REG_SZ:"https://<MicrosoftRMSURL> /_wmcs/certification" = "http(s)://<_connectorName_>/_wmcs/certification"
HKLM\SOFTWARE\Microsoft\ExchangeServer\v14\IRM\LicenseServerRedirection
For Exchange Server 2013, the following registry values need to be added:
HKLM\Software\Microsoft\MSDRM\ServiceLocation\Activation/_wmcs/certification/_wmcs/Licensing/_wmcs/certification" = "http(s):///_wmcs/certification"/_wmcs/licensing" = "http(s):///_wmcs/licensing"
Where:
<_MicrosoftRMSURL_>is your organization's Azure Rights Management service URL (generally in the form {GUID }.rms.<_region_>.aadrm.com.
<_region_> is the region of your organization's Azure Rights Management service:
<_connectorName_> is the name you defined in DNS for the connector. The https prefix needs to be utilized for <_connectorName_> if you have configured IIS in the connector servers to use this protocol. The Azure Rights Management service URLs should always be entered in the registry indicating the use of HTTPS.
These registry settings tell Exchange that whenever a Rights Management operation must be performed the calls must be made through the Rights Management connector.
You can obtain the Azure Rights Management service URL for your organization by using the Microsoft Rights Management administration tools available on the Microsoft Download Center .
Note You can also get your Azure Rights Management service URLs tenant by using the cmdlet Get-AadrmConfiguration as described later in the paragraph "Getting the URLs of the Azure Rights Management service".
Once these steps are performed you can enable IRM functionality in Exchange Server.
Note To learn how to configure IRM in Exchange, see Microsoft TechNet article Information Rights Management Procedures .
To ease the above configuration, you can use the RMS connector server configuration tool available on Microsoft Connect . This tool can be utilized to automatically configure Exchange Server to utilize the Rights Management connector by configuring the above settings in the registry and checking for pre-requisites.
Note
The tool can also create a Group Policy Object (GPO) script that can be later run by a domain administrator to create GPOs that apply the necessary settings on the target computers. Once created, the GPOs need to be linked, targeted and filtered as desired so these settings are applied to the computers that need to be configured to use the connector.
To use the tool, you need to launch an elevated Windows PowerShell command prompt and navigate to the directory where you have download the tool and type "help .\GenConnectorConfig.ps1 " for usage. You can add "-examples " to the Help command line to see examples of the usage of the tool in different scenarios.
Configuring a SharePoint server to utilize the Rights Management connector
In order to connect to the Azure Rights Management service utilizing the Rights Management connector a SharePoint server must be running one of the following software versions:
SharePoint Server 2010
SharePoint Server 2013
SharePoint servers must be running the latest version of the RMS client. For SharePoint Server 2013 that is the MSIPC client version available at http://www.microsoft.com/en-us/download/details.aspx?id=38396 .
The MSIPC client is installed by default in the following folder:
%ProgramFiles%\Active Directory Rights Management Services Client 2.x .
For SharePoint 2010 the same MSDRM client version is required as for Exchange servers (http://support.microsoft.com/kb/2627273 or http://support.microsoft.com/kb/2627272 depending on the Operating System used for the server).
Furthermore, if using SharePoint Server 2013, the following registry setting needs to be configured on the server:
HKLM\SOFTWARE\Microsoft\MSIPC\ServiceLocation\LicensingRedirection/_wmcs/licensing"="http:///_wmcs/licensing"
Where:
<_MicrosoftRMSURL_>is your organization's Azure Rights Management service URL (generally in the form {GUID }.rms.<_region_>.aadrm.com.
<_region_> is the region of your organization's Azure Rights Management service:
<_connectorName_> is the name you defined in DNS for the connector. The https prefix needs to be utilized for <_connectorName_> if you have configured IIS in the connector servers to use this protocol. The Azure Rights Management service URLs should always be entered in the registry indicating the use of HTTPS.
To ease the above configuration, you can use the RMS connector server configuration tool available on Microsoft Connect . This tool can be utilized to automatically configure SharePoint Server to utilize the Rights Management connector by configuring the above settings in the registry and checking for pre-requisites.
Note
The tool can also create a Group Policy Object (GPO) script that can be later run by a domain administrator to create GPOs that apply the necessary settings on the target computers. Once created, the GPOs need to be linked, targeted and filtered as desired so these settings are applied to the computers that need to be configured to use the connector.
To use the tool, you need to launch an elevated Windows PowerShell command prompt and navigate to the directory where you have download the tool and type "help .\GenConnectorConfig.ps1 " for usage. You can add "-examples " to the Help command line to see examples of the usage of the tool in different scenarios.
Once the right software is installed and the necessary registry changes have been made, IRM needs to be enabled in SharePoint by following the instructions in the Microsoft TechNet article Plan Information Rights Management (SharePoint Server 2010) .
When enabling IRM in SharePoint Server as per the steps in the article linked above, you have to point SharePoint Server to the Rights Management connector by utilizing the option Use this RMS server and entering the Rights Management connector URL as defined by you. Only the protocol prefix (http:// or https:// ) and the server name of the connector must be entered.
After IRM has been enabled on a SharePoint farm, you can enable IRM in on individual libraries by using the Information Rights Management option in the Library Settings page for each of the libraries.
Testing and evaluating the Rights Management connector installation
As its title suggests, this section guides you through a set of instructions required to build a representative test lab environment. Considering the involved products and technologies that encompass such an environment - Active Directory, Internet Information Services (IIS), Exchange Server, SharePoint Server to name a few - and the related required configuration, we've tried to streamlined and to ease as much as possible the way to build a suitable test lab environment, to consequently reduce the number of instructions that tell you what servers to create, how to configure the operating systems and core platform services, and how to install and configure the required core products and technologies, and, at the end, to reduce the overall effort that is needed.
We hope that the provided experience will enable you to see all of the components and the configuration steps on both the front-end and back-end that go into such a multi-products and services solution.
Building the on-premises test lab environment
A challenge in creating a useful test lab environment is to enable their reusability and extensibility. Because creating a test lab can represent a significant investment of time and resources, your ability to reuse and extend the work required to create the test lab is important. An ideal test lab environment would enable you to create a basic lab configuration, save that configuration, and then build out multiple test lab scenarios in the future by starting with the base configuration.
For that reason and considering the above objectives, this guide will use for the corporate on-premises infrastructure the Microsoft Test Lab Guides (TLGs) available on Microsoft TechNet to build the test lab environment to test and evaluate the Microsoft Right Management connector.
The Microsoft Test Lab Guides (TLGs) allow you to get valuable hands-on experience with new products and technologies using a pre-defined and tested methodology that results in a working configuration.
Microsoft Test Lab Guides (TLGs) are a set of documents that step you through the configuration and demonstration of a Microsoft technology or product in a standardized test lab environment, which starts with a common base configuration that mimics a simplified intranet and the Internet. TLGs are designed to be modular, extensible, and stackable to configure complex, multi-product solutions. TLGs make learning about products, technologies, and solutions easier by providing that crucial hands-on, "I built it out myself" experience.
Note For more information, see Test Lab Guides on Microsoft TechNet.
The setup of the on-premises environment for this evaluation of the Microsoft Right Management connector is based on the Test Lab Guide: Configure an Integrated Exchange, Lync, and SharePoint Test Lab . A TLG stack is a set of dependent TLGs that, when configured from the bottom of the stack, create a meaningful test lab configuration. This TLG is at the top of the following TLG stack:
This TLG describes how to configure a test lab consisting of servers running Exchange Server 2013, Lync Server 2013, and SharePoint Server 2013 by using six server computers and two client computers. After verifying that all three types of servers are working, you then configure server-to-server trust relationships between them. The resulting test lab can be typically used as a basis for scenarios and solutions that use a combination of Exchange Server 2013, SharePoint Server 2013, (and Lync Server 2013,) and Office 2013. In the specific context of this document, this will represent our on-premises collaboration environment for testing and evaluating the Azure Rights Management service along with the Rights Management connector for Information Protection and Control (IPC) on-premises.
Note For information about how to deploy Exchange Server 2013 in a pilot or production environment, see Planning and Deployment: Exchange 2013 Help . For information about how to deploy SharePoint Server 2013 in a pilot or production environment, see Install and deploy SharePoint 2013 . (For information about how to deploy Lync Server 2013 in a pilot or production environment, see Deployment for Lync Server 2013 .)
By following the instructions outlined in the above TLG you should be able to successfully prepare your test lab environment based on virtual machines (VM) to later deploy the Azure Rights Management service, install and configure the Rights Management connector, and start evaluating/using it within your organization to create and consume protected content.
Important note Individual virtual machines (VM) are needed to separate the services provided on the network and to clearly show the desired functionality. This being said, the suggested configuration to later evaluate the Rights Management connector is neither designed to reflect best practices nor does it reflect a desired or recommended configuration for a production network. The configuration, including IP addresses and all other configuration parameters, is designed only to work on a separate test lab networking environment.
Any modifications that you make to the configuration details provided in the rest of this document may affect or limit your chances of successfully setting up the on-premises collaboration environment that will serve as the basis for the integration with the Azure Rights Management service in the Cloud.
Microsoft has successfully built the suggested environment with the Windows Server 2012 Hyper-V virtualization technology, Windows Server 2012 and Windows 8 Pro virtual machines.
The on-premises test infrastructure is deployed by using the following:
One computer running Windows Server 2012 named DC1 that is configured as a domain controller, Domain Name System (DNS) server, and DHCP server.
One intranet member server running Windows Server 2012 named SQL1 that is configured as a SQL database server.
One intranet member server running Windows Server 2012 named EX1 that is configured as the Exchange Server 2013 email server.
One (optional) intranet member server running Windows Server 2012 named LYNC1 that is configured as the Lync Server 2013 Standard Edition server.
One intranet member server running Windows Server 2012 named SP1 that is configured as an enterprise root certification authority (PKI server) and a SharePoint Server 2013 Web server.
One intranet member server running Windows Server 2012 named EDGE1 that is configured as an Internet edge Web server.
One client computer running Windows 8 named CLIENT1.
One client computer running Windows 8 named CLIENT2.
The above virtual machines (VM) will enable you to create snapshots so that you can easily return to a desired configuration for further learning and experimentation.
Note The above virtual machines (VM) will enable you to create snapshots so that you can easily return to a desired configuration for further learning and experimentation.
The integrated test lab consists of:
A single subnet named Corpnet (10.0.0.0/24) that simulates a private intranet. Computers on the Corpnet subnet connect by using a private virtual network switch on the Hyper-V host machine. These computers are DC1, SQL1, EX1, LYNC1, SP1, EDGE1, CLIENT1, and CLIENT2.
A subnet named Internet that provides Internet connectivity and that is separated from the Corpnet subnet by the EDGE1 machine. Computers on the Internet subnet connect by using an external virtual network switch on the Hyper-V host machine. These computers are EDGE1, CLIENT1, and CLIENT2.
**The EDGE1, CLIENT1 and CLIENT2 machines must have two network adapters installed. Connect one adapter to the virtual network switch for the Corpnet subnet, and connect the second adapter to the external virtual network switch for the Internet subnet. The external virtual network switch configuration must provide Internet connectivity via the external network.
The following nine steps as outlined by the above top-level TLG must be followed in order to set up the on-premises core infrastructure of our test lab:
Setting up the Windows Server 2012 Base Configuration test lab.
Installing and configuring a new server named SQL1.
Installing SQL Server 2012 on SQL1.
Installing and configuring a new client computer named CLIENT2.
Installing and configuring Exchange Server 2013 on EX1.
Installing and configuring a new server named LYNC1 (Optional).
Installing Lync Server 2013 Standard Edition on LYNC1 (Optional).
Installing SharePoint Server 2013 on SP1.
Configuring integration between EX1, LYNC1, and SP1 (Optional).
The following subsections outline the minor discrepancies if any for our test lab and provide any additional information details necessary to (hopefully) successfully build such a test lab.
**In order to later define a federated domain in the Azure Active Directory tenant, we've opted not to configure the domain corp.contoso.com as described in the TLG and choose the domain corp-contoso.com instead. Consequently, in our case, whenever a reference to CORP is made in a procedure, it has been replaced by CORP-CONTOSO to reflect accordingly the change in naming. Likewise, a reference to corp.contoso.com is substituted by corp-contoso.com.
Choose a domain name of your choice whose DNS domain name is currently not in used on the Internet. For checking purpose, you can for instance use the domain search capability provided by several popular domain name registrars such as Go Daddy.
Furthermore, for the sake of simplicity, the same password "Pass@word1 " is used throughout the procedures of the above TLGs as well as the ones detailed in this document. This is neither mandatory nor recommended in a real world scenario.
Finally, to perform all the tasks in this guide, use the Contoso domain Administrator account User1 for each Windows Server 2012 VM, unless instructed otherwise.
Setting up the Windows Server 2012 Base Configuration test lab
As described in the top-level TLG, setup the Base Configuration test lab for the Corpnet subnet using the procedures in Section § Steps for configuring the Corpnet subnet of the Test Lab Guide: Windows Server 2012 Base Configuration .
This said, for the Subsection § Step 3: Configure CLIENT1, please keep in mind that CLIENT1 has two networks adapters in our configuration, one connected to the Corpnet subnet, and an additional one connected to the Internet subnet. The configuration of the second one – not covered in the TLG - must ensure Internet connectivity to CLIENT1 and obviously depends on your own specifics environment. Please configure the TCP/IP properties of the second network adapter to provide such a connectivity in accordance to your own specificities.
Eventually, follow the instructions of the Subsection § Step 1: Configure EDGE1 of the Section § Steps for configuring the Internet Subnet. Similarly to CLIENT1, the configuration of the second network adapter connected to the Internet subnet must ensure Internet connectivity. Consequently, please do not follow the related instructions of the TLG and configure the TCP/IP properties of this adapter to provide such a connectivity in accordance to your own specificities.
As described, you also need to add a public key infrastructure to the test lab using the procedures in the Test Lab Guide Mini-Module: Basic PKI for Windows Server 2012 , substituting SP1 for APP1 in the instructions.
Installing and configuring a new server named SQL1
Simply follow the procedures described in the TLG. We have no specific additions and/or discrepancies.
Installing SQL Server 2012 on SQL1
Install and configure SQL Server 2012 on SQL1 as described in Steps 2, 3, and 4 of the SQL Server 2012 Test Lab Guide . Follow the procedures described in the TLG, substituting SQL1 for APP1 in the instructions. Please note that the machine is running Windows Server 2012 in lieu of Windows Server 2008 R2. As consequence, when asked to install the .NET Framework, you should select in the Features list .NET Framework 3.5 (includes .NET 2.0 and 3.0) under .NET Framework 3.5 Features in lieu of .NET Framework 3.5.1 Features .
Installing and configuring a new client computer named CLIENT2
As already mentioned for CLIENT1, CLIENT2 in our configuration has two networks adapters: one connected to the Corpnet subnet, and an additional one connected to the Internet subnet. The configuration of the second one – not covered in the top level TLG - must ensure Internet connectivity to CLIENT2 and obviously depends on your own specifics environment. Please configure the TCP/IP properties of the second network adapter to provide such a connectivity in accordance to your own specificities.
Installing and configuring Exchange Server 2013 on EX1
Follow the instructions in Steps 2-5 of Test Lab Guide: Install Exchange Server 2013 . Please note that the EX1 machine is running Windows Server 2012 in our configuration in lieu of Windows Server 2008 R2 SP1. As a consequence, for Step 4, the prerequisites for Exchange Server 2003 are the ones listed for the Mailbox server role for Windows Server 2012 in the eponym Microsoft TechNet article Exchange 2013 Prerequisites .
To install these prerequisites, proceed with the following steps:
Open an elevated Windows PowerShell command prompt and run the following command to install the required Windows components:
PS C:\Windows\System32> Install-WindowsFeature AS-HTTP-Activation, Desktop-Experience, NET-Framework-45-Features, RPC-over-HTTP-proxy, RSAT-Clustering, RSAT-Clustering-CmdInterface, RSAT-Clustering-Mgmt, RSAT-Clustering-PowerShell, Web-Mgmt-Console, WAS-Process-Model, Web-Asp-Net45, Web-Basic-Auth, Web-Client-Auth, Web-Digest-Auth, Web-Dir-Browsing, Web-Dyn-Compression, Web-Http-Errors, Web-Http-Logging, Web-Http-Redirect, Web-Http-Tracing, Web-ISAPI-Ext, Web-ISAPI-Filter, Web-Lgcy-Mgmt-Console, Web-Metabase, Web-Mgmt-Console, Web-Mgmt-Service, Web-Net-Ext45, Web-Request-Monitor, Web-Server, Web-Stat-Compression, Web-Static-Content, Web-Windows-Auth, Web-WMI, Windows-Identity-Foundation
After you've installed the operating system roles and features, install the following software in the order shown hereafter:
Microsoft Unified Communications Managed API 4.0, Core Runtime 64-bit
Microsoft Office 2010 Filter Pack 64 bit
Microsoft Office 2010 Filter Pack SP1 64 bit
To complete the configuration, install Microsoft Office Professional Plus 2013 on both CLIENT1 and CLIENT2 as described in the Test Lab Guide Mini-Module: Installing Microsoft Office Professional Plus 2013 on CLIENT1 , substituting CLIENT2 for CLIENT1 in the instructions for the CLIENT2 machine.
Installing and configuring a new server named LYNC1
This procedure is optional. If you want to deploy a Lync Server 2013 in your test lab, follow the procedures described in the TLG.
Installing Lync Server 2013 Standard Edition on LYNC1
This procedure is optional. If you opt to deploy a Lync Server 2013 in your test lab in the previous step, follow the procedures described in the TLG. When defining and configuring the topology, please note that the Lync file store share Files must be created before defining the file store. You can create this folder where ever you want but for this test lab we will create a folder called "Files " in C:\ of the LYNC1.
In addition, you need to grant full access permissions to the following Active Directory groups:
RTCHS Universal Services
RTC Component Universal Services
RTC Universal Server Admins
RTC Universal Config Replicator
To share the folder and grant the above groups the appropriate permissions on this file share, proceed with the following steps:
Right-click the newly created folder and select Properties . The Files Properties dialog appears.
Select the Sharing tab.
Click Share . A File Sharing wizard pops up.
Click the dropdown beside Add and select Find People… A Select Users or Groups dialog opens up.
Type "RTC " in Enter the object names to select (examples): and click Check Names . A Multiple Names Found dialog opens up.
Press the CTRL key, select the above groups, and then click OK twice.
Change each newly added group to Read/Write and click Share .
The publishing wizard should run without encountering any error. You can then proceed with the installation of the Lync server 2013 core components.
Installing SharePoint Server 2013 on SP1
Follow the procedures described in the TLG.
Configuring integration between EX1, LYNC1, and SP1
To support integrated scenarios and solutions, servers must be able to request resources from each other in a secure way. Server-to-server authentication is a new feature of Exchange Server 2013, SharePoint Server 2013, and Lync Server 2013 that allows a server to request resources of another server on behalf of a user. This feature uses the industry standard Open Authorization (OAuth) 2.0 protocol. Server-to-server authentication enables many new scenarios such as eDiscovery, high-resolution user photos, and site mailboxes (see Section § Leveraging the InPlace eDiscovery & Hold feature later in this document).
This step is completely optional in the context of this paper. If you nevertheless want to implement it, we outline in the following sections the various changes that are necessary.
Configuring the server-to-server trust from SP1 and EX1 to LYNC1
**You can skip this section if you haven't deployed LYNC1 in your test lab.
Please note that the content provided in the TLG for the s2sauth.ps1 Windows PowerShell script contains some typos. So you must proceed with the following replacements to make it work as expected and also to reflect the chosen domain name for Active Directory in your test lab:
Search for https//ex1.corp.constoso.com/autodiscover/metadata/json/1 and replace it by https//ex1.corp-contoso.com/autodiscover/metadata/json/1 . Please note that corp-contoso.com in the URL should also be replaced by the name of your Active Directory domain to accommodate your own deployment option of the test lab.
Search for https//ex1.corp.contoso.com/autodiscover/metadata/json/1 and replace it by https//ex1.corp-contoso.com/autodiscover/metadata/json/1 . Please note that orp-contoso.com in the URL should also be replaced by the name of your Active Directory domain to accommodate your own deployment option of the test lab.
Search for https//sp1.corp.contoso.com/_layouts/15/metadata/json and replace it by https//sp1.corp-contoso.com/_layouts/15/metadata/json/1 . Please note that corp-contoso.com in the URL should also be replaced by the name of your Active Directory domain to accommodate your own deployment option of the test lab.
Furthermore, since the script s2sauth.ps1 isn't signed, you may need to change the script execution policy prior to running the script on LYNC1.
To verify that Windows PowerShell can run the created script on LYNC1, proceed with the following steps:
Whilst still being logged as CORP-CONTOSO\User1 on LYNC1, open an elevated Windows PowerShell command prompt, and, at the command prompt, run the following command:
PS C:\Windows\system32>Get-ExecutionPolicy
If the value returned is anything other than RemoteSigned or Unrestricted , you need to change the value to RemoteSigned . Run the following command if needed:
PS C:\Windows\system32>Set-ExecutionPolicy RemoteSigned
Note When you set the script execution policy to RemoteSigned, you can only run scripts that you create on your computer or scripts that are signed by a trusted source. For additional information, see the Microsoft TechNet article about_Execution_Policies .
Configuring the server-to-server trusts from SP1 and LYNC1 to EX1
Replace the corp.contoso.com by your own domain name in the various URLs of the provided commands, which is corp-contoso.com in our case. Furthermore, do not run the following command if you haven't deployed LYNC1 in your test lab:
.\Configure-EnterprisePartnerApplication.ps1 -AuthMetadataUrl https://lync1.corp-contoso.com/metadata/json/1 -ApplicationType Lync
Configuring the server-to-server trusts from EX1 and LYNC1 to SP1
Similarly to the previous section, replace the corp.contoso.com by your own domain name in the various URLs of the provided commands, which is corp-contoso.com in our case.
Furthermore, before running the first command, make sure that the SharePoint App Management Service is running. Proceed as follows:
From the Start screen, click SharePoint 2013 Management Shell .
At the Windows PowerShell command prompt, run the following command:
PS C:\Users\User1>Get-SPServiceApplication | where {$_.Name –like "App Management"}
If the App Management Service is missing, then the service instance is likely not started on SP1. In this case:
From the Start screen, click SharePoint 2013 Central Administration . A User Account Control dialog appears.
Click Yes .
Under Central Administration on the left side, click System Settings .
On the System Settings page, click Manage services on server under Servers .
On the Services on Server page, start the service instance.
If you do not follow the above step, you will be likely to encounter an error when executing the Get-SPAppPrincipal command.
Finally, do not run the following command if you haven't deployed LYNC1 in your test lab:
New-SPTrustedSecurityTokenIssuer –MetadataEndpoint "https://lync1.corp.contoso.com/metadata/json/1 " –IsTrustBroker –Name "Lync Server"
At this stage, your on-premises environment should up and running and ready for the next steps.
Creating an Azure Active Directory/Office 365 tenant and activating the Azure Rights Management service
Choose one of the option outlined in Section § Creating your tenant earlier in this document and follow the related steps. For the course of this step-by-step, we've provisioned an Office 365 Enterprise (E3) tenant: demorms.onmicrosoft.com .
Setting up the directory synchronization and the federation with the tenant
As previously outlined, the use of the Rights Management connector requires that accounts in Azure Active Directory are synchronized with the on-premises Active Directory, i.e. the domain corp-contoso.com in our implementation of the test lab. Furthermore, federation between the on-premises Active Directory and Azure Active Directory can be enabled to offer a more seamless user experience through single sign-on to the Azure Rights Management service.
The page Set up and manage single sign-on on the Microsoft Online Portal provides an overview of the various steps to conduct in order to achieve such an integration between your on-premises environment and your Azure Rights Management service tenant.
Note For an overview on the above steps, see the Microsoft TechNet articles Configure directory synchronization
Since our test lab environment represents a fairly simple single forest scenario in terms of integrating the on-premises identity infrastructure with the Azure Rights Management service tenant, we leverage the Quick Start Guide for Integrating a Single Forest On-Premises Active Directory with Windows Azure AD available on the wiki of Microsoft TechNet and more especially the Windows PowerShell script that accompanies the guide to implement on top of our test lab environment such an integration.
By notably leveraging the available Windows PowerShell cmdlets to manage Azure Active Directory, this script is indeed designed to configure two Windows Server 2012 machines with a full federation (AD FS, AD FS proxy (optional), and DirSync) to Azure Active Directory where you already have an existing on-premises AD in a single forest, which is thankfully our case at this stage of the test lab environment.
Note For information on how to manage Azure Active Directory using Windows PowerShell, see the Microsoft TechNet article Manage Windows Azure AD using Windows PowerShell .
For the sake of simplicity, and to set up the directory synchronization and the federation between the on-premises infrastructure of our test lab and the Azure Rights Management service tenant in the Cloud, we will not implement the AD FS proxy's optional step and only installed AD FS and DirSync on EDGE1.
Consequently, the following seven main steps must be followed:
Installing the prerequisite software on EDGE1.
Adding and verifying the domain name in the Azure Rights Management service tenant.
Adding the domain verification record to the external DNS.
Enabling the Directory Synchronization tool (DirSync) on the Azure Rights Management service tenant.
Configuring AD FS on EDGE1.
Configuring Azure Active Directory Federation Support.
Installing and configuring DirSync on EDGE1.
The following subsections describe in the context of our test lab environment the use of the above script, outline the minor discrepancies if any for our test lab and provide any additional information details necessary to (hopefully) successfully build the identity integration between the test lab and the Azure Active Directory/Office 365 tenant in the cloud for the Azure Rights Management service.
Installing the prerequisite software on EDGE1
Unless noticed otherwise, all the instructions should be done on the EDGE1 machine.
Installing the Microsoft Online Sign-In Assistant (MOS SIA)
The Windows PowerShell script of the quick start guide doesn't point to the latest version of the Microsoft Online Services Sign-In Assistant (MOS SIA) 7.0, which is 7.250.4551.0 as of this writing. So we will install it manually.
Note The Microsoft Online Services Sign-In Assistant (MOS SIA) 7.0 provides end user sign-in capabilities to Microsoft Online Services, such Office 365 and the Azure Rights Management service. In the context of this paper, the MOS SIA is used to authenticate users to these services through a set of dynamic link library files (DLLs) and a Windows service as described in the community article Description of Microsoft Online Services Sign-In Assistant (MOS SIA) .
To install the Microsoft Online Sign-In Assistant (MOS SIA) 7.0 on the EDGE1 machine, proceed with the following steps:
On EDGE1, log on as the domain administrator CORP-CONTOSO\User1.
Open a browser session and navigate to the following link: Microsoft Online Services Sign-In Assistant for IT Professionals RTW and click Download .
In the Choose the download you want page, check msoidcli_64bit.msi.msi and click Next .
The Microsoft Online Services Sign-in Assistant Setup wizard opens.
On the license terms page, select I accept the terms in the License Agreement and Privacy Statement and click Install . A User Account Control dialog pops up.
In the User Account Control dialog, click Yes to execute the setup.
On the completion page, click Finish .
Setting up the execution policy for the quick start guide's Windows PowerShell script
To verify that Windows PowerShell can run the downloaded script on EDGE1, proceed with the following steps:
Whilst still being logged as CORP-CONTOSO\User1 on EDGE1, open an elevated Windows PowerShell command prompt, and, at the command prompt, run the following command:
PS C:\Windows\system32>Get-ExecutionPolicy
If the value returned is anything other than RemoteSigned or Unrestricted , you need to change the value to RemoteSigned . Run the following command if needed:
PS C:\Windows\system32>Set-ExecutionPolicy RemoteSigned
When invited, press "Y " to confirm the operation.
Disabling the IE Enhanced Security Configuration (ESC)
Depending on the selected choice in the menu of the script, the script may download files from the Internet and should consequently be authorized to conduct such an operation.
Since the script is intended to run on a test lab environment, the IE Enhanced Security Configuration should be disabled for the course of the setup operations. The script handles that for you as illustrated hereafter:
Installing Azure Active Directory Module for Windows PowerShell
The Azure Active Directory Module for Windows PowerShell provides corporate administrators the ability to complete many Azure Active Directory/Office 365 tenant-based administrative tasks within Windows PowerShell.
Note A Windows PowerShell "module" is a package that contains Windows PowerShell commands, cmdlets, providers, functions, variables, and aliases. The Azure Active Directory Module for Windows PowerShell is a separate installation package which includes cmdlets specifically designed for Azure Active Directory tenant-based administration.
The Azure Active Directory Module for Windows PowerShell cmdlets mirror the administrative functions tenant administrators can complete with the Microsoft Online Services Portal (MOP). Administrators can leverage the Azure Active Directory Module for Windows PowerShell cmdlets to streamline Azure Active Directory/Office 365 tenant-based administrative tasks that would otherwise be time consuming in the MOP GUI environment (such as running administration tasks in bulk against a set of users for example). The Azure Active Directory Module for Windows PowerShell cmdlets were previously known as the Microsoft Online Services Module for Windows PowerShell cmdlets.
For more information, see the article Manage Windows Azure AD by using Windows Powershell .
Administrative privileges are needed on the local computer in order to install the Azure Active Directory Module.
To install the module on EDGE1, proceed with the following steps:
Whilst still being logged as CORP-CONTOSO\User1 on EDGE1, open an elevated Windows PowerShell command prompt, and, at the command prompt, run the following command:
PS C:\Windows\system32>C:\Menu.ps1
When prompted Enter your selection , type "2 " to select choice 2 in the menu. The script proceeds with the download and the installation of Azure Active Directory Module for Windows PowerShell.
Enter your selection: 2
--------------------------------------------------------------------------
Checking to see if machine already has product Microsoft Online Services Sign-in Assistant installed…http://go.microsoft.com/fwlink/p/?linkid=236297
Completed. Press "Enter" to continue.
Press ENTER to return to the main menu of the script.
Adding and verifying the domain name in the Azure Rights Management service tenant
Perform all steps in this section on EDGE1 logged in as the domain administrator CORP-CONTOSO\User1.
Adding the local UPN suffix as domain in the Azure Rights Management service tenant
On EDGE1, proceed with the following steps:
Back to the main menu of the script running in an elevated Windows PowerShell command prompt, type "4 " to select choice 4 in the menu when prompted Enter your selection . You will then be prompted for your credentials.
Enter your Azure Active Directory/Office 365 Enterprise credentials (the set of credentials should have Global Administrator privilege) and wait to be authenticated. In the Windows PowerShell Credential Request window that opens up, provide the credentials for the Office 365 Enterprise global administrator account such as:
Username: _philber@demorms.onmicrosoft.com
Password: ****************
Since in our test lab environment, there is only one UPN suffix active, e.g. corp-contoso.com , the script assume that this is the one to add.
Note If you have a multiple domain forest with a single tree, you would want to first add the top-level domain (for example, contoso.com ) and then add the child domain names (for example, corp.contoso.com ). In such case, the script enables to select the UPN suffix you would like to add. Also note that the tool only lists domains which have not yet been added to Azure Active Directory.
Enter your selection: 4
---------------------------------------------------------------------------
Attempting to load system module MSOnline
Name Status Authentication
Domain verification code: ms78729055
Completed. Press "Enter" to continue.
Press ENTER to return to the main menu of the script.
Adding the domain verification record to the external DNS
For the added UPN suffix domain, add a text record for the domain that matches the verification information to external, public DNS.
On EDGE1, proceed with the following steps:
Back to the main menu of the script running in an elevated Windows PowerShell command prompt, type "5 " to select choice 5 in the menu when prompted Enter your selection . You will then be prompted for your credentials.
Enter your selection: 5
-----------------------------------------------------------------------------------------
Getting unverified domain list…
Completed. Press "Enter" to continue
Press ENTER to return to the main menu of the script.
In our illustration, the information to add consists in a TXT record with the value "MS=ms78729055 "
Note For more information on this process, including detailed steps for several popular domain name registrars, see the Microsoft TechNet article Verify a domain .
To add the TXT record, proceed with the following steps:
Note For more information on verifying a domain à Go Daddy, see the eponym Microsoft TechNet article Verify a domain at Go Daddy .
Open a browsing session with the browser of your choice from your local machine and navigate to http://www.godaddy.com/ and click Sign In . in the upper right corner. A Sign in dialog appears.
Enter your credentials and click Sign In . Once authenticated, The My Account page (https://mya.goddady.com ) opens up.
On the Products tab, at the end of the DOMAINS row, click Launch .
On the Domains page, find the domain name in which the service discovery records should be added, in our case corp-contoso.com .
Click the domain name, in our case CORP-CONTOSO.COM . The Domain Details page opens in a new tab in your browser.
Click DNS Zone File in the toolbar.
…
Click Add Record . An Add Zone Record dialog opens up.
Click the down arrow for the Record type: box and select TXT (Text) . The Add DNS Record dialog displays the related fields.
For Host: , type "@ ".
For TXT Value: , type "MS= " followed by the verification value provided by the script: "MS=ms78729055 " in our case.
For TTL: , leave the value set to 1 Hour .
Click Finish to close the dialog.
Click Save Changes to save your new TXT record.
Scroll down to the TXT (Text) . You should see the newly added TXT record.
Click OK .
Enabling the Directory Synchronization tool (DirSync) on the Azure Rights Management service tenant
On EDGE1, proceed with the following steps to enable the Directory Synchronization (DirSync) support in your Azure Active Directory/Office 365 tenant:
Back to the main menu of the script running in an elevated Windows PowerShell command prompt, type "6 " to select choice 6 in the menu when prompted Enter your selection . You will then be prompted for your credentials.
Press ENTER to return to the main menu of the script.
Note This process can take up to 24 hours, although it rarely takes longer than an hour. You will enable the setting here, but not use it until later; this will give Azure Active Directory time to complete processing the request while you continue with further steps.
Configuring AD FS on EDGE1
This step enables to create a basic on-premises Active Directory Federation Services (AD FS) server configuration on EDGE1. AD FS is used to support single sign-on (SSO) with your Azure Active Directory tenant. Although a detailed explanation of this process is outside of the scope of this document, the important thing to know as an IT professional is that at no point in the process are user credentials for the on-premises environment accessible to Azure Active Directory. Instead, authentication tokens with a limited lifetime are used to represent the authenticated user. This is done using industry-standard processes and protocols and ensures the integrity of on-premises credentials while still supporting single sign-on.
Note For a detailed explanation of the process, see the whitepaper Office 365 Single Sign-on with AD FS 2.0 .
To install and configure AD FS on EDGE1, proceed with the following steps:
On EDGE1, back to the main menu of the script running in an elevated Windows PowerShell command prompt, type "7 " to select choice 7 in the menu when prompted Enter your selection .
Enter your selection: 7
-------------------------------------------
Local Windows feature ADFS-Federation missing, installing…http://go.microsoft.com/fwlink/?LinkId=224868 .
Complete. Press "Enter" to continue.
Press ENTER to return to the main menu of the script. To create a service account in the local domain corp-contoso.com for AD FS use, type "8 " to select choice 8 in the menu when prompted Enter your selection .
When prompted, specify the domain name (FQDN or NetBIOS will work), the SAM account name, and the password (with confirmation) for the new on-premises service account. The new account will be created with the Password never expires flag set.
Enter your selection: 8
---------------------------------------------------------------------
Domain name for ADFS service account: corp-contoso.com
Complete. Press "Enter" to continue.
Press ENTER to return to the main menu of the script. To create an internal DNS entry for AD FS, type "9 " to select choice 9 in the menu when prompted Enter your selection .
When prompted, select the domain name to use for AD FS externally. This should match the UPN suffix active in the Azure Rights Management service tenant. For example, corp-contoso.com in our configuration. Select the 10.0.0.1 to point to the internal DNS on DC1.
Enter your selection: 9
--------------------------------------------------------
Getting custom domain list…
corp-contoso.com
Select a DNS server for the creation request
xxx.xxx.xxx.xxx
10.0.0.1
DNS server: 2
Local IP addresses
10.0.0.1
xxx.xxx.xxx.xxx
Main ADFS service IP address: 1
Local Windows Feature RSAT-DNS-Server missing, installing…
Complete. Press "Enter" to continue.
Press ENTER to return to the main menu of the script. To create a new, self-signed SSL certificate for AD FS, type "10 " to select choice 10 in the menu when prompted Enter your selection .
Note We use a self-signed certificate here for demonstration purposes. However, in a production environment, you would generally use a certificate issued by a public certificate authority (CA) such as VeriSign, although if only internal domain-joined clients will be used to access services, then a private Enterprise CA would be acceptable too. To reflect this, we could have leverage the Certificate Authority on SP1, but this would have required to modify the script. We've not opted for this option.
Enter your selection: 10
-------------------------------------------
Checking for existing certificate…
corp-contoso.com
Domain to use: 1
Confirm Self-Signed
Complete. Press "Enter" to continue.
Press ENTER to return to the main menu of the script. To export the newly created self-signed SSL certificate for AD FS, type "11 " to select choice 10 in the menu when prompted Enter your selection .
Enter your selection: 11
--------------------------------------------------
Exporting…
corp-contoso.com
Domain to use: 1
Complete. Press "Enter" to continue.
The command creates the following two certificate files at the root of the C drive: ADFSSelfSigned.cer and ADFSSelfSigned.pfx . We will use the former one later in this document.
Press ENTER to return to the main menu. To configure ADFS with basic configuration of the script, type "12 " to select choice 12 in the menu when prompted Enter your selection .
Note For ease of configuration and implementation, AD FS on EDGE1 is left with its default of Windows Integrated Authentication, but has NTLM prioritized over Negotiate in the provider list. This is not a default configuration but avoids potential Kerberos issues. In production, you would likely leave the default to keep the enhanced security offered by Kerberos.
Enter your selection: 12
--------------------------------------------------
Domain name for ADFS service account: corp-contoso.com
Reboot the EDGE1 machine and log on as the domain administrator CORP-CONTOSO\User1.
Open an elevated Windows PowerShell command prompt, and, at the command prompt, run the following command:
PS C:\Windows\system32>C:\Menu.ps1
When prompted Enter your selection , type "13 " to select choice 13 in the menu to confirm/configure Windows Firewall for port 443.
Enter your selection: 13
---------------------------------------------------------
Attempting to load system module NetSecurity…
Complete. Press "Enter" to continue.
Start Internet Explorer and select Internet Options on the Tools menu. An Internet Options dialog pops up.
Click the Security tab, select the Local intranet zone, and then click Sites . A Local intranet dialog appears.
Click Advanced . A Trusted sites dialog appears.
In Add this website to the zone , type "https://adfs.corp-contoso.com Add . You should replace corp-contoso.com by your own domain as already mentioned.
Click Close , and then click OK .
Verify that the security level for the zone is set to the default setting of Medium-low which enables Windows integrated authentication for Intranet zones.
Click OK to close the Internet Options dialog.
Back to the Windows PowerShell command prompt, press ENTER to return to the main menu of the script. To launch test web pages, type "14 " to select choice 14 in the menu when prompted Enter your selection .
Enter your selection: 14
-------------------------------
Attempting to load system module MSOnline
corp-contoso.com
Domain to use: 1
Page launch will take about 10 seconds…
Three Internet Explorer tabs are launched:
Configuring Azure Active Directory Federation Support
To check DNS records for TXT entries for unverified domains, proceed with the following steps:
Back to the main menu of the script on EDGE1, type "22 " to select choice 22 in the menu when prompted Enter your selection .
You are invited to specify the IP address of the FQDN of an external DNS server to query. You can simply press ENTER to accept the default (209.244.0.3 ) or specify one of the name server of your DNS zone.
Note In our illustration with GoDaddy.com, see the article Finding Your Hosting Account's Name servers to determine the name servers. For our corp-contoso.com zone, the name servers are ns77.domaincontrol.com and ns78.domaincontrol.com .
Enter your selection: 22
Enter the IP address for the external DNS server to query
Completed. Press "Enter" to continue.
Press ENTER to return to the main menu of the script. To configure Azure Active Directory connection to AD FS, type "23 " to select choice 23 in the menu when prompted Enter your selection .
Enter your selection: 23
Getting custom domain list…
corp-contoso.com
Configuring the Windows Azure AD connection to ADFS…
Completed. Press "Enter" to continue.
Press ENTER to return to the main menu of the script. To create a single sign-on test user, type "24 " to select choice 24 in the menu when prompted Enter your selection .
Enter your selection: 24
SAM account name for Test user: JohnDoe
corp-contoso.com
Domain to use: 1
Attempting to load system module ActiveDirectory
Completed. Press "Enter" to continue.
Open a browser session and navigate to the Microsoft Online Portal at https://portal.microsoftonline.com .
Log on as the newly created sign-in test user. You should be automatically redirected to the on-premises AD FS server, transparently authenticated thanks to the Windows integrated authentication and then redirected back to the portal. At the end of the process, you should have a seamless access to the sign-in test user settings in Office 365. This is expected for the test user as in fact you have not assigned a license to the test user.
Installing and configuring DirSync on EDGE1
This final step enables to configure and activate Directory Synchronization (DirSync). DirSync is a custom, specialized implementation of Microsoft Forefront Identity Manager (FIM) that is configured to synchronize accounts between your on-premises domain corp-contoso.com and a corresponding Azure Active Directory domain.
On EDGE1, proceed with the following steps:
Back to the main menu of the script, to download and install the DirSync tool, type "25 " to select choice 25 in the menu when prompted Enter your selection .
This will take some time; the download is approximately 180 MB, and when installing, it will install a local SQL Server Express instance to support the synchronization. The installation for the most part will be invisible as it runs.
Enter your selection: 25
-----------------------------------------------------------
Downloading C:\\DirSync.exehttp://g.microsoftonline.com/0BX10en/571
Log off and log on again as the domain administrator CORP-CONTOSO\User1.
Double click the shortcut Windows Azure Directory Module for Windows PowerShell on the desktop. A Windows PowerShell command prompt opens. At the command prompt, run the following command to connect to your tenant:
PS C:\Users\user1\Desktop>Connect-MsolService
You will then be prompted for your credentials.
Enter your Azure Active Directory/Office 365 Enterprise credentials (the set of credentials should have Global Administrator privilege) and wait to be authenticated. In the Windows PowerShell Credential Request window that opens up, provide the credentials for the Office 365 Enterprise global administrator account such as:
Username: _philber@demorms.onmicrosoft.com
Password: ****************
Run the following command to create an account with administrative privileges:
Important note This account will be used as the ongoing synchronization account and must not be configured in the synchronized corp-contoso.com domain – our default domain demorms.onmicrosoft.com for the Azure Rights Management service tenant represents a good choice -, and must be set to not have its password expire.
PS C:\Users\user1\Desktop>$user = New-MsolUser –DisplayName "DirSync Agent" –UserPrincipalName "DirSyncAgent@Demorms.onmicrosoft.com " –FirstName "DirSync" –LastName "Agent" –AlternateEmailAddresses philber@demorms.onmicrosoft.com –Password "Pass@word1" –PasswordNeverExpires $true –ForceChangePassword $false
Close the Windows PowerShell command prompt.
Now open an elevated Windows PowerShell command prompt, and, at the command prompt, run the following command:
PS C:\Windows\system32>C:\Menu.ps1
When prompted Enter your selection , type "26 " to select choice 26 in the menu to configure the DirSync tool.
Enter your selection: 26
-------------------------------------------
Attempting to load system module MSonline
Completed. Press "Enter" to continue.
Press ENTER to return to the main menu of the script. To get the latest directory synchronization events (event in the past thirty minutes), type "27 " to select choice 27 in the menu when prompted Enter your selection .
Open a browser session and navigate to the Microsoft Online Portal at https://portal.microsoftonline.com . provide the credentials for the Office 365 Enterprise global administrator account such as:
Username: _philber@demorms.onmicrosoft.com
Password: ****************
In the left-side navigation area of the Office 365 admin center, under dashboard , select users and groups .
Click active users and confirm that Chris Ashton and Janet Schorr are listed under DISPLAY NAME and that their STATUS is marked as Synced with Active Directory .
You are now in a position to install and configure the Rights Management connector on your test lab environment.
You can use the Directory Synchronization Windows PowerShell cmdlet to force synchronization. The cmdlet is installed when you install the Directory Sync tool. To force the directory synchronization, proceed with the following steps:
On EDGE1, navigate to the directory synchronization installation folder located here: %ProgramFiles%\Windows Azure Active Directory Sync .
Double-click _DirSyncConfigShell.psc1_to open a Windows PowerShell window with the cmdlets loaded.
In the Windows PowerShell command prompt, run the following command:
PS C:\Program Files\Windows Azure Active Directory Sync> Start-OnlineCoexistenceSync
Installing and configuring the Rights Management connector
The following five main steps must be followed in order to install and configure the Rights Management connector:
Setting up the RMS connector on EDGE1.
Authorizing the EX1 Exchange server to the Rights Management connector on EDGE1.
Configuring Exchange Server 2013 on EX1.
Authorizing the EX1 SharePoint server to the Rights Management connector on EDGE1.
Configuring SharePoint Server 2013 on SP1.
Setting up the Rights Management connector on EDGE1
Unless otherwise indicated, all the instructions below should be done on the EDGE 1 machine.
Configuring the Rights Management connector on EDGE1
To configure the Rights Management connector on EDGE1, proceed with the following steps:
Whilst still being logged as CORP-CONTOSO\User1 on EDGE1, double click the shortcut Windows Azure Directory Module for Windows PowerShell on the desktop. A Windows PowerShell command prompt opens. At the command prompt, run the following command to connect to your tenant:
PS C:\Users\user1\Desktop>Connect-MsolService
You will then be prompted for your credentials.
Enter your Azure Active Directory/Office 365 Enterprise credentials (the set of credentials should have Global Administrator privilege) and wait to be authenticated. In the Windows PowerShell Credential Request window that opens up, provide the credentials for the Office 365 Enterprise global administrator account such as:
Username: _philber@demorms.onmicrosoft.com
Password: ****************
Run the following command to create an account with administrative privileges for the Rights Management connector:
PS C:\Users\user1\Desktop>$user = New-MsolUser –DisplayName "RMS Connector Agent" –UserPrincipalName "RMSConnectorAgent@Demorms.onmicrosoft.com " –FirstName "RMSConnector" –LastName "Agent" –AlternateEmailAddresses philber@demorms.onmicrosoft.com –Password "Pass@word1" –PasswordNeverExpires $true –ForceChangePassword $false
Close the Windows PowerShell command prompt.
Follow the installation step described in Section § Installing the Rights Management connector earlier in this document.
In the page, ensure that Launch connector administration console to authorize servers is checked and click Finish . The Rights Management connector administration tool opens up.
Installing the Microsoft Rights Management administration module for Windows PowerShell on EDGE1
As previously outlined, the Microsoft Rights Management administration module provides a set of Windows PowerShell cmdlets that provide administrative (advanced) capabilities for the Azure Rights Management service.
To connect Windows PowerShell to the Azure Rights Management service, proceed with the following steps:
Download the Microsoft Rights Management Administration Tool (WindowsAzureADRightsManagementAdministration.msi ) from http://go.microsoft.com/fwlink/?LinkId=314106 .
Important note Unlike the administration package available in the link Windows Azure AD Rights Management administration module for Windows PowerShell , this new version of the package not only enables to configure the Azure Rights Management service tenant and manage usage logging, but also enable to configure and manage the Rights Management connector, which allows Exchange and SharePoint Server to use the Azure Rights Management service.
Double-click the file WindowsAzureADRightsManagementAdministration.msi . A Microsoft Rights Management Administration Setup wizard opens up.
On the Welcome page, select the Next option.
On the End-User License Agreement page, select I accept the terms in the License Agreement and click Next .
On the Ready to Install page, click Install . An User Account Control dialog pops up.
Click Yes .
On the completion page, click Finish .
The cmdlets of the Microsoft Rights Management administration module for Windows PowerShell will be used later in this document with for getting the current configuration of the Azure Rights Management service.
Connecting Windows PowerShell to the Azure Rights Management service
To connect Windows PowerShell to the Azure Rights Management service, proceed with the following steps:
Open an elevated Windows PowerShell command prompt.
Then import the module and connect to the Azure Rights Management service for your Office 365 Enterprise tenant by typing the following commands:
PS C:\Windows\system32> Import-Module AADRM
You will be prompted for your credentials.
Enter your Office 365 Enterprise credentials (the set of credentials should have Global Administrator privilege) and wait to be authenticated. In the Windows PowerShell Credential Request window that opens up, provide the credentials for the Office 365 Enterprise global administrator account such as:
Username: _philber@demorms.onmicrosoft.com
Password: ****************
Note By default, global administrators are able connect to the Azure Rights Management service.
PS C:\Windows\system32> Connect-AadrmService –Verbose
In the step 2, you can also create a PSCredential object by using a script or by using the Get-Credential cmdlet. You can then set the Credential parameter to the PSCredential object.
The following example shows how to create credentials.
PS C:\Windows\system32> $Cred = Get-Credential "philber@demorms.onmicrosoft.com "
The following shows how to set the Credential parameter to these credentials.
PS C:\Windows\system32> Connect-AadrmService –Verbose -Credential $Cred
If the acting credentials do not have tenant-level permission to perform the task, the Azure Rights Management service returns a terminating error.
Once connected, the Microsoft Rights Management administration module provides a set of Windows PowerShell cmdlets that provide administrative (advanced) capabilities for the Azure Rights Management service as illustrated hereafter.
Note For additional information, see the online help topics Administering rights management and Known Issues for Windows Azure AD Rights Management .
Authorizing the EX1 Exchange server to use the connector on EDGE1
To authorize the EX1 Exchange server to use the Rights Management connector, proceed with the following steps:
Whilst still being connected as CORP-CONTOSO\User1 on EDGE1 with the Rights Management connector administration tool dialog opened from the previous step, click Add .
Scroll down the Role combo box and select Exchange Server .
Click Browse… . A Select User, Computer, Service Account, or Group dialog appears.
Type "Exchange Servers " in Enter the object name to select (examples): , click Check Names , The name should resolve. Click OK . This closes the dialog.
Click OK .
Authorizing the SP1 SharePoint server to use the Rights Management connector on EDGE1
To authorize the SP1 SharePoint server to use the Rights Management connector, proceed with the following steps:
On DC1, log on as the domain administrator CORP-CONTOSO\User1.
Launch Server Manager .
Click Tools and then Active Directory Users and Computers . The Active Directory Users and Computers MMC snap-in appears.
Right-click corp-contoso.com , select New , and then select Organizational Unit . A New Object –Organizational Unit dialog appears.
Type "Microsoft SharePoint Security Groups " and click OK .
Right-click the newly created OU, select New , and then select Group . A New Object –Organizational Unit dialog appears.
Type "SharePoint Servers " in Group name and click OK .
Right-click the newly created group and select Properties . A Properties dialog appears.
Select the Members tab.
Click Add… A Select Users, Contacts, Computers, Services Accounts, or … dialog appears.
Type "SPFarmAdmin; SQL Server Database Engine " in Enter the object name to select (examples): and click Check Names . The names should correctly resolve,
Click OK twice.
Close the MMC snap-in.
On SP1, log on as the domain administrator CORP-CONTOSO\User1 and restart the machine.
On EDGE1, log on as the domain administrator CORP-CONTOSO\User1.
Double-click the Microsoft RMS connector administration tool shortcut on the desktop. The Rights Management connector administration tool dialog opens up.
Enter your Azure Active Directory/Office 365 Enterprise credentials (the set of credentials should have Global Administrator privilege) and click Sign in . Provide the credentials for the Office 365 Enterprise global administrator account such as:
Username: _philber@demorms.onmicrosoft.com
Password: ****************
Click Add . An Allow a server to utilize the connector dialog appears.
Scroll down the Role combo box and select SharePoint Server .
Click Browse… . A Select User, Computer, Service Account, or Group dialog appears.
Type "SharePoint Servers " in Enter the object name to select (examples): , click Check Names . The name should resolve. Click OK . This closes the dialog.
Click OK .
Click Close .
Configuring Exchange Server 2013 to use the Rights Management connector
As previously mentioned, the Exchange 2013 Cumulative Update 3 (CU3) constitutes a prerequisite for Exchange Server 2013 to work with the Rights Management connector.
Setting the Windows PowerShell execution policy
To prevent installation issues with the Exchange 2013 Cumulative Update 3 (CU3), you should ensure that the Windows PowerShell Script execution policy is set to Unrestricted on the EX1 machine.
Note For more information, see the Microsoft TechNet article Running Scripts .
To verify the policy settings on EX1, proceed with the following steps:
Open an elevated Windows PowerShell command prompt and run the following command:
PS C:\Windows\system32> Get-ExecutionPolicy
If the policies are NOT set to Unrestricted you should use the resolution steps in article 981474 You receive error 1603 when you try to install the Exchange Server 2010 RU1 to adjust the settings.
Installing the Exchange 2013 Cumulative Update 3 (CU3)
To apply the Exchange 2013 CU3, proceed with the following steps:
Open a browsing session and navigate to the page Cumulative Update 3 for Exchange Server 2013 (KB2892464) on the Microsoft Download Center.
Click Download on this page to start the download.
Click Run to execute the program (Exchange2013-x64-cu3.exe ) once downloaded.
Once downloaded, the executable archive file is verified and a Choose Directory For Extracted Files dialog appears.
Replace the C:\ path by typing "C:\CU3 " instead and click Ok . The files of the Exchange 2013 CU3 are then extracted from the executable archive. Once the extraction completed, an Extraction Complete dialog opens up.
Click OK and navigate to the C:\CU3 folder, right-click the setup.exe and select Run as administrator . An User Account Control dialog pops up.
Click Yes . A MICROSOFT EXCHANGE SERVER 2012 CUMULATIVE UPDATE 3 SETUP appears.
Since EX1 doesn't have an Internet connectivity, select Don't check for updates right now . This isn't recommend for production environment. Click Next .
The various files are copied and the setup initializes.
In the Upgrade page, click Next .
In the Licenses Agreement page, click I accept the terms in the license agreement , and then click Next .
Click Install .
Do no pay attention to the warning since EX1 doesn't have Internet connectivity. Click Install . Once completed the 17 steps required for applying the CU3, the Setup Completed page appears.
Click Finish .
Restart EX1 to complete the setup.
Enabling IRM capabilities on Exchange Server
Getting the URLs of the Azure Rights Management service
To get the URLs of the Azure Rights Management service, proceed with the following steps:
On EDGE1, log on as the domain administrator CORP-CONTOSO\User1.
Connecting Windows PowerShell to Azure Rights Management service as per Section § Connecting Windows PowerShell to the Azure Rights Management service earlier in this document.
View the current configuration for the tenant by running Get-AadrmConfiguration cmdlet:
PS C:\Windows\system32> Get-AadrmConfiguration
PS C:\Windows\system32> Get-AadrmConfiguration
BPOSId : ddfe7f3c-34a2-40c9-a84b-3e2576d6aa94
LicensingIntranetDistributionPointUrl : https://3599e415-dcde-4c14-ba31-765d543c5f25.rms.eu.aadrm.com/\_wmcs/licensing https://3599e415-dcde-4c14-ba31-765d543c5f25.rms.eu.aadrm.com/\_wmcs/licensing https://3599e415-dcde-4c14-ba31-765d543c5f25.rms.eu.aadrm.com/\_wmcs/certification https://3599e415-dcde-4c14-ba31-765d543c5f25.rms.eu.aadrm.com/\_wmcs/certification
AdminConnectionUrl : https://admin.eu.aadrm.com/admin/admin.svc/Tenants/3599e415-dcde-4c14-ba31-765d543c5f25 S-1-5-21-3329035506-405825422-4103004664-1126@3599e415-dcde-4c14-ba31-765d543c5f25.rms.eu.aadrm.com }
Considering the above output, our organization's Azure Rights Management service URL is in our configuration 3599e415-dcde-4c14-ba31-765d543c5f25.rms.eu.aadrm.com . This value will serve for the configuration of the registry settings on EX1 to configure Exchange to use the Azure Rights Management service, but redirect it to talk through the Rights Management connector whenever is has to communicate with the Azure Rights Management service.
As already outlined, and beyond the GUID that relates to our tenant, for regions outside the European Union, .eu . will be replaced in the above Urls by .na . for North America, or .ap . for Asia.
Close the connection with the Azure Rights Management service.
PS C:\Windows\system32> Disconnect-AadrmService
Close the Windows PowerShell command prompt.
Setting URLs manually in the EX1 Registry
Considering both our Azure Rights Management service configuration and the current setup of the Rights Management connector on EDGE1, the following registry setting must be set on EX1 to configure Exchange Server to use the Azure Rights Management service, but redirect it to talk through the Rights Management connector whenever is has to communicate with the Azure Rights Management service:
HKLM\Software\Microsoft\MSDRM\ServiceLocation\Activationhttps://3599e415-dcde-4c14-ba31-765d543c5f25.rms.eu.aadrm.com/\_wmcs/certification
HKLM\Software\Microsoft\MSDRM\ServiceLocation\EnterprisePublishinghttps://3599e415-dcde-4c14-ba31-765d543c5f25.rms.eu.aadrm.com/\_wmcs/Licensing https://3599e415-dcde-4c14-ba31-765d543c5f25.rms.eu.aadrm.com/\_wmcs/certification " = "http://edge1.corp-contoso.com/\_wmcs/certification "https://3599e415-dcde-4c14-ba31-765d543c5f25.rms.eu.aadrm.com/\_wmcs/licensing " = "http://edge1.corp-contoso.com/\_wmcs/licensing "
To set these registry settings, proceed with the following steps:
On EX1, open an elevated Windows PowerShell command prompt, and, at the command prompt, run the following command to create the first registry value:
PS C:\Windows\system32>REG ADD HKLM\Software\Microsoft\MSDRM\ServiceLocation\Activation /t Reg_SZ /d https://3599e415-dcde-4c14-ba31-765d543c5f25.rms.eu.aadrm.com/\_wmcs/certification
Run the following command to create the second one:
PS C:\Windows\system32>REG ADD HKLM\Software\Microsoft\MSDRM\ServiceLocation\EnterprisePublishing /t Reg_SZ /d https://3599e415-dcde-4c14-ba31-765d543c5f25.rms.eu.aadrm.com/_wmcs/Licensing
Run the following command to create the third one:
PS C:\Windows\system32>REG ADD HKLM\SOFTWARE\Microsoft\ExchangeServer\v15\IRM\CertificationServerRedirection /v https://3599e415-dcde-4c14-ba31-765d543c5f25.rms.eu.aadrm.com/\_wmcs/certification /d "http://edge1.corp-contoso.com/\_wmcs/certification "
Run the following command to create the fourth one:
PS C:\Windows\system32>REG ADD HKLM\SOFTWARE\Microsoft\ExchangeServer\v15\IRM\LicenseServerRedirection /v https://3599e415-dcde-4c14-ba31-765d543c5f25.rms.eu.aadrm.com/\_wmcs/licensing /d http://edge1.corp-contoso.com/_wmcs/licensing
Close the Windows PowerShell command prompt.
The RMS connector server configuration can ease the configuration of the above settings.
Setting URLs in the EX1 Registry with the RMS connector server configuration tool
To set the registry settings with the RMS connector Configuration tool, proceed with the following steps:
On EX1, open an elevated Windows PowerShell command prompt, and, navigate to the folder where the RMS Connector configuration tool has been download, for example "C:\RMS connector server configuration tool " in our configuration.
Run the following command to set the Exchange Server 2013 configuration:
PS C:\RMS connector server configuration tool> .\GenConnectorConfig.ps1 –ConnectorUri http://edge1-corp-contoso.com –SetExchange2013
Close the Windows PowerShell command prompt.
Enabling IRM capabilities on EX1
To test the IRM configuration, proceed with the following command:
From the Start screen, click Exchange Management Shell . An eponym Exchange Management Shell command prompt appears.
When the prompt [PS] C:\Windows\system32> appears, run the following command:
PS C:\Windows\system32> Set-IRMConfiguration –InternalLicensingEnabled $true
With this configuration change (which is immediate) users should then be able to use the rights policy templates from any Rights Management client.
Optionally, test the configuration using the following command:
PS C:\Windows\system32> Test-IRMConfiguration –sender chris@corp-contoso.com
Once IRM enabled, the related Xrml licenses and certificated are located under C:\Users\All Users\Microsoft\DRM\Server\S-1-5-18\ .
The IRM logs are enabled by default on Exchange Server 2013. The related files are located under %ExchangeInstallPath%Logging\IRMLogs .
Testing IRM capabilities on EX1
Configuring transport rules
In Exchange Server 2013, transport rules provide some mail flow control capabilities for administrators. The basic goal, when creating a transport rule, is to have Exchange Server inspect e-mail messages sent to and received by the users of the tenant and process actions against that e-mail message based on conditions. These rules can help administrators mitigate security and compliance risks in their organization. For example, transport rules are commonly used by administrators in order to apply a legal disclaimer on each e-mail message leaving their organization.
Transport rules use a set of conditions, actions, and exceptions:
Conditions identify specific criteria such as sender, receiver and keywords within an e-mail message and determines why the rule is triggered;
Actions are applied to e-mail messages that match these conditions;
Exceptions identify e-mail messages to which a transport rule action shouldn't be applied, even if the message matches a transport rule condition.
Along with the standard list of conditions that can be applied to all rules, administrators can set up transport rules that automatically apply IRM-protection to e-mail messages in transit (including Microsoft Office Word, Excel, PowerPoint, and XPS attachments).
For example, you can create a transport rule that automatically protects any e-mail message sent to the "Legal Department " (represented by a distribution group - DG) in you organization, with a "Company - Confidential View Only " rights policy. With such a configuration any message sent to a member of the "Legal Department " group, will be automatically protected by Exchange Server 2013 with the "Company - Confidential View Only " rights policy template. When such a template will be applied, the e-mail message could not be replied to, forwarded, or copied when it is received by a member of the distribution group.
Information workers exchange sensitive information such as financial reports and data, customer and employee information, and confidential product information and specifications, by e-mail every day. Users can protect e-mail messages content in Outlook 2013 or in Outlook Web App (OWA) by applying a rights policy template.
However, when left to the discretion of users, e-mail messages may be sent in clear text without applying any IRM protection. Transport rules can help protect against information leakage by having tenant administrators defining IRM-protection enforcement based on a set of conditions. Outlook protection rules represent another way to help protect against this type of information leakage.
To create a transport rule to help protect against information leakage, proceed with the following steps on EX1:
From a Web browser, open the Exchange Administration Center (EAC) at https://ex1/ecp/ .
Sign in as CORP-CONTOSO\User1. Click sign in .
Select mail flow in the left pane and click rules .
Click + and Create a new rule… to create a new rule. You can alternatively select in our context Apply rights protection to messages…
A new rule dialog appears.
In *Apply this rule if… , select The recipient... and then is this person. A Select Members Web dialog appears.
Select Chris Ashton , and then click add- > , and then ok .
In *Do the following… , click Select one… A select RMS template dialog appears.
Select the RMS template that will be applied as part of this new transport rule (, and then click ok . You can select for example the "Company – Confidential View Only " template, "Demorms – Confidential View Only " in our Azure Rights Management service tenant.
Click save .
When the transport rule is in place, users of the given selection (in our example: Chris Ashton (CORP-CONTOSO\Chris)) are getting all their messages enforced by an IRM-Protection policy template. The IRM template itself will define which persistent protection will be applied to the messages and will define whether they could viewed, copied, forwarded, printed, etc.
Configuring Data Loss Prevention (DLP) policies
Leakage or loss of data through email represents a growing risk and concern for many organizations today – because of regulations, breaches of trust or loss of business critical information.
In such a context, organizations must ensure that data is properly handled during regular business processes, preventing inappropriate access or sharing. They must consequently must organize their content and classify it to assign retention and access controls as part of their compliance practice. Current classification systems place enormous responsibility on the user and can interfere with their ability to complete their job.
Exchange Server 2013 approach to the problem is different and provides a range controls that can detect sensitive data in email before it is sent and automatically block, hold, notify the sender or apply usage rights restriction. This corresponds to the Data Loss Prevention (DLP) feature which is the ability to identify, monitor, and protect sensitive data through deep content analysis.
DLP can help organizations reduce unintentional disclosure of sensitive data. It is designed to help organizations meet specific regulations or security objectives by finding and protecting sensitive data. DLP content holds data type definitions to locate regulatory and/or sensitive content, and defines the policy objectives to meet regulatory controls for identified content. The actual classification of documents in DLP is achieved through content analysis.
Transport rules covered in the previous section have been updated in Exchange Server 2013 to support creating rules that accompany and enforce DLP policies. In fact, DLP policies define the different types of projects through the organization.
Built-in templates for a DLP policy based on regulatory standards such as Personally Identifiable Information (PII) and Payment Card Industry Data Security Standard (PCI-DSS) are offered as illustrated hereafter:
This set of DLP policies is extensible to support other policies important to your business. Corporate administrators can easily create DLP policies in the Exchange Administration Center. For example, a DLP policy built for a financial institution would take action on email that includes credit card information.
Fundamentally a DLP policy is an .xml document (can think of it as a block of configuration) that will determine what content it should be detecting and what is the response (action) when that content is detected.
A DLP policy can include rules, actions, and exceptions, and uses the full power of Exchange Server transport rules.
Upon identifying sensitive information, DLP can automatically take action such as applying IRM protection, appending a disclaimer, generating an audit log, sending the message for moderation, or preventing a message from being sent.
The latest release of Exchange Server 2013 Service Pack 1 (SP1) adds Document Fingerprinting, which helps you detect sensitive information in standard forms that are used throughout the organization.
Note For more information about document fingerprinting, see the Microsoft TechNet article Document Fingerprinting .
Document Fingerprinting is a DLP feature that converts a standard form into a sensitive information type, which you can use to define transport rules and DLP policies. For example, you can create a document fingerprint based on a blank patent template and then create a DLP policy that detects and blocks all outgoing patent templates with sensitive content filled in.
As far as the forms are concerned, Document Fingerprinting supports the same file types as the ones that are supported in transport rules.
Note For more information about the supported file types, see the Microsoft TechNet article same File Types That Are Supported In Transport Rules .
DLP works with a new feature called Policy Tips that informs users of a potential policy violation before it occurs. Policy Tips help educate users about what sensitive data has been found in the email and can educate them about related company policies. This ongoing education helps users manage data appropriately and avoid sending sensitive data to unauthorized users.
Note For more information, see the online help article Policy Tips .
To create a custom DLP policy from scratch, proceed with the following steps:
In the Exchange Administration Center (EAC), navigate to compliance management and click data loss prevention .
Click the arrow that is beside the + icon, and select New custom DLP policy .
If you click + instead of the arrow, you will create a new policy based on a DLP policy template (as illustrated above).
On the New custom DLP policy page, complete the following fields:
Name : add a name that will distinguish this custom DLP policy from others, for example "Company Confidential DLP Policy ". This field is required.
Description : add an optional description that summarizes this custom DLP policy. This field is optional.
Choose a mode for the requirements in this DLP policy : select the mode for this custom DLP policy, for example Test DLP Policy without Policy Tips . The new DLP policy is not fully enabled until you specify that it should be. The default mode for a policy is test without notifications.
Click save to finish creating the new DLP policy reference information. The DLP policy is added to the list of all DLP policies that you have configured, although there are not yet any rules or actions associated with this new custom policy.
Double-click the DLP policy that you just created. An edit DLP policy dialog appears.
On the Company Confidential DLP Policy page, click rules on the left end side.
Click + and Create a new rule to add a new blank rule.
A New Rule dialog appears. You can establish conditions using all the traditional transport rules in addition to the sensitive information types defined in Exchange Online.
In the Name field, give the new rule a name. In order to avoid confusion, supply a unique name for each part of your DLP policy or rule.
In *Apply this rule if… , select The recipient is... A Select Members Web dialog appears. In that dialog box, select a user or a distribution group, then click add- > , and then ok .
Click More options to add additional conditions and actions for this rule including time-bound limits of enforcement or effects on other rules in this policy.
In *Do the following… , select Secure the message with... and rights protection . This automatically applies IRM protection and gives the option of the rights policy templates.A select RMS template dialog appears.
Select the RMS template that will be applied as part of this new transport rule, and then click ok . You can select for example the "Company – Confidential View Only " template, "Demorms – Confidential View Only " in our tenant.
Click Save to finish modifying the policy and save your changes.
Clickok .
Back to the edit DLP policy dialog, click save .
As shortly illustrated, the new DLP technology is a sophisticated system built into Exchange Server 2013 for helping users work with sensitive data safely and efficiently. It provides a rich framework on the kinds of policies you can construct for your organization.
Note For more information, see the online help topic Data Loss Prevention .
The DLP technology is part of the compliance management features provided Exchange Server 2013. In terms of compliancy, we would like to take this paper to shortly describe the InPlace eDiscovery & Hold feature.
Note For more information, see the online help topic Messaging Policy and Compliance .
Leveraging the InPlace eDiscovery & Hold feature
With the explosive growth compliance requirements both inside and outside organizations, compliance has become everyone's responsibility. Neither the IT department nor the legal and compliance departments can keep tabs on all of the information that is exchanged in the ordinary course of business. Organizations need tools that enable self-service and automated compliance wherever possible. Enabling legal teams to search, hold and export the right information without intervention from IT is cost saving for the organization.
This is the role devoted to E-discovery:
_"E-discovery is the identification, preservation, collection, preparation, review and production of electronically stored information associated with legal and government proceedings"
Gartner Says E-Discovery Software Marketplace is Set to Continue High-Growth Pace
Exchange Server 2013 is built with an integrated E-discovery solution, through the InPlace eDiscovery & Hold feature and the eDiscovery Center across Exchange Server 2013, SharePoint Server 2013, and Lync Server 2013 that address pre-processing stages of E-discovery, including information management, identification, preservation, and collection.
Note For more information, see the Electronic Discovery Reference Model (EDRM) , a set of guidelines and processes for conducting eDiscovery for customers and providers, and was developed by a group of industry experts in a number of working projects. EDRM focuses on reducing the cost and complexity of eDiscovery through the development of standards such as EDRM XML to attempt to provide a clear and repeatable process.
Thanks to this solution, compliance officers can perform the discovery process in-place; data is not duplicated into separate repositories. As such, tools operate on data where it lives, and preserve minimum amount of data needed. Since content is held in-place, teams can respond quickly by accessing data in its native format (without any loss of fidelity often associated with copying data to separate archives). Then, teams have an easy way to package the result by exporting it according to the EDRM XML specification so that it can be imported for example into a review tool.
In order to be able to decrypt any rights protected content within an organization, compliance officers must be added as super user in Azure Rights Management service.
Such a capability resonates with the site mailbox, another new feature of Exchange Server 2013. A site mailbox is a shared inbox in Exchange Server 2013 that all the members of a SharePoint Server 2013 site, i.e. the individuals listed in the Owners and Members groups of the site (security groups or distribution lists are not supported) can access. It's accessible from the site in which it is created. The e-mail address of the site mailbox is generated automatically from the name of the site.
With site mailboxes, Exchange Server 2013 works with SharePoint Server 2013 to give users more ways to collaborate while keeping data safe.
To support such an integrated scenario, the servers must be able to request resources from each other in a secure way. This leverages the Server-to-server authentication, a new feature of Exchange Server 2013, SharePoint Server 2013, and Lync Server 2013 that allows a server to request resources of another server on behalf of a user. This feature uses the industry standard Open Authorization (OAuth) 2.0 protocol (see Section § Configuring integration between EX1, LYNC1, and SP1).
Beyond the site itself, site mailboxes are surfaced in Outlook 2013 and give you easy access to the email and documents for the projects you care about. It's listed in the Folder Explorer in Outlook 2013, letting you file emails or documents into the shared project space simply by dragging the email, document, or attachment into the site mailbox. (Site mailboxes are not available in Outlook Web App (OWA))
Users view site mailbox emails just as they would any other Exchange message, while SharePoint Server 2013 enables versioning and coauthoring of documents.
Note For more information, see the blog post Site Mailboxes in the new Office .
In the context of this paper, site mailboxes can be searched using the Exchange eDiscovery Center where the built-in eDiscovery functionality makes it easy to find needed information across held, archived, and current e-mail messages. As a consequence, e-mail messages and documents stored in site mailboxes can be put on legal hold. Additionally, site mailboxes adhere to the lifecycle policies applied to the SharePoint Server 2013 site with which they are associated, enabling automated retention and archiving of the entire site mailbox. Site mailboxes allow users to naturally work together – while compliance policies are applied behind the scenes.
In tandem with SharePoint Server 2013, organizations can search e-mail message, instant messages, calendars, and contacts, as well as SharePoint documents, sites, file shares, blogs, wikis, and more, all from the eDiscovery Center.
Configuring SharePoint Server 2013 to use the Rights Management connector
Starting with SharePoint Server 2010, a SharePoint server includes IRM feature support using AD RMS.
Note For additional information, see the Microsoft TechNet articles Plan Information Rights Management (SharePoint Server 2010) and Configure Information Rights Management (SharePoint Server 2010) .
This section describes how to configure the SP1 SharePoint server with the Rights Management connector deployed on the EDGE1 computer to benefit from the Azure Rights Management service protection and how to enable and use IRM settings on the SharePoint document library of the deployed Contoso Corporation Team Site at http://sp1/
Installing the MSIPC 2.1 client
As previously noticed, a SharePoint server must be running the latest version of the MSIPC client 2.1.
To install the MSIPC client 2.1 on the SP1 machine, proceed with the following steps:
Log on as the domain administrator CORP-CONTOSO\User1 on the EDGE1 computer.
Open a browser session and navigate to the following link: Active Directory Rights Management Services SDK 2.1 and click Download .
In the Choose the download you want page, check Setup_sdk_x64.exe and click Next .
Click Save .
Copy the downloaded file Setup_sdk_x64.exe to \\SP1\C$ .
Now log on as the domain administrator CORP-CONTOSO\User1 on the SP1 computer and from a Windows Explorer windows, double-click the copied file Setup_sdk_x64.exe . A User Account Control dialog opens up.
Click Yes . The Active Directory Rights Management Services SDK 2.1 Setup wizard opens up.
Click Next .
On the End-User License Agreement page, select I accept the terms in the License Agreement and click Install .
On the Destination Folder page, keep the default folder and click Next .
Click Install .
Once completed, click Finish . This launches the Active Directory Rights Management Services Client 2.1 Setup wizard.
Click Next .
On the End-User License Agreement page, select I accept the terms in the License Agreement and then click Next .
Select I don't want to use Microsoft Update since the SP1 machine in the test lab environment doesn't have Internet connectivity. This setting isn't recommended for a production environment. Click Next .
Click Install .
Once completed, click Finish .
The right version of MSIPC.dll (under C:\Program Files\Active Directory Management Services Client 2.1 ) should show, in the msipc.dll Properties dialog, version 1.0.622.34:
To finalize the setup, considering both our Azure Rights Management service configuration and the current setup of the Rights Management connector on EDGE1, the following registry key must be must be set on SP1 to configure SharePoint Server to use the Azure Rights Management service, but redirect it to talk through the Rights Management connector whenever is has to communicate with the Azure Rights Management service:
HKLM\SOFTWARE\Microsoft\MSIPC\ServiceLocation\LicensingRedirectionhttps://3599e415-dcde-4c14-ba31-765d543c5f25.rms.eu.aadrm.com/\_wmcs/licensing"="http://edge1.corp-contoso.com/\_wmcs/licensing "
Note As per Section § Getting the URLs of the Azure Rights Management service, our organization's Azure Rights Management service URL is in our configuration 3599e415-dcde-4c14-ba31-765d543c5f25.rms.eu.aadrm.com . This value serves for the configuration of the second registry setting on SP1 to configure SharePoint Server to use Azure Rights Management service, but redirect it to talk through the Rights Management connector whenever is has to communicate with the Azure Rights Management service. As already outlined, and beyond the GUID that relates to our tenant, for regions outside the European Union, .eu. will be replaced in the above Urls by .na. for North America, or .ap. for Asia
To manually set these registry settings, proceed with the following steps:
On SP1, open an elevated Windows PowerShell command prompt, and, at the command prompt, run the following command to create the registry above setting:
PS C:\Windows\system32>REG ADD HKLM\SOFTWARE\Microsoft\MSIPC\ServiceLocation\LicensingRedirection /v https://3599e415-dcde-4c14-ba31-765d543c5f25.rms.eu.aadrm.com/\_wmcs/licensing /d "http://edge1.corp-contoso.com/\_wmcs/licensing "
Close the Windows PowerShell command prompt.
To set these registry settings with the RMS connector Configuration tool, proceed with the following steps:
On SP1, open an elevated Windows PowerShell command prompt, and, navigate to the folder where the RMS Connector configuration tool has been download, for example "C:\RMS connector server configuration tool " in our configuration.
Run the following command to set the SharePoint Server 2013 configuration:
PS C:\RMS connector server configuration tool> .\GenConnectorConfig.ps1 –ConnectorUri http://edge1-corp-contoso.com –SetSharePoint2013
Close the Windows PowerShell command prompt.
Enabling IRM capabilities on SharePoint Server 2013
To enable the SP1 SharePoint server to use the Azure Rights Management service via the Rights Management connector, proceed with the following steps:
Press the WINDOWS key. From the Start screen, click SharePoint 2013 Central Administration .
A User Account Control dialog appears. Click Yes .
Click Security under Central Administration on the left side.
In the Security page, click Configure information rights management under Information policy .
In the Information Rights Management page, select Use this RMS server , type "http://edge1.corp-contoso.com OK . You should come back to the Security page.
Once IRM enabled, the related Xrml licenses and certificated are located under C:\Users\All Users\Microsoft\MSIPC\Server .
After IRM is enabled for the SharePoint server, IRM settings can be applied on SharePoint document libraries.
Settings on libraries are a superset of the capabilities that were available in SharePoint 2010 especially around granular control on the usage rights and introduction of group protection.
Group protection feature provide library owners the ability to specify an e-mail-enabled group who can protect the documents downloaded from the library. This enables collaboration scenarios out-of-SharePoint for members of a given distribution group.
In addition, rights managed document libraries provide read-only Web access support and provide collaboration scenarios across organizations (tenants).
To configure IRM settings on the SharePoint document library of the Contoso Corporation Team Site at http://sp1/
Open a browser session and navigate to http://sp1 /. The Contoso Corporation Team Site shows up.
Click Documents .
From the document library page, click the LIBRARY tab.
Click Settings .
Click Information Rights Management and configure the document library for rights management as illustrated in the next step.
In the Information Rights Management Settings page, configure IRM settings to enforce the IRM-Protection on documents when downloading them.
Click Restrict permissions on this library on download ,
Enter a permissions policy title, for example "Contoso FTE Policy ".
Enter a permission policy description, for example "Applies to all Contoso FTE ".
And then click SHOW OPTIONS .
Clicking SHOW OPTIONS will show the rest of the setting fields, which includes all advanced settings as illustrated hereafter.
As far as the latter is concerned, library administrators can check the Prevent opening documents in the browser for this document library box to prevent Office Web Apps from showing the content.
Furthermore, whenever a document is downloaded from a rights managed document library, by default each supported file type is encrypted and rights are restricted to the authenticated user who downloaded the documents. Other users who have rights to the same library must get their own copy.
The Allow group protection box enables to protect, as its name indicates, a library for a group. Library administrators can specify an Active Directory e-mail-enabled group and use it to stamp the usage license for the file. Then, documents that are downloaded can be used by all the members of the group, and the user who downloaded the copy can transfer the copy to any member of the group directly.
Set the above appropriate settings, and then click OK .
Testing IRM capabilities with the Rights Management connector
Updating CLIENT1 and CLIENT2
Before testing the IRM configuration, both CLIENT1 and CLIENT2 need to be updated.
On CLIENT1, proceed with the following steps:
Log on as the domain administrator CORP-CONTOSO\User1
Install the Microsoft Online Services Sign-In Assistant (MOS SIA) 7.0:
Open a browser session and navigate to the following link: Microsoft Online Services Sign-In Assistant for IT Professionals RTW and click Download .
In the Choose the download you want page, check msoidcli_32bit.msi and click Next .
Click Run . The Microsoft Online Services Sign-in Assistant Setup wizard opens. Follow the instructions to complete the installation as previously illustrated.
Install the MSIPC client 2.1:
From a browser session, navigate to the following link: Active Directory Rights Management Services SDK 2.1 and click Download . In the Choose the download you want page, check Setup_sdk_x86.exe and click Next .
Click Run . The Active Directory Rights Management Services SDK 2.1 Setup wizard opens up. Follow the instructions to complete the installation as previously illustrated.
The right version of MSIPC.dll (under C:\Program Files\Active Directory Management Services Client 2.1 ) should show, in the msipc.dll Properties dialog, version 1.0.622.34:
Open an command prompt and type the following command:
C:\Users\User1.CORP-CONTOSO> Copy \\EDGE1\C$\ADFSSelfSigned.cer .\Desktop
From the desktop, double-click the file ADFSSelfSigned.cer . An Open File – Security Warning dialog pops up.
Click Open . A Certificate dialog appears.
Click Install Certificate… A Certificate Import Wizard dialog appears.
Select Local Machine and click Next . An User Account Control dialog pops up.
Click Yes .
Select Place all certificates in the following store and click Browse.. . A Select Certificate Store dialog pops up.
Select Trusted Root Certificate Authorities and click OK .
Click Next .
Click Finish . A Certificate Import Wizard dialog pops up.
Click OK twice.
Sign out.
Repeat all the above steps on CLIENT2.
Configuring Office Professional 2013 on CLIENT1 and CLIENT2
On CLIENT1, proceed with the following steps:
Log on as the user CORP-CONTOSO\Chris.
Launch Outlook 2013. When this is the first Outlook 2013 is launched on the local computer, the Welcome to Microsoft Outlook 2013 wizard starts and you will be prompted to setup an e-mail account. In that case, you can proceed with that wizard and configure the Exchange e-mail settings to use Exchange Server 2013 in our test lab with the mailbox enabled user CORP-CONTOSO\Chris.
Click Next .
Ensure Yes is selected and click Next .
In the Auto Account Setup page, the mailbox enabled user information should be automatically retrieved. Outlook 2013 is performing a configuration query against the Exchange Server 2013 environment - the proper auto discover DNS record is in place for the CORP-CONTOSO domain - to find the e-mail server setting for that user's mailbox. Click Next .
Click Finish . Outlook 2013 launches.
Select Ask me later and click Accept .
From Outlook 2013, click New Email . A new e-mail window appears. Select the OPTIONS tab in the Office Ribbon, click Permission and then Connect to Rights Management Servers and get templates .
A Microsoft Outlook dialog pops up. The very first time you use the IRM feature, Outlook contacts the Azure Rights Management service to finalize the configuration. the "Do Not Forward ", "Company – Confidential " and "Company – Confidential View Only " templates aren't available until the initial Office IRM client configuration has been completed.
Once the environment is properly configured, the "Do Not Forward ", "Company – Confidential " and "Company – Confidential View Only " templates should appears under Permission .
Close the e-mail window and close Outlook 2013. At this stage, the IRM feature is fully configured to work with the Azure Rights Management service.
Sign out.
Repeat all the above steps whilst being connected as CORP-CONTOSO\Janet.
You can now test the IRM feature with EX1 and SP1 from a user experience perspective.
Note For additional information, please refer to Section § Configuring and using Office 365 ProPlus IRM features in the whitepaper Information Protection and Control (IPC) in Office 365 with Azure Rights Management service .
Testing SharePoint rights managed document libraries
In order to test the SharePoint rights managed document library settings, you can go back to the document library, add a new Word document to the library. You can do that for instance from the CLIENT1 machine logged as CORP-CONTOSO\Chris.
On the CLIENT2, log on as CORP-CONTOSO\Janet. You can then try opening this Word document and verify that the IRM-Protection has properly been applied to the content upon download in Word 2013.
An Active Directory Rights Management Services dialog opens up.
Click OK to continue. The document should now open in Word 2013.
Click **View Permission…
Click OK .
Leveraging the support for PDF in addition to Office formats
SharePoint Server 2013 supports IRM protection of PDF documents. Such a support leverages a Microsoft extension to the existing ISO 32000 international standard , which is based on the Portable Document Format (PDF), version 1.7 developed by Adobe standard .
The extension allows PDF documents to be encrypted by Azure Rights Management service.
In the context of this paper, with such a support, users can upload PDF documents to SharePoint rights managed document libraries (see previous section), and upon download, the files will be protected using Microsoft Office IRM along with Azure Rights Management service via the Rights Management connector.
To use PDF files in libraries that the owner has protected with IRM, the user will need a PDF compatible readers as listed in the article SharePoint-Compatible PDF readers that support Microsoft Information Rights Management services .
Without a compatible PDF reader that implements the extension, the user experience will be as follows when viewing a protected PDF:
As you can see, the user will be invited to download a compatible PDF reader. In terms of compatible PDF readers, one can use for instance the Foxit Enterprise Reader with the RMS PDF Plug-in Module .
This reader leverages the functionalities exposed by the MSIPC Client 2.1. These components result from a major effort to reduce complexity, to streamline the development process of IPC-enlightened applications and solutions_,_ to handle documents of different file types (Office documents, PDF, text, image and others), and to be able to quickly protect and unprotect documents.
From that point, an IRM-protected PDF document is rendered as expected along with the permission information from the SharePoint rights managed document library:
Click Change Permission… to see the granted permissions. A Permission dialog opens up.
The Foxit Enterprise Reader provides tight integration into SharePoint 2013 service to enable instant viewing and collaboration.
This concludes this chapter devoted to the test and the evaluation of the Rights Management connector.
Administering the Rights Management connector
Monitoring the Rights Management connector
The Rights Management connector exposes a set of performance counters that can be leveraged to monitor its activities.
The following table lists the performance counters that are typically used for troubleshooting.
Table 2: Key Rights Management connector's performance counters
Performance Counter
Description
Microsoft Rights Management connector\Authorization Failure
Total individual servers unable to connect through this node due to not finding a match for the requesting service account in the authorization table
Microsoft Rights Management connector\Authorization policy download failures
Total number of failed attempts to download the authorization table
Microsoft Rights Management connector\Authorization Success (group name ):
Total individual servers successfully authenticating to this connector node and for which a match has been found in the authorization table for this group (also includes a _total instance)
Microsoft Rights Management connector\Authorization Success Rate (group )
Number of individual servers successfully authenticating to this connector node and for which a match has been found in the authorization table for this group per second (also includes a _total instance)
Microsoft Rights Management connector\Certification Failed Requests
Total number of Successful single licensing requests
Microsoft Rights Management connector\Certification Failed Requests Rate
Current rate of failed single licensing requests being performed per second
Microsoft Rights Management connector\Certification Successful Requests
Total number of Successful single licensing requests
Microsoft Rights Management connector\Certification Successful Requests Rate
Current rate of failed single licensing requests being performed per second
Microsoft Rights Management connector\Licensing Failed Batched Requests
Total number of failed batched licensing requests
Microsoft Rights Management connector\Licensing Failed Batched Requests Rate
Current rate of failed batched licensing requests being performed per second
Microsoft Rights Management connector\Licensing Failed Single Requests
Current rate of failed single licensing requests being performed per second
Microsoft Rights Management connector\Licensing Failed Single Requests Rate
Total number of failed single licensing requests
Microsoft Rights Management connector\Licensing Successful Batched Requests
Current rate of Successful batched licensing requests being performed per second
Microsoft Rights Management connector\Licensing Successful Batched Request Average Connector Processing Time
Current average connector processing time of successful batched licensing requests, which is the difference between the two previous performance counters
Microsoft Rights Management connector\Licensing Successful Batched Request Average Connector Response Time
Current average connector response time of successful batched licensing requests, from the time the request is received until a response is returned to the caller
Microsoft Rights Management connector\Licensing Successful Batched Request Average Service Response Time
Current average processing time of successful batched licensing requests by the service from the time a request is sent to the service until a response is received
Microsoft Rights Management connector\Licensing Successful Batched Requests Rate
Total number of successful batched licensing requests
Microsoft Rights Management connector\Licensing Successful Single Request Average Connector Processing Time
Current average connector processing time of successful batched licensing requests, which is the difference between the two previous performance counters
Microsoft Rights Management connector\Licensing Successful Single Request Average Connector Response Time
Current average connector response time of successful batched licensing requests, from the time the request is received until a response is returned to the caller
Microsoft Rights Management connector\Licensing Successful Single Request Average Service Response Time
Current average processing time of successful batched licensing requests by the service from the time a request is sent to the service until a response is received
Microsoft Rights Management connector\Licensing Successful Single Requests
Total number of Successful single licensing requests
Microsoft Rights Management connector\Licensing Successful Single Requests Rate
Current rate of Successful single licensing requests being performed per second
Microsoft Rights Management connector\PreLicensing Successful Requests
Total number of successful pre-licensing requests
Microsoft Rights Management connector\PreLicensing Successful Requests Rate
Current rate of successful pre-licensing requests being performed per second
Microsoft Rights Management connector\PreLicensing Failed Requests
Total number of failed pre-licensing requests
Microsoft Rights Management connector\Time since last authorization policy update
Time (in seconds) since the last successful download of the authorization table
Enabling tracing the Rights Management connector
For more difficult to diagnose scenarios, you may want to utilize DebugView to capture internal traces of the product as it responds to server requests.
You can download DebugView from the Windows Sysinternals downloads .
To enable tracing in the Rights Management connector, you need to modify the web.config file for the Default site in IIS. The file contains the following line:
Which needs to be replaced with:
After this, you will need to stop and start IIS to activate tracing with the iisreset command. To disable tracing just reverse this change.
Getting usage logs from the Azure Rights Management service
You can configure the Azure Rights Management service to generate and give you a log of every request that Azure Rights Management service fulfils for your tenant through notably the Rights Management connector, as soon as it happens.
This information is very useful for a variety of reasons:
Analyzing for business insight . The Azure Rights Management service writes logs in W3C Extended Log (Weblog) format into a Windows Azure storage account that you provide for this purpose. You can then feed the logs into a repository of your choice (database, OLAP, Map/Reduce, etc.) in order to analyze and report.
Examples of insight you can gain are: who is accessing your RMS-protected assets, what are they accessing, from what devices, from where, are they getting a satisfactory experience, who all has read a given document etc.
Monitoring for abuse . The Azure Rights Management service shares logs with you in near-realtime (99.9% of logs available to you within 15 minutes of the action). This allows you to continuously monitor usage of your Azure Rights Management service's assets.
You know your employees best and are uniquely qualified to identify an abuse pattern. As an example, your administrators may want to be alerted if there is a spike in accesses to your assets during off hours (insider trying to steal a bunch of documents?), or if the same user accesses from two different IP addresses within 15 minutes (potential password compromise?).
With the Azure Rights Management service's architecture, your documents can flow any way you want (email, cloud storage such as Dropbox, USB, etc.) but recipients must get a license from the Azure Rights Management service to open and consume those documents. Therefore the Azure Rights Management service's logs are a definitive source of information for forensics, as long as your assets are protected with the Azure Rights Management service.
To turn on logging and get these logs, follow the instructions outlined in the whitepaper Get Usage Logs from Azure R ights Management available on the Microsoft Download Center.