
Operations Management Suite (OMS): Custom OMS Solutions
Integration
In this chapter, we will focus on how to extend Operations Management Suite (OMS) Log Analytics by authoring your own custom solutions for applications running in your environments. We will cover the following components which are the building blocks of your custom OMS solutions:
SCOM collection rules for OMS
AzureRM.OperationalInsights PowerShell module
OMS related APIs
- Log Analytics Search API
- HTTP Data Collector API
- OMS Alert API
- Service Map API
OMS View Designer
Azure Resource Providers and ARM templates
SCOM Collection Rules for OMS
When you have connected your System Center Operations Manager (SCOM) management groups to your OMS workspace, a number of management packs are pushed down from OMS to your management group and then distributed to the SCOM agents that are enrolled into OMS. These management packs expose many modules that we can leverage in our own management packs.
Unlike SCOM, OMS does not utilize classes. Therefore, it is not possible to target collection rules to any specific types of computers (i.e. SQL database server, Hyper-V hosts, etc.) natively in OMS. Luckily, since the OMS management pack modules have been made available within SCOM, once we have connected our SCOM management group to OMS, we are able to author custom SCOM data collection rules that send various types of data to OMS.
In the following sections, we will demonstrate how to collect the following types of data from endpoints managed by OMS-connected SCOM management groups:
- Event Data (Type=Event)
- Near Real-Time Performance Data (Type=Perf)
Note: Although it is not possible to target OMS rules to specific classes, once you have connected your SCOM management group to OMS, it is possible to utilize SCOM overrides to fine-tune OMS rules. More details can be found from Cameron Fuller's blog post: http://blogs.catapultsystems.com/cfuller/archive/2015/12/02/changing-how-oms-gathers-performance-information-from-systems-in-operations-manager/
We will also cover the following areas:
- Setting up your authoring environment.
- OMS management pack (MP) module types.
- Authoring for optimal performance by leveraging the SCOM Cookdown feature.
- Creating and collecting custom performance data through the SCOM console.
Let us begin with setting up the authoring environment.
Setting Up the Authoring Environment
The Microsoft Monitoring Agent (MMA), is the agent that SCOM uses to collect monitoring data from Microsoft workloads and the same agent is also used by OMS to collect data from endpoints.
When you have connected your SCOM management groups to OMS, depending on the solutions you have enabled in OMS, a list of MPs will be sent to your SCOM management groups via OMS. These MPs expose many OMS specific management pack elements (e.g. - data source and write action modules) which you can use to develop your own custom solutions for the agents managed by your SCOM management groups.
In this section, we will discuss and demonstrate how to write your own custom SCOM MP workflows that interact with OMS. We will demonstrate how to build different types of MP workflows using Visual Studio 2015 and the Visual Studio Authoring Extension (VSAE). You are also able to download the Visual Studio project, the demo MP and all other source code we have used in this chapter from our GitHub repository at https://github.com/insidemscloud/OMSBookV2 in the \Chapter 17 directory.
If you wish to work through the exercises in this chapter, you will need to install the following software onto your computer:
- Microsoft Visual Studio 2015 Enterprise (Or Professional)
- Visual Studio Authoring Extension v1.2.0.1 (http://www.microsoft.com/en-us/download/details.aspx?id=30169
- SCSM Entity Explorer (https://gallery.technet.microsoft.com/SCSM-Entity-Explorer-68b86bd2
Note: If you do not have a licensed version of Visual Studio 2015
- Professional or Enterprise, you may use the free Visual Studio 2015 Community Edition instead (https://www.visualstudio.com/en-us/downloads/download-visual-studio-vs .
- Please also be aware of the licensing terms for Visual Studio Community Edition. You can find details from this blog post: http://blogs.msdn.com/b/quick_thoughts/archive/2014/11/12/visual-studio-community-2013-free.aspx. The authors of this book are not responsible if you have misused Visual Studio Community edition for commercial purposes.
Before we start, we expect that you are familiar with SCOM MPs and have previous experience in authoring SCOM MPs using VSAE. If you do not have any previous MP authoring experience using VSAE, we strongly recommend that you complete the free online SCOM 2012 R2 MP authoring course from the Microsoft Virtual Academy before continuing with this chapter: https://www.microsoftvirtualacademy.com/en-US/training-courses/system-center-2012-r2-operations-manager-management-pack-8829.
As a prerequisite for VSAE, Microsoft Monitoring Agent (MMA) must also be installed on the authoring computer. You can either install the MMA version that's shipped with SCOM 2012 R2, SCOM 2016 or download it from your OMS portal.
It is also a good idea to export all the OMS-related management packs to unsealed xml format so you are able to read the content of these MPs during the authoring process.
Installing Required Software
Let us start with Visual Studio. For this example, we will assume you will be using Visual Studio 2015 Enterprise Edition. You can simply install Visual Studio 2015 with the default options, as shown in Figure 1.

FIGURE 1. VISUAL STUDIO 2015 ENTERPRISE DEFAULT INSTALLATION OPTIONS
Note: At the time of writing this book, the latest version of the VSAE (version 1.2.0.1) only supports Visual Studio 2012, 2013 and 2015. It does not support Visual Studio 2017. Therefore, we are using Visual Studio 2015 in this chapter.
Next, we will need to install the following components before installing VSAE:
- Microsoft Monitoring Agent (MMA)
- .Net Framework 3.5
Note: In this case, we will download the Microsoft Monitoring Agent installer from the OMS portal and install it on the authoring computer. You may also install the SCOM 2012 SP1/R2 or SCOM 2016 version with the latest Update Rollup.
MMA is required because the MP Simulator within VSAE requires the assemblies that come with MMA. However, once you have installed the MMA on the authoring computer, it is not required to connect this computer to your SCOM management group or OMS workspace. If you use the SCOM console to push the MMA to your authoring computer, the computer will be automatically connected to your SCOM management group. Alternatively, if you do not want to connect the computer to your SCOM management group, you can manually install the agent from SCOM installation media (
For the same reason, .Net Framework 3.5 is also required when you are using the MP Simulator within Visual Studio. Visual Studio will crash when you launch the MP Simulator if .Net Framework 3.5 is not installed.
Note: If you are pushing the agent via the SCOM console, the installed agent will be on the same Update Rollup level as the management group. However, if you manually install the agent from the installation media, it is always a good idea to also install the latest update rollup after the agent installation is complete.
After VSAE is installed, you will see the various SCOM and System Center 2012 R2 Service Manager (SCSM) MP templates when creating new Visual Studio projects, as shown in Figure 2.
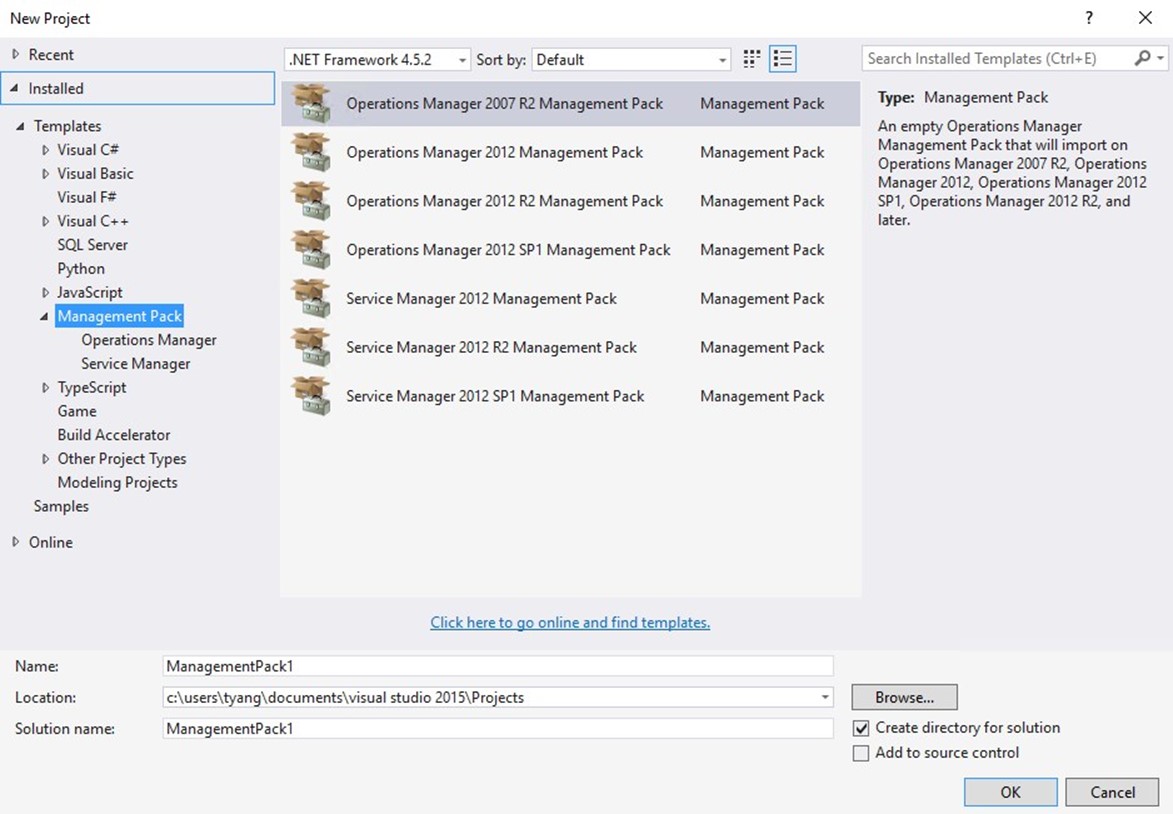
FIGURE 2. NEW VISUAL STUDIO MANAGEMENT PACK PROJECT TEMPLATES
Installing Optional Software
Although it is not required when authoring MPs, we also recommend the following software for your authoring PCs:
Notepad++
In this chapter, we will use Notepad++ to view the unsealed MP XML files. We recommend you install it on your authoring PC as well.
SCSM Entity Explorer
We will also use SCSM Entity Explorer to navigate SCOM monitoring classes (targets for our OMS collection rules). Although it was written primarily for SCSM, it also works with SCOM. There is no need to install it, simply download it from the TechNet Gallery (https://gallery.technet.microsoft.com/SCSM-Entity-Explorer-68b86bd2) and place it on your authoring PC. We will use it later.
MPViewer
MPViewer is a very handy utility when you need to view the content of an MP. You can also use it to unseal a sealed MP or MP bundle to XML files. You can download the latest version 2.2.3 from 6560.MPViewer.2.3.3.zip
SCOM Operations Console
Although it is not required, we also recommend you install the SCOM Operations Console (2012 or 2016 depending on your SCOM version) onto your authoring machine. Having the console installed makes things easier when importing and testing your MPs. It is important that you also patch the console to the same Update Rollup level as your management group.
PowerShell Tools for Visual Studio 2015
As we will be writing PowerShell scripts to be used in the demo MP, we also recommend that you install the PowerShell Tools for Visual Studio 2015. This is a Visual Studio Extension. You can find it within Visual Studio by going to Tools Extensions and Updates, as shown in Figure 3.

FIGURE 3. ACCESSING VISUAL STUDIO EXTENSIONS AND UPDATES
In the Extensions and Updates window, select the "Online" category from the left, and you can find the tools by searching for "PowerShell" in the search box, as shown in Figure 4.

FIGURE 4. INSTALLING POWERSHELL TOOLS FOR VISUAL STUDIO 2015
Collecting Reference Management Packs
When authoring MPs, you will often need to reference elements from other MPs. When this is required, you will need to locate either sealed management packs (.mp files) or management pack bundles (.mpb files) that contain the elements you need to reference and add them into your MP Visual Studio project as references. VSAE ships with many built-in MPs. After the VSAE is installed, you will find these MPs located in "C:\Program Files (x86)\System Center Visual Studio Authoring Extensions\References" folder, as shown in Figure 5.

FIGURE 5. VSAE REFERENCE MANAGEMENT PACKS LOCATION
Since VSAE only comes with the built-in essential MPs for different versions of SCOM and
SCSM, you will not be able to find application-specific MPs in VSAE, such as SQL or SharePoint MPs. Therefore, we recommend that you create another folder on your authoring computer and place all other required reference MPs in this folder. If you are using multiple computers when authoring MPs, using a folder that can be accessed by multiple computers might be a better option (i.e. a network share or OneDrive).
As a rule of thumb when referencing MPs, you should ALWAYS use the minimum required version of the referencing MP. For example, if you are referencing a class or a data source module from MP XYZ, and this class or data source module was defined in version 1.0.0.0 of MP XYZ, but the most recent version of this MP is version 2.0.0.0. In this case, copy version 1.0.0.0 of MP XYZ to your reference folder and add it to your VSAE project as a reference.
This is to ensure your MP will still be compatible with management groups that are still using version 1.0.0.0 of the MP XYZ, and people can import your MP into their management groups without having to update MP XYZ to 2.0.0.0 first. However, in this example, if the version 2.0.0.0 of the MP XYZ has introduced additional properties in the class or contains bug fixes in the modules that you are referencing that would impact your MP, then you must reference the version 2.0.0.0 in your Visual Studio project.
Exporting OMS Related Management Packs
Since we are going to heavily leverage the MP module types from various OMS-related MPs, it is a good idea to export them to unsealed MPs (in XML files) so we can read their content.
Additionally, since at the time of this writing, Microsoft has not made the sealed version of these MPs available for download, we are unable to reference them in our management pack projects. We will demonstrate a workaround later in this chapter, but for now, even if you are not interested in reading the content of these OMS MPs, export them as we will need to use them later.
Because we are not able to export sealed MPs directly from the SCOM console, we will have to use the SCOM PowerShell module to export them.
To export the OMS related MPs from your SCOM management group, please run the following commands from your SCOM PowerShell console:
Get-SCOMManagementPack -Name "*Advisor*" | Export-SCOMManagementPack Path C:\OMSBook
Get-SCOMManagementPack -Name "*Intelligence*" | Export-SCOMManagementPack -Path C:\OMSBook
These commands will export all OMS related MPs to a C:\OMSBook folder on your computer. Replace "C:\OMSBook" with a folder of your choice. These commands do not show any output on the PowerShell console but once finished, you will be able to see a list of XML files in the folder that you have specified, as shown in Figure 6.

FIGURE 6. EXPORTED OMS RELATED MANAGEMENT PACKS
Creating Key Files for Sealed Management Packs
If you do not have a key file for sealing MPs, even if you are not planning to seal your MPs, you should still create a key file as we will need to manually seal the required OMS MP that will be used temporarily during our authoring process.
Note: If you already have a key file (.snk file) that you have previously used to seal MPs, you can skip this section.
To create a key file, begin by locating the shortcut for "Developer Command Prompt for VS2015" on your authoring PC where Visual Studio 2015 is installed. You can find this shortcut in the Start Menu under the "Visual Studio 2015" folder, as shown in Figure 7.

FIGURE 7. DEVELOPER COMMAND PROMPT FOR VS2015
Once you have launched the command prompt from the shortcut, you can use the following command to create your key file, as shown in Figure 8:
sn –k

FIGURE 8. CREATING KEY FILES USING SN.EXE
Note: After the key file (.snk) is created, save it to a secure location. Do not share this key publicly as it ensures the integrity of the MPs sealed by this key.
Resealing OMS Related MPs for Authoring
As mentioned previously, at the time of this writing, Microsoft has not yet made sealed versions of OMS related MPs publicly available. In order to make our authoring experience easier, we will seal the required MPs ourselves so we can add them as references in our Visual Studio management pack projects. Once the MP you are authoring is finalized, we will edit the unsealed MP XML files and seal them manually, outside of Visual Studio. We will demonstrate the manual sealing process later in this chapter.
We are going to use the following management pack in this chapter: Microsoft.IntelligencePacks.Types
You will need to locate the Microsoft.IntelligencePacks.Types.xml that you have exported from your SCOM management group previously. You will also use the key file that you have created from the previous section to seal these MPs.
To manually seal this MP, on your authoring computer where VSAE is installed, copy FASTSEAL.EXE from "C:\Program Files (x86)\System Center Visual Studio Authoring Extensions\Tools" to another location (i.e. C:\Software).
Once you have copied FASTSEAL.EXE to another location, run the following command from the folder where the copy resides, as shown in Figure 9:
FASTSEAL.exe C:\OMSBook\Microsoft.IntelligencePacks.Types.xml /KeyFile C:\Documents\OMSBook.snk /Company "OMS Book" /OutDir C:\Documents

FIGURE 9. RESEALING OMS MANAGEMENT PACKS FOR AUTHROING PURPOSES
After you have sealed the MP, copy it to the folder you have created previously for storing reference MPs.
Creating Visual Studio Management Pack Project
Now that we have all the prerequisites in place, we can start authoring the MP in Visual Studio.
We are going to create a project that is stored locally on your authoring computer. Although you can also store this project in Source Control systems such as Visual Studio Online or GitHub, source control is not in the scope of this chapter.
To create a project, launch Visual Studio 2015, and choose File New Project (as shown in Figure 10).

FIGURE 10 CREATING NEW VISUAL STUDIO PROJECT
In the New Project dialog box, choose "Operations Manager 2012 SP1 Management Pack", and specify the name and location. For the demo MP we are building in this chapter, we are going to name the MP "OMSBook.Demo" and store the project under "C:\Documents\OMSBook" (as shown in Figure 11).

FIGURE 11 CREATING A NEW MANAGEMENT PACK SOLUTION
Note: Since the minimum supported SCOM version for connecting to OMS is 2012 SP1 UR6 and 2012 R2 UR2, it is OK to choose the "Operations Manager 2012 SP1 Management Pack" template from the New Project dialog because SCOM 2012 RTM is not supported for OMS.
Before we start creating any MP elements, we will first configure various properties of this MP.
Then, we will set the Management Pack version to 0.0.0.1 and give it a friendly name: "OMS Book Demo". We can do so by right clicking on the "OMSBook.Demo" project from Solution Explorer and choosing "Properties", as shown in Figures 12 and 13.

FIGURE 12. CONFIGURING MANAGEMENT PACK PROJECT PROPERTIES

FIGURE 13. SPECIFYING MANAGEMENT PACK VERSION AND FRIENDLY NAME
Next, since we are going to build a sealed MP, we will have to fill out the fields under "Build" tab, as shown in Figure 14.

FIGURE 14. CONFIGURING PROPERTIES FOR SEALED MPS
To simplify the process of incrementing MP versions when authoring sealed MPs, you may also find the "Auto-increment version" feature very handy. When you have enabled this feature, the MP version will automatically increase by 0.0.0.1 when every time you click "Build Solution" to build the MP. You can enable this feature under the "Deployment" tab of the MP project properties page, as shown in Figure 15.
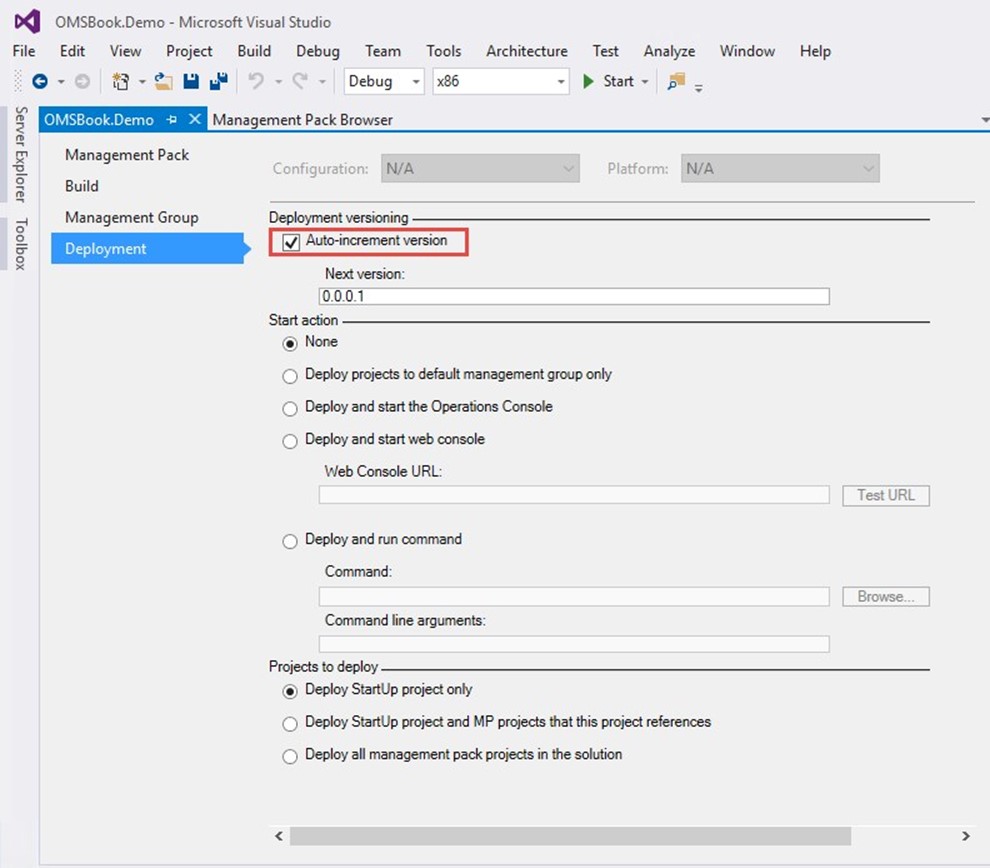
FIGURE 15. CONFIGURING MP VERSION AUTO-INCREMENT
After we have configured all the properties for the management pack, we will then create an MP fragment and specify the MP display name and description in a

FIGURE 16. ADDING NEW ITEMS TO THE MANAGEMENT PACK PROJECT
In the "Add New Item" dialog, choose "Empty Management Pack Fragment" and give it a name. Since we are going to specify the MP display name and description in this fragment, we will call it "ManagementPack.mpx", as shown in Figure 17.

FIGURE 17. CREATING EMPTY MANAGEMENT PACK FRAGMENT
After the ManagementPack.mpx file is created, type the following under the
<LanguagePack ID=**"ENU"** IsDefault=**"true"**>
<DisplayString ElementID=**"OMSBook.Demo"**>
Download the Code
You can find the ManagementPack.mpx on GitHub at https://github.com/insidemscloud/OMSBookV2 in the \Chapter 17\Demo MP\OMSBook.Demo directory.
The last thing we are going to do before we start writing the MP element is to add the required referencing MPs. We will add the OMS MP that we manually sealed in the previous section, as well as the System.Performance.Library MP. Use the information provided in Table 1 below and add these two MPs as references in the OMSBook.Demo MP. You must name the reference aliases exactly as what is show in Table 1.
MP Name | Location | Reference Alias |
Microsoft.IntelligencePacks.Types | C:\Documents | IPTypes |
System.Performance.Library | C:\Program Files (x86)\System Center Visual Studio Authoring Extensions\References\OM2012SP1 | Perf |
TABLE 1: REQUIRED REFERENCE MPS
Note: Previously we have manually sealed the Microsoft.IntelligencePacks.Types MP to the C:\Documents folder. Thus, the location from the table above is listed as C:\Documents. If your location is different, then substitute accordingly.

FIGURE 18. ADDING REFERENCE MPS
Now the OMSBook.Demo MP is configured, we can start creating modules and workflows in this MP.
Creating OMS Event Collection Rules
Although you can specify which event logs to collect from the Settings page in OMS, the settings are not as granular as those available in SCOM. As shown in Figure 19, when configuring OMS to collect an event log, the only filter you can specify is the event severity (Error, Warning, and Information). Additionally, for every log you have configured here, OMS will create a collection rule targeting all computers that are managed by OMS, regardless of whether the log exists or not.

FIGURE 19. CONFIGURING EVENT COLLECTION IN OMS
Note: When you add an application-specific event log in OMS, you may see an error event with ID 26002 repeatedly logged on computers that do not have the event log you have specified. For example, the event collection rule created by OMS is unable to access the "Microsoft-Windows-Hyper-V-VMMS-Admin" log on a non-Hyper-V server, as shown in Figure 20.

FIGURE 20. EVENT LOG NOT FOUND ERROR EVENT IN OPERATIONS MANAGER EVENT LOG
Unlike OMS, SCOM would normally discover the applications and systems that specific rules and monitors apply to. For example, when SCOM collects events from the System Center Virtual Machine Manager (VMM), it would first discover the VMM server and only target the event collection rules to the VMM server class.
Also, it is very common to generate event data from script outputs in SCOM. In the following sections, we will demonstrate two sample event collection rules:
- Collecting Event ID 1002 from the VMM Server Admin event log on VMM servers and saving the events to OMS.
- Script Based Event Collection Rule for OMS.
Creating Event Collection Rules
In this section, we will demonstrate how to author an event collection rule that collects events with ID 1002 from VMM servers "Microsoft-VirtualMachineManagerServer/Admin" log, as shown in Figure 21.

FIGURE 21. THE MICROSOFT-VIRTUALMACHINEMANAGER-SERVER/ADMIN LOG ON A VMM SERVER
Before authoring any workflows, we first need to identify the target monitoring class for our workflow (in this instance, the event collection rule). Since this event log would only exist on SCVMM servers, it is logical to target the rule only to the VMM server. More specifically, we would only want to collect the event from VMM 2012 servers. Now, if we search "VMM" in SCSM Entity Explorer once it is connected to our SCOM management group, we can easily find our target monitoring class "Microsoft.SystemCenter.VirtualMachineManager.2012.VMMManagementServer". We can also see this monitoring class is defined in the "Microsoft.SystemCenter.VirtualMachine.2012.Discovery" MP, as shown in Figure 22.

FIGURE 22. VMM 2012 SERVER MONITORING CLASS AND MANAGEMENT PACK
Now that we have identified our target class and found in which MP the class is defined, we will need to make sure the "Microsoft.SystemCenter.VirtualMachine.2012.Discovery" MP is referenced in our Visual Studio management pack project. We will also need to reference the "Microsoft.SystemCenter.VirutalMachine.Library" MP because the target class "Microsoft.SystemCenter.VirtualMachineManager.2012.VMMManagementServer" is based on the abstract class "Microsoft.SystemCenter.VirtualMachineManager.VMMManagementServer", which is defined in the VMM library MP.
Note: Unlike MPs for other Microsoft Products, the VMM MPs are shipped with VMM and cannot be downloaded from the Microsoft MP Catalog. You can find it on your VMM server, under "

FIGURE 23. VMM MANAGEMENT PACKS LOCATION
After copying these two MPs to the MP reference folder we created earlier on the authoring PC, we can then add them as references in Visual Studio. We will also name the alias for the VMM 2012 Discovery MP "VMM2012" and the VMM Library MP "VMMLib", as shown in Figure 24.

FIGURE 24. MP REFERENCE FOR VMM 2012 DISCOVERY MP
Next, we will create a folder called "Rules" within the Visual Studio project. Although it is not necessary, we recommend that you create various folders for different types of MP elements (such as class definitions, module types, monitor types, discoveries, rules, monitors, scripts, etc.). It will make your life much easier when working on a complex MP if you place MP fragments into different folders. You can create the folder by rightclicking the MP project in Solution Explorer and choosing "Add""New Folder", as shown in Figure 25.

FIGURE 25. CREATING NEW FOLDER IN VISUAL STUDIO MANAGEMENT PACK PROJECT
Now that the "Rules" folder is created, let us create an empty MP fragment in this folder and name it "VMM.1002.Event.Collection.Rule.mpx"
Note: You can name the MP fragment (.mpx) files however you want to, as it will not impact the MP. Although VSAE ships many templates that we can use (such as Event Collection Rule template), in order for you to better understand the MP XML schema, we will not use any templates in this chapter. Instead, all elements will be written in XML directly.
Once the empty MP fragment is created, you will see nothing but the
The XML code for the event collection rule is listed below. Place it inside the
Download the Code
You can find the VMM.1002.Event.Collection.Rule.mpx on GitHub at https://github.com/insidemscloud/OMSBookV2 in the \Chapter 17\Demo MP\OMSBook.Demo\Rules directory.
Since this is the first rule that we are authoring in this chapter, before continuing with the authoring process, let us take some time and explain the XML code. The Rule is defined within the
<Rule ID=**"OMSBook.Demo.VMM.Server.Event1002.Collection.Rule"** Remotable=**"false"** Enabled=**"true"** Priority=**"Normal"** Target=**"VMM2012!Microsoft.SystemCenter.VirtualMachineManager.2012.VMMManagementServer"** ConfirmDelivery=**"false"** DiscardLevel=**"100"**>
As we can see, we have also defined various attributes in the
- ID: The internal name of the rule. This must be unique within your management group.
- Remotable: When set to true, this rule will also run against agentless managed computers. However, in this instance, since VMM can only be monitored by SCOM via the locally installed agent, we have configured the "Remotable" property to false.
- Target: The target monitoring class for the rule. In this instance, the value is "VMM2012!Microsoft.SystemCenter.VirtualMachineManager.2012.VMMManagem entServer". This string contains two parts, separated by the exclamation mark ("!"). The first part "VMM2012" is the management pack reference (using the alias). It refers to the management pack in which the target class is defined. The second part is the target class ID.
Within the
A rule in a SCOM MP is comprised of the following parts:
- One or more Data Source modules.
- Zero or one Condition Detection module.
- One or more Write Action modules.
Note: You can learn more about different SCOM management pack module types at the TechNet wiki page: https://social.technet.microsoft.com/wiki/contents/articles/15217.operations-manager-management-pack-authoring-module-types.aspx
In this rule, we only need one Data Source module and one Write Action module.
- Data Source module - "Microsoft.Windows.EventProvider". We use this module collect the events from VMM servers' event log.
- Write Action module – "Microsoft.SystemCenter.CollectCloudGenericEvent". This module is shipped from the OMS MP "Microsoft.IntelligencePacks.Types". We use this module to send the event data to OMS.
Some modules require mandatory or optional inputs. When this is the case, the input parameters must be defined in the module XML tag. Some modules do not require any inputs, such as the write action module of this rule "Microsoft.SystemCenter.CollectCloudGenericEvent".
Lastly, we have also defined the display name and the description of this rule in the
Once you have saved the MP fragment file, you may build the solution. This will generate the MP. You can build your MP project using "Build"-> "Build Solution" option from the top menu, or using the shortcut "Ctrl+Shift+B", as shown in Figure 26.

FIGURE 26. BUILDING MANAGEMENT PACK SOLUTION
The MP build result is displayed in the "Output" section., as shown in Figure 27.

FIGURE 27. MP BUILD RESULT
By default, the management pack output can be found in the "
Manually Resealing Management Pack
Before importing the MP into your SCOM management group, in this instance, we must manually edit the XML and reseal it again. This is because we have referenced several OMS MPs that we manually sealed using our own key (as explained previously).
To edit and reseal this MP, we will first copy the unsealed version (OMSBook.Demo.xml) from the debug folder to another place. In this demo, we have created a folder "C:\Documents\Manual Seal".
After the unsealed MP has been copied to another folder, open it with Notepad++. You can find a reference to the "Microsoft.IntelligencePacks.Types" MP within the

FIGURE 28. MP REFERENCE FOR "MICROSOFT.INTELLIGENCEPACKS.TYPES "
The
Note: All MPs released by Microsoft are sealed using a key pair with public key "31bf3856ad364e35". Therefore, all the sealed OMS MPs pushed to your SCOM management group also have the public key token of "31bf3856ad364e35".
Once you have updated the
Next, we are going to manually seal this MP using FASTSEAL.EXE. In command prompt, navigate to the folder of where the FASTSEAL.EXE is located, and run the following command:
FastSeal.exe <Path** to the unsealed MP XML file**> /Keyfile <Path** to the key file**> /Company "<**Company Name**>" /Copyright "<**Copyright message**>"
For Example:
FastSeal.exe "C:\Documents\Manual Seal\OMSBook.Demo.xml" /Keyfile C:\Documents\OMSBook.snk /Company "OMS Book" /Copyright "Copyright (c) OMS Book Authors 2017. All rights reserved."
FASTSEAL.EXE will generate the sealed MP (OMSBook.Demo.mp) in the current working directory, as shown in Figure 29.

FIGURE 29. MANUALLY SEALING MANAGEMENT PACK USING FASTSEAL.EXE
A word on FASTSEAL versus MPSEAL:
There are two executables you can use to create sealed MPs. In addition to FASTSEAL.EXE, you can also use MPSEAL.EXE, which can be located on the SCOM 2012/2016 installation media, under the SupportTools folder. However, in this instance, we must use FASTSEAL.EXE. The difference between FASTSEAL.EXE and MPSEAL.EXE is FASTSEAL.EXE does not validate the MP before sealing, whereas when using MPSEAL.EXE, you must also specify a path containing all sealed referencing MPs so it can validate your MP XML. MPSEAL.EXE validates the unsealed MP before sealing it. In this case, we are not able to use MPSEAL.EXE because it will fail at the validation process because we do not have valid sealed OMS MPs.
MPSEAL.EXE is documented on MSDN: https://technet.microsoft.com/en-us/library/hh457550.aspx
Importing Management Packs
Once the sealed MP is created, we can import it into the SCOM management group. After it's imported, you should see a 1201 event in the Operations Manager event log on the VMM server indicating the MP has been received by the agent, as shown in Figure 30.

FIGURE 30. NEW MANAGEMENT PACK RECEIVED EVENT (ID 1201)
Accessing Collected Event Data in OMS
The event collection rule should become active once you have seen the 1210 event, shortly after the 1201 event. You will be able to access the collected events using the search query such as "Type=Event EventID=1002", as shown in Figure 31.

FIGURE 31. ACCESSING COLLECTED VMM EVENTS IN OMS
Script Based OMS Event Collection Rule
Now that we have demonstrated how to create more granular event collection rules in OMS (targeting specific class and only collecting a specific event ID), we will demonstrate how to create a script based event collection rule for OMS. We will demonstrate how to create a "heartbeat" event rule that targets the SCOM management server class and sends a heartbeat event to OMS every 3 minutes.
Note: The heartbeat rule example demonstrated in this section is simply an example that shows how to inject event data into OMS using a script. Do not use this rule in your production environments as OMS already offers native agent heartbeat capability via the Agent Health solution.
The workflow of this rule is configured as shown in Figure 32.

FIGURE 32. HEARTBEAT EVENT RULE WORKFLOW
The workflow starts with a scheduler in the Data Source Module, which is configured to run every 180 seconds (3 minutes). The scheduler then triggers a PowerShell script, which runs locally on each management server, and generates a property bag with the following information:
- Heartbeat Message
- Logging Computer
- Log Time
- Log Time in UTC
The condition detection module takes the property bag that the data source module has generated and maps the value to the event data format.
Additional Reading: If you are not familiar with the 'property bag' in SCOM scripting, see "Script Monitors and Rules" on the Microsoft website at https://technet.microsoft.com/en-us/library/hh457579.aspx.
Lastly, the write action module uses module type "Microsoft.SystemCenter.CollectCloudGenericEvent" from the OMS MP "Microsoft.IntelligencePacks.Types" and uploads the event data to your OMS workspace.
As you can see, we will write a custom data source module for this rule. We have named this data source module "OMSBook.Demo.Send.OMSHeartbeat.Event.DataSource". This is the first MP element we need to create for this rule. We will first create two folders in the Visual Studio project and call them "Modules" and "Scripts".
After the folders are created, we will add the PowerShell script for the probe action module embedded in the Data Source module type. As we will place this PowerShell script under the "Scripts" folder, we can right click the "Scripts" folder, choose AddNew Item and select "PowerShell script file". We will name this PowerShell script "GenerateHeartbeatMessageProbe.ps1", as shown in Figure 33.

FIGURE 33 CREATING POWERSHELL SCRIPT WITHIN VSAE PROJECTS
Place the following code into the "Generate-HeartbeatMessageProbe.ps1" script:
$Now = Get-Date
$UTCNow = $Now.ToUniversalTime()
$strNow = Get-Date $Now -Format F
$strUTCNow = Get-Date $UTCNow -Format F
$ComputerName = $env:COMPUTERNAME
$Domain = (Get-WmiObject -Query "Select Domain from
Win32_ComputerSystem").Domain
$FQDN = "$ComputerName`.$Domain"
$oApi = New-Object -Comobject "MOM.ScriptAPI"
$HeartbeatMessage = "OpsMgr Heartbeat Event. Originating Computer:
'$FQDN'. Local Time: '$strNow'. UTC Time: '$strUTCNow'."
#Submit property bag
$oBag = $oAPI.CreatePropertyBag()
$oBag.AddValue("LogTime", $strNow)
$oBag.AddValue("LogUTCTime", $strUTCNow)
$oBag.AddValue("LoggingComputer", $ComputerName)
$oBag.AddValue("HeartbeatMessage", $HeartbeatMessage)
$oBag
Download the Code
You can find the Generate-HeartbeatMessageProbe.ps1 on GitHub at https://github.com/insidemscloud/OMSBookV2 in the \Chapter 17\Demo MP\OMSBook.Demo\Scripts directory.
As shown in the previous script, it simply gets the current date and time in both local time zone and UTC time, along with the computer FQDN, then forms a message before placing all the information into a property bag. The property bag contains the following values:
- LogTime
- LogUTCTime
- LoggingComputer
- HeartbeatMessage
Once the script is created, we can then create the custom data source module "OMSBook.Demo.Send.OMSHeartbeat.Event.DataSource". To do so, let us create an empty MP fragment under the "Modules" folder and give it a name. In this example, we have named this fragment file "Send.OMS.Heartbeat.Event.DS.mpx". The content of this fragment is listed below:
Download the Code
You can find the Send.OMS.Heartbeat.Event.DS.mpx on GitHub at https://github.com/insidemscloud/OMSBookV2 in the \Chapter 17\Demo MP\OMSBook.Demo\Modules directory.
As you can see, this module contains two member modules:
- Data Source Member Module: System.SimpleScheduler
- Probe Action Member Module: Microsoft.Windows.PowerShellPropertyBagTriggerOnlyProbe This module requires 3 input parameters:
- IntervalSeconds – The execution frequency (in seconds) for the System.SimpleScheduler.
- SyncTime – Optionally, specify if the System.SimpleScheduler should be executed at a specific time.
- TimeoutSeconds – Specify the script timeout (in seconds) for the PowerShell script used by the "Microsoft.Windows.PowerShellPropertyBagTriggerOnlyProbe" module.
The MP fragment file also contains a
Additionally, when we defined the "Microsoft.Windows.PowerShellPropertyBagTriggerOnlyProbe", we did not have to place the PowerShell script source code within the

FIGURE 34. USING $INCLUDEFILECONTENT VARIABLE IN VSAE
In this case, we have specified "$IncludeFileContent/Scripts/Generate-
HeartbeatMessageProbe.ps1$", which indicates we are going to include the file content for the "Generate-HeartbeatMesssageProbe.ps1 from the "Scripts" folder.
Now that the custom data source module is created, we can start creating the heartbeat event rule itself. Same as the previous example, we will create an empty MP fragment file under the "Rules" folder. We will name the fragment file "OMS.Heartbeat.Events.Rule.mpx" in this demo. The XML code for the MP fragment is shown as below:
<ManagementPackFragment SchemaVersion="2.0"
xmlns:xsd="http://www.w3.org/2001/XMLSchema">
<Rule
ID="OMSBook.Demo.SCOM.Management.Server.OMS.Heartbeat.Event.Rule"
ConfirmDelivery="false" DiscardLevel="100" Remotable="false"
Target="SC!Microsoft.SystemCenter.ManagementServer"
Enabled="true" Priority="Normal">
<DataSource ID="DS"
TypeID="OMSBook.Demo.Send.OMS.Heartbeat.Event.DataSource">
<ConditionDetection ID="MapToEvent"
TypeID="System!System.Event.GenericDataMapper">
<WriteAction ID="HTTPWA"
TypeID="IPTypes!Microsoft.SystemCenter.CollectCloudGenericEvent" />
<LanguagePack ID=**"ENU"** IsDefault=**"true"**>
<DisplayString
ElementID="OMSBook.Demo.SCOM.Management.Server.OMS.Heartbeat.Even t.Rule">
Heartbeat Event Rule
Download the Code
You can find the OMS.Heartbeat.Events.Rule.mpx on GitHub at https://github.com/insidemscloud/OMSBookV2 in the \Chapter 17\Demo MP\OMSBook.Demo\Rules directory.
We have configured the rule with the following parameters:
Data Source Module:
- IntervalSeconds: 180
- SyncTime: None
- TimeoutSeconds: 60
Condition Detection Module:
- PublisherName: SCOMHeartbeat
- Channel: Operations Manager
- LoggingComputer: The "LoggingComputer" value from the property bag output
- EventNumber: 123
- EventCategory: 1
- EventLevel: 4 (Information)
- Description: the "HeartbeatMessage" value from the property bag output.
- Additional parameters (
): The "LogTime" and "LogUTCTime" value from the property bag output.
Note: For more information about the parameters required by the System.Event.GenericDataMapper condition detection module, please refer to its documentation on MSDN: https://msdn.microsoft.com/en-us/library/ee692955.aspx
Once you have saved the rule MP fragment file and generated the MP by building the solution, you must manually edit and reseal the MP again before importing it into your SCOM management group.
After importing the MP into your SCOM management group, you should see the new rule under the Authoring pane when targeting your SCOM Management Server class, as shown in Figure 35.

FIGURE 35. VIEWING THE OMS HEARTBEAT EVENT RULE IN SCOM CONSOLE
Shortly after the MP has been imported into SCOM, you should begin to see related events coming into OMS. You can access the event data in OMS via search queries such as "Type=Event Source=SCOMHeartbeat", as shown in Figure 36.

FIGURE 36. ACCESSING HEARTBEAT EVENT DATA
We can also create a dashboard tile to display number of heartbeat events over the last X number of minutes. For example, use the following query to check the number of heartbeat events for a particular management server over the last 15 minutes (shown in Figure 37):
Type=Event Source=SCOMHeartbeat Computer=

FIGURE 37. HEARTBEAT EVENT DASHBOARD TILE
OMS Event Collection Rules Summary
To summarize, we have demonstrated how to create rules that collect event data for OMS and we have shown how you would author the OMS event collection rules just like normal SCOM event collection rules, but using a different write action module.
Normally, when authoring SCOM event collection rules, the following two write action modules are used:
- Write to Operational DB: Microsoft.SystemCenter.CollectEvent
- Write to DW DB: Microsoft.SystemCenter.DataWarehouse.
PublishEventData When we want to send the event data to OMS, we will need to use an alternative write action module – "Microsoft.SystemCenter.CollectCloudGenericEvent". If we want to store the event data in both SCOM and OMS, we can either author a single rule that uses all three above mentioned write action modules or write multiple rules with the same data source module and input parameters. If we are writing different rules, collecting the same event data for both SCOM and OMS, and use the same data source module and input configuration, the SCOM agent would utilize the Cookdown feature, so it would not add additional overhead to the agent computers.
For more information about the SCOM agent Cookdown feature, please refer to the Chapter 23 of the Microsoft Virtual Academy (MVA) MP Authoring course at https://www.microsoftvirtualacademy.com/en-US/training-courses/system-center-2012-r2-operations-manager-management-pack-8829.
Note: You should NOT use the "Microsoft.SystemCenter.CollectCloudGenericEvent" Write Action module to collect events with large volume in nature (i.e. Security Events). This is because this Write Action module injects data into OMS via SCOM management servers. It may cause performance issues on SCOM management servers when used to collect large volume of event data. When OMS is collecting large volume data types such as SecurityEvent or WireData, it uses different Write Action modules that bypass SCOM management servers so the data is injected into OMS directly via the Microsoft Monitoring Agent.
Creating OMS Performance Collection Rules
In this session, we will discuss how to author OMS Near Real-Time (NRT) performance data collection rules.
Note: The OMS performance collection mechanism has been changed since version 1 of this book was published. The hourly aggregated performance data (Type=PerfHourly) is no longer available. Furthermore, the NRT performance data is no longer being aggregated.
When writing rules to collect OMS NRT performance data, we need to follow these guidelines:
- When mapping performance data, the object name must follow the format "\\
\