Operations Management Suite (OMS): Introduction and Onboarding
Introduction
The Operations Management Suite (OMS) is Microsoft's new cloud-based management platform that complements your investments in Azure, System Center, Windows, and open source technologies to enable new, cloud integrated management scenarios. OMS extends System Center capabilities to deliver a full hybrid management experience across any data center or cloud. You can enable and configure OMS integration with System Center in a matter of minutes and begin to realize value from the solution in the first few hours.
"Inside Microsoft OMS" includes coverage of fundamental and advanced topics through hands-on examples demonstrating not only how to use OMS, but how to customize, automate and extend OMS native capabilities. Topics include:
- Search and analysis. Searching and Presenting OMS Data, through the OMS portal, as well as through PowerShell and the OMS search API.
- System Center integration. OMS integrates with System Center Operations Manager (SCOM) for agent reporting, Configuration Manager (SCCM) so collections may be used as computer groups in OMS, Service Manager (SCSM) for automated ticket creation, and Data Protection Manager (DPM) to Azure for system and application backup.
- Assessing system and workload configuration. Assessing system configuration, data center capacity and enterprise workload health through OMS assessment solutions.
- Custom data collection. Collecting native Windows performance data, as well as how to collect and visualize custom data through SCOM UI wizards and custom management packs.
- Hybrid automation. Automating processes on Windows, Linux and System Center through Desired State Configuration (DSC), Azure Automation, and the new Hybrid Worker enabled exclusively through OMS integration with your Azure subscription.
- Network and security analysis. Gaining insights into network activities and security events, and achieving deeper insights through correlation of network communication and security event data.
- Cross-platform management. Collecting Syslog and performance data from a variety of Linux distributions.
How to get the most from "Inside Microsoft OMS".
To get the most from the book, read the chapters, but also try the examples for yourself! You can download the scripts, runbooks, and samples used throughout the book and practice as you follow along. By the end of the book, you will have the knowledge to leverage all that OMS has to offer!
In chapter 1, you will learn about the architecture of the OMS service itself, as well as the features it delivers. Then, we will walk through the agent installation and configuration process in detail.
In this chapter:
- What is the Operations Management Suite?
- History of OMS
- OMS Solutions
- Data Flow, Security and Retention
- Onboarding and Configuration
- Troubleshooting Onboarding Issues
By the end of this chapter 1, you will have an understanding of what the OMS service has to offer, as well as the knowledge to onboard systems in your environment.
What is the Operations Management Suite?
OMS is a simplified IT Management Solution that provides Log Analytics, Automation, Security and Compliance, as well as Backup and Site Recovery. It also integrates with your existing management solutions to provide a consolidated view of performance, event, and alert and configuration data. OMS is a simplified IT management solution that helps you manage and protect your entire IT infrastructure footprint, whether in onpremises data centers or any cloud infrastructure. OMS implements management as-aservice, extending System Center into the cloud.
Because OMS is management as-a-service, fully managed by Microsoft, the service is always up to date. It connects to your existing on-premises data centers and it provides instant access to your critical information in one integrated console. Using OMS, you can collect, analyze, and search millions of records across all your workloads and servers regardless of their physical location. You can start using OMS in minutes and have deep insights into your log data in hours. Using a simple wizard-driven experience, you can add new servers, access services, and use real-time operational intelligence across all your applications and workloads.
With OMS, you can also protect your applications by using Azure or your own data center as a disaster recovery site. You can replace legacy tape by backing up critical data to Azure for short and long-term retention. You can also create a hybrid cloud by moving multi-tier workloads into Azure, or run tests on a copy of your production workloads in Azure.
OMS can also enhance your System Center investment with new management scenarios. OMS extends System Center capabilities to deliver a full hybrid management experience across data centers and clouds.
History of OMS
The current Microsoft Operations Management Suite (OMS) is an evolution from Azure Operational Insights, originally released as a revamped version of System Center Advisor and released in limited public preview in May 2014 at the MS TechEd conference in Houston. The name was changed to Azure Operational Insights when the full public preview was announced in November 2014.
The Operations Management Suite and the features you can enable (called "solutions") are the results of this evolution, but the journey continues. New solutions are coming online several times a year, as OMS grows to become the single control plane for managing all your application and infrastructure investments across clouds and data centers.
OMS Services
As of today, OMS consists of four services, collectively containing more than 35 solutions, including:
Log Analytics - Log Analytics helps you collect, correlate, search, and act on log data. It gives you real-time operational insights using an integrated search, custom dashboards, and Microsoft developed solutions for data analytics, which you can enable via the Solution Gallery or Azure Portal. Log Analytics enables you first to collect machine data from all your on-premises and cloud infrastructure and then to gain deep insights into the data from your environment through intelligent search, analysis, and visualization. Log analytics in OMS enables you to interact with real-time and historical machine data to rapidly develop insights to drive decisions.
Solutions: A few of the solutions in this category include Azure Web App Analytics, Containers, VMware Monitoring and DNS Analytics.
Automation –Azure Automation helps you orchestrate and automate complex and repetitive operations. With the introduction of the Hybrid Runbook Worker role, OMS extends these capabilities from the cloud to your on-premises data center. You can automate manual and recurring tasks using both runbooks developed directly in the PowerShell ISE or the graphical authoring interface. It also provides a way for you to automate the manual, long-running, error-prone, and frequently repeated administrative tasks common to the data center or cloud environments. You can implement administrative processes as runbooks that can perform multiple tasks with no human intervention. When it makes sense, you can schedule runbooks to automate tasks at recurring intervals.
Solutions: The showcase solution in this service is the Automation Solution, which brings Azure Automation and OMS together, enabling a game-changing hybrid automation capability. More on this in "Chapter 3 – Process Automation".
Backup and Disaster Recovery - Backup and Disaster Recovery help you protect and extend your data center and quickly implement a hybrid cloud. The Backup and Recovery solutions are powered by Azure Backup and Azure Site Recovery. The replication capabilities of Azure Site Recovery help protect critical applications and extend your data center to Azure, enabling recovery, development and testing, reporting and analytics, as well as migrating applications to Azure. Azure Backup is a scalable solution that protects your application data and retains it for years, without any capital investment (CAPEX) and with minimal operating costs.
Solutions: Solutions in this category are Azure Backup and Azure Site Recovery. More on this in "Chapter 15: Protection & Recovery".
Security and Compliance – OMS Security and Compliance solutions help you identify, assess, and mitigate security risks to your infrastructure. They can enhance protection of workloads, servers, and users with audit, breach analysis, malware assessment, and system update assessments. Security and Compliance can identify missing system updates and your malware status. You can also collect security related events and perform forensic, audit and breach analysis. You can recognize threats early and improve compliance. You can also capture and examine network communication to determine whether there is any communication is occurring with malicious IP addresses.
Solutions: Solutions in this category include Security and Audit, as well as the Antimalware Assessment. See "Chapter 14: Security & Compliance" for a deep dive into these solutions.
The above lists grow all the time! Microsoft releases new solutions frequently, with new features coming approximately every quarter.
Adding solutions to your OMS workspace
You can add OMS solutions to your workspace through a number of different methods, including:
- The Solutions Gallery in the OMS Workspace
- From the Azure Marketplace (in the Azure portal)
- Via an Azure Resource Manager template
We assume most of our readers have probably added at least one solution, but if not, you will find step-by-step instructions for each of these methods on the Microsoft website in "Working with management solutions in Operations Management Suite (OMS)" at https://docs.microsoft.com/en-us/azure/operations-management-suite/operationsmanagement-suite-solutions .
OMS Agent Deployment & Communication Models
As mentioned, OMS managed systems need the Microsoft Monitoring Agent (MMA). This agent is able to send data to both SCOM and OMS. There are two agent deployment models:
- SCOM attached. Agents operated through a SCOM infrastructure, which is a very easy way to add value to your SCOM deployment. When an agent uses SCOM to communicate to OMS, most of the data is funneled through the SCOM infrastructure up to the Management Server pool in charge of OMS communication.
- Directly connected. These are agents directly connected to OMS.
It is also important to mention the Dependency Agent. The Dependency Agent depends on the OMS Agent for its connections to Operations Management Suite. This means that a server must have the OMS Agent installed and configured first, and then the Dependency Agent can be installed. OMS agent architecture for Windows and Linux are shown in Figure 1. This agent is required by the Wire Data and Service Map solutions.

FIGURE 1. OMS AGENT ARCHITECTURE
In the real world, the two architectures are often mixed, for at least a couple of reasons:
- For some high-volume solutions, even SCOM-attached agents always connect directly to OMS, such as with the Windows Security and Audit and Wire Data solutions.
- Since OMS is not yet multi-tenant and the systems cannot be scoped for different management teams, each team may opt to use a specific and separate OMS workspace, which is the management boundary used to delegate administrative rights.
In both cases, the communication protocol is simply https, forwarded to well-known and documented destinations. These are documented in "Configure proxy and firewall settings" on the Microsoft website at https://azure.microsoft.com/engb/documentation/articles/operational-insights-proxy-firewall/ .
Data Flow, Security and Retention
With any service in the public cloud, data security is of paramount importance. This section describes the security of the data you see in the OMS portal, as it moves through the OMS service.
- Data segregation. Customer data is kept logically separate on each component throughout the OMS service. All data is tagged per organization. This tagging persists throughout the data lifecycle, and it is enforced at each layer of the service. Each customer has a dedicated Azure blob that houses the long-term data. The blob is encrypted with unique per-customer keys, which are changed automatically every 90 days.
- Data retention. Data retention in OMS depends on your licensing tier. Data retention is 7 days on the Free tier, 1 month on the Standard tier, and 1 year on the Premium tier, with an option to extend it to 2 years, if desired.
- Physical security. Microsoft personnel manage the OMS service and all activities are logged and can be audited. The OMS service runs 100% in Azure and complies with the Azure common engineering criteria.
- Compliance and certifications. The OMS Software Development and Service team is actively working with the Microsoft Legal and Compliance teams, as well as other industry partners, to acquire a variety of certifications. Today, OMS meets the following security standards:
- Windows Common Engineering Criteria
- Microsoft Trustworthy Computing Certification
- ISO/IEC 27001 compliant
The capabilities of OMS service are growing quickly, and strategy of data security in OMS may evolve with the service.
Sending Data from Agents
With agents that connect directly to the OMS web service, you register them with a OMS key and a secure connection is established between the agent and the OMS service using port 443.
With SCOM, you register an account with the OMS service and a secure HTTPS connection is established between the SCOM management server and the OMS service by using port 443. If SCOM is unable to communicate to the service for any reason, the collected data is stored in a temporary cache and the management server tries to resend the data every 8 minutes for 2 hours. Collected data is compressed and sent to the OMS service, bypassing on-premises databases, to prevent database bloat. After the agent sends the collected data, it is removed from the agent cache.
How OMS Receives and Processes Data
The OMS service ensures that incoming data is from a trusted source by validating certificates and the data integrity. The unprocessed raw data is then stored as a blob in Microsoft Azure Storage. Each OMS workspace has a dedicated Azure blob, which is accessible only to users with permissions. The type of data that is stored is dependent on the types of solutions that are enabled in the OMS workspace. The OMS service processes the raw data, and the processed data is stored in a SQL database (the database is part of the OMS service, not managed by the OMS customer). Communication between the OMS service and SQL relies on SQL database authentication.
The types of data stored by OMS may expand as Microsoft releases new solutions in OMS.
Controlling Data Flow (internet proxy strategies)
When implementing OMS is an enterprise, one of the initial challenges is ensuring the data collected by OMS rules on agent managed systems can reach the cloud. The first step in this process is understanding how data flows through the solution, so you can enable the appropriate rules on firewalls and configure appropriate Internet proxy rules. Proxy needs depend on whether the agents are directly connected agents or SCOM attached agents.
As mentioned previously, SCOM-attached agents forward data for most solutions to their SCOM management server, which then forwards the data to OMS. However, for some solutions, even SCOM-attached agents forward data directly to OMS.
For traffic funneled through SCOM, the endpoints (the All Management Servers Resource Pool) are sometimes already configured to communicate with the cloud. For example, if your organization uses the Global Service Monitoring (GSM) feature in SCOM, which provides a simplified way to monitor the availability of external-web-based applications from multiple locations around the world, egress for these endpoints is already in place.
Since OMS involves the collection of larger amounts of data than that of traditional SCOM management packs, the collective volume of data from agents across your environment can be very high. The traffic is also forwarded over HTTPS (SSL) on port 443.
With this in mind, forwarding traffic through a standard HTTP proxy is a perfect fit for agents without direct Internet access. The agent for Windows has been implemented to be proxy-aware, supporting proxy for agent data only, with no impact on other traffic on the managed system. You can configure proxy settings for the agent through the agent installation user interface, command line or via PowerShell.
Proxy settings for directly connected Windows agents are covered in "Onboarding Windows Systems Directly to OMS", and for "Proxy Settings on Linux Agents", both later in this chapter.
Tip: If using an existing proxy, make sure that SSL inspection is disabled. OMS data flow can be high volume, so disabling this setting ensures the proxy infrastructure can support the increased load. If your proxy server(s) will not allow disabling this feature at an acceptably granular level, you may opt for a dedicated proxy infrastructure for OMS traffic.
For SCOM-connected agents, the proxy settings are centrally configured on the SCOM management server and will be propagated to all OMS-enabled agents. These agents can send data directly when necessary, but passing through an HTTP proxy, without the need configure each individual agent.
The central proxy configuration for Windows SCOM connected agents is accessible in the SCOM console at Administration Operations Management Suite Connection by clicking the Configure Proxy Server link. The screen where you enter the proxy server URL is shown in Figure 2.

FIGURE 2. HTTP PROXY SETTINGS FOR SCOM CONNECTED AGENTS
Either way, you get the benefit of centralized communication for OMS using standard Internet protocols. If the load is too high, many HTTP proxy implementations enable you to scale out your proxy configuration using virtual machines (VMs) with identical configurations. If your single proxy machine has too much load or you want to make it redundant, it is just an HTTP proxy, so you can scale it horizontally.
Note: You will need to request ports and exceptions from your HTTP proxy administrator. Find the complete list of agent resources and ports in "Configure proxy and firewall settings with Operations Manager" at https://technet.microsoft.com/en-us/library/mt484101.aspx .
This also provides centralized logging for reporting on which agents sent data and how much data they sent.
OMS Gateway
If your IT security policies do not allow computers on your network to connect to the Internet, such as point of sale (POS) devices, or servers supporting other services, but you need to connect them to OMS to manage and monitor them, they can be configured to communicate directly with the OMS Gateway to receive configuration and forward data on their behalf. If these computers are configured with the OMS agent to directly connect to an OMS workspace, all computers will instead communicate with the OMS Gateway. The OMS Gateway transfers data from the agents to OMS directly but does not analyze any of the data in transit.
Each agent must have network connectivity to its gateway so that agents can automatically transfer data to and from the gateway. Installing the gateway on a domain controller is not recommended. The OMS Gateway supports all the major OMS agent communication scenarios, as shown in Figure 3:
- Azure Automation Hybrid Runbook Workers
- Windows computers with the Microsoft Monitoring Agent directly connected to an OMS workspace
- Linux computers with the OMS Agent for Linux directly connected to an OMS workspace
- System Center Operations Manager management group integrated with OMS., including
- 2012 SP1 with UR7
- Operations Manager 2012 R2 with UR3
- Operations Manager 2016

FIGURE 3. OMS GATEWAY ARCHITECTURE & DATA FLOW
When selecting a computer to run the OMS Gateway, you can choose from a number of supported client and server operating systems, appropriately resourced, as detailed below:
- Windows 10, Windows 8.1, Windows 7
- Windows Server 2016, Windows Server 2012 R2, Windows Server 2012, Windows Server 2008 R2, Windows Server 2008
- .Net Framework 4.5
- Minimum of a 4-core processor and 8 GB of memory
Detailed instructions for installing and configuring the OMS Gateway are available on the Microsoft website in "Connect computers without Internet access to OMS using the OMS Gateway" at https://docs.microsoft.com/en-us/azure/log-analytics/log-analytics-omsgateway .
Authenticating Resources to OMS
You can sign into OMS by using the Microsoft accounts or organizational accounts and agents connected to OMS are authenticated as well. All traffic between SCOM or directly connected agents and the OMS service is sent over a secure HTTPS channel. How authentication is negotiated is different for SCOM-connected environments and directly connected agents, as described here and shown in Figure 4:
- SCOM management group. The connected management group is authenticated via certificate authentication over SSL from the elected management server in the pool.
- Directly connected agents. An enrollment key is used to negotiate authentication per-agent certificate over SSL.

FIGURE 4. AGENT COMMUNICATION AND AUTHENTICATION WITH OMS
Azure storage. When collecting Azure diagnostics logs from Azure storage, there is no agent with which to authenticate. In this case, OMS authenticates to Azure blob storage with a read only storage key, as shown in Figure 5.
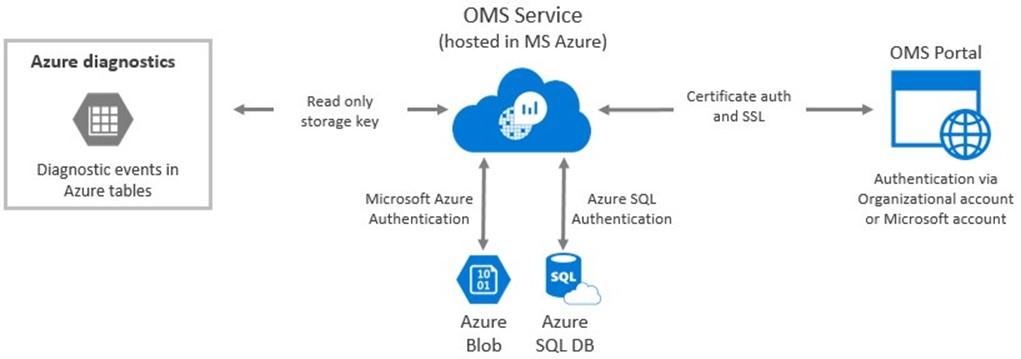
FIGURE 5. OMS AUTHENTICATION TO AZURE STORAGE
Now that we have covered core concepts of the OMS service and how it works, you are ready to begin the OMS onboarding process.
Onboarding and Configuration
This section includes the detailed configuration steps for signing up for the OMS service, connecting your Active Directory subscription, delegating permissions and finally, onboarding your managed Windows and Linux systems.
Configuring Your First Workspace
There are a few different ways to create a new OMS Log Analytics workspace, including:
- From the OMS Portal
- From the Azure Portal
- With PowerShell
- With an Azure Resource Manager (ARM) Template
In the OMS Portal
Begin by browsing to https://microsoft.com/oms, clicking Try for free and then Get started. You will be prompted to authenticate with your Microsoft (Live) or organizational (Azure Active Directory) account.
Then, complete the form, supplying a name for the new OMS workspace along with your details and click Create, as shown in Figure 6.

FIGURE 6. CREATE NEW WORKSPACE FOR OMS
Next, you need to link the Azure subscription associated with your Microsoft or corporate account, as shown in Figure 7. Note that having an Azure subscription is not a prerequisite for this step (you can just click 'not now'), but it is recommended to enable user onboarding and role delegation in OMS for users in your organization. This step is also required to connect Azure Automation, Azure Backup and/or Azure Site Recovery to your OMS subscription.

FIGURE 7. LINKING OMS TO YOUR AZURE SUBSCRIPTION
To make sure you are the owner of the email address (it does not have to be an email that is associated with your account), Microsoft will send you a confirmation e-mail. Click Confirm Now, as shown in Figure 8, and continue.

FIGURE 8. OMS E-MAIL CONFIRMATION
At this point, your OMS workspace is ready for you to connect agents and enable solutions.
In the Azure Portal
While the procedure in the previous section represents the original method for creating an OMS workspace, it is now also simple to create a new workspace in the Azure Portal. The step-by-step process is documented in "Get started with a Log Analytics workspace" at https://docs.microsoft.com/en-us/azure/log-analytics/log-analytics-get-started .
With PowerShell
The step-by-step instructions for creating OMS Log Analytics workspaces with PowerShell is documented in "Manage Log Analytics using PowerShell" at https://docs.microsoft.com/en-us/azure/log-analytics/log-analytics-powershellworkspace-configuration .
With an ARM Template
The step-by-step instructions for creating OMS Log Analytics workspaces with an Azure Resource Manager template is documented in "Manage Log Analytics using Azure Resource Manager templates" at https://docs.microsoft.com/en-us/azure/loganalytics/log-analytics-template-workspace-configuration.
Associating an Organization to an OMS Workspace
Associating an organization to your OMS workspace refers to associating an Azure Active Directory instance from your Azure subscription to the workspace. This enables you to delegate permissions to users within your organization to authenticate to and access data within an OMS workspace.
To associate an organization to an OMS workspace, perform the following steps:
- In the OMS portal, click on your workspace in the upper left corner. Select the workspace settings. Alternatively, you can click on the Settings tile on the OMS portal homepage.
- Next, click on the Accounts tab.
- Next, click the Add Organization button shown in Figure 9.

FIGURE 9. CONNECTING AN AZURE AD INSTANCE TO OMS
- You will be redirected to an authentication page, where you will be prompted to enter an account from your Azure subscription, as shown in Figure 10.

FIGURE 10. AUTHENTICATING TO YOUR AZURE SUBSCRIPTION
The organization (the Azure Active Directory instance from your Azure subscription) will be connected almost immediately. As soon as it is, the Add Organization button will be grey and inaccessible. From this point, you will be able to add users from Azure Active Directory to your OMS subscription and grant them rights.
We will cover the details of delegation in the next section.
Controlling Access OMS Workspaces
OMS includes role-based access control (RBAC) enabling delegation of permissions to your OMS workspace. In order to add delegates to the workspace, you must first associate an organization to the workspace, as detailed in the previous section.
Currently, the following roles are available in OMS:
- User. This role has permission to view and search data but cannot make changes to the workspace configuration.
- Administrator. This role has full control within the OMS workspace and can add, configure, and remove solutions as necessary.
- Microsoft Support Accounts. You can grant access to users from Microsoft to your workspace by selecting 'Microsoft Support' as the account type.
To configure permissions for an OMS workspace, perform the following steps:
- In the OMS portal, click on your workspace in the upper left corner. Select the workspace settings, as shown in Figure 11. Alternatively, you can click on the Settings tile on the OMS portal homepage.

FIGURE 11. OMS WORKSPACE SETTINGS
- In workspace settings, select the Accounts tab, then Manage Users, as shown in Figure 12.
- You can then add delegates from the organization (aka the Azure Active Directory).

FIGURE 12. ACCOUNTS TAB IN OMS SETTINGS
With permissions delegated, we are now ready to begin onboarding systems to OMS.
Onboarding System Center Operations Manager
You can connect an existing SCOM 2012 SP1 or newer environment to an OMS workspace. This will allow you to use existing SCOM agents for data collection. If you use SCOM to monitor any of the following workloads, then you will need to set SCOM run-as accounts for them.
Note: Support for OMS is available as of SCOM 2012 SP1 UR6 and SCOM 2012 R2 UR2. Microsoft added proxy support in SCOM 2012 SP1 UR7 and SCOM 2012 R2 UR3.
To connect your SCOM instance to your OMS workspace, perform the following steps:
- In the Operations Manager console, click Administration.
- Expand the Operations Management Suite node, then the Connection node. Next, click the Configure Operations Management Suite connection.
- Click the Register to Operational Insights link and follow the onscreen instructions.
- After completing the registration wizard, click Add a Computer/Group, as shown in Figure 13.

FIGURE 13. ADDING COMPUTERS TO OMS IN THE SCOM CONSOLE
- In the Computer Search dialog box, you can search for computers or groups monitored by Operations Manager, as shown in Figure 14. Select computers or groups to onboard to OMS, click Add and then click OK.

FIGURE 14. COMPUTER SEARCH DIALOGUE FOR OMS ONBOARDING IN SCOM
If you are connecting from an environment with an Internet proxy, you will need to configure run as credentials in SCOM for authentication to the proxy server (if your proxy server requires automation).
- Open the Operations Manager console and select the Administration workspace.
- Under RunAs Configuration, select Profiles.
- Open the System Center Advisor Run As Profile Proxy profile shown in Figure 15.

FIGURE 15. OMS PROXY ACCOUNT RUN AS PROFILE
- In the Run As Profile Wizard, click Add to use a Run As account. You can create a new Run As account or use an existing account. This account needs to have sufficient permissions to send data through the proxy server.
- To set the account to manage, choose A selected class, group, or object to open the Object Search box.

FIGURE 16. ADD A RUN AS ACCOUNT INTERFACE
- Search for then select Microsoft System Center Advisor Monitoring Server Group, as shown in Figure 17.

FIGURE 17. CONFIGURING RUN AS ACCOUNT DISTRIBUTION
- Click OK to close the Add a Run As account box.

FIGURE 18. CONFIGURING RUN AS ACCOUNT DISTRIBUTION
- Complete the wizard and save the changes.
Validating your configuration
To ensure your configuration is correct, you can verify by checking that management packs are being downloaded by your SCOM instance. You should also verify that your SCOM management server is successfully uploading data to OMS.
- If you added solutions by using OMS, you can view them in the Operations Manager console as management packs under Administration. You can find them by searching for System Center Advisor.

FIGURE 19. OMS MANAGEMENT PACKS IN SCOM
- Verify SCOM is uploading data to OMS. For a SCOM-connected scenario, you can look at the events in the Operations Manager Windows Event Log, for events with source 'Advisor', shown in Figure 20.

FIGURE 20. OMS EVENT VALIDATING DATA UPLOAD FROM SCOM
Onboarding Windows Systems Directly to OMS
You can connect computers directly to OMS by installing the OMS agent on each computer you want to onboard. In this section, we will cover the available installation options for directly connected agents, including:
- Manual install
- Command line
- PowerShell or PowerShell DSC
- Enabling via ARM Template (for Azure and Azure Stack VMs)
With the agent installation complete, we will cover configuration steps, including HTTP proxy settings.
Note: At present, you can only onboard Windows server operating systems to OMS. Client operating systems are not yet supported.
Installing the agent manually
To install the Microsoft Monitoring Agent manually, you must first download the agent binaries from the OMS portal.
- Under Attach Servers Directly (64 bit), click the Download Agent button to download the setup file, as shown in Figure 21.

FIGURE 21. MICROSOFT MONITORING AGENT LINK IN THE OMS PORTAL
- On the right of the Workspace ID, click the copy icon and paste the ID into Notepad.
- On the right of the Primary Key, click the copy icon and paste the ID into Notepad.
Once you have the agent binaries, you can then double-click the agent executable to start the installer.
- Run Setup to install the agent on a computer that you want to manage.
- Select Connect the agent to Microsoft Azure OMS and then click Next.
- When prompted, enter the Workspace ID and Primary Key that you copied into Notepad in the previous procedure.
- Click Next. The agent verifies that it can connect to OMS.
- When complete, the Microsoft Management Agent appears in Control Panel.
Command line installation
To install the agent using the command line, use the following example, modifying to suit your environment-specific settings.
MMASetup-AMD64.exe /C:"setup.exe /qn ADD_OPINSIGHTS_WORKSPACE=1
OPINSIGHTS_WORKSPACE_ID=<your workspace id>
OPINSIGHTS_WORKSPACE_KEY=<your workspace key>
AcceptEndUserLicenseAgreement=1"
Installation via PowerShell DSC
To install the agent using PowerShell DSC, use the following example, modifying to suit your environment-specific settings.
Configuration MMAagent {
$OIPackageLocalPath = "C:\MMASetup-AMD64.exe"
Import-DscResource -ModuleName xPSDesiredStateConfiguration
Node MMAagent {
#Service state
Service OIService
{
Name = "HealthService" State = "Running"
}
xRemoteFile OIPackage {
Uri =
"https://opsinsight.blob.core.windows.net/publicfiles/MMASetup-
AMD64.exe"
DestinationPath = $OIPackageLocalPath }
#Application
Package OI {
Ensure = "Present"
Path = $OIPackageLocalPath
Name = "Microsoft Monitoring Agent"
ProductId = ""
Arguments = '/C:"setup.exe /qn
ADD_OPINSIGHTS_WORKSPACE=1 OPINSIGHTS_WORKSPACE_ID="YOURID" OPINSIGHTS_WORKSPACE_KEY="YOURKEY"'
DependsOn = "[xRemoteFile]OIPackage"
}
#Other configuration such as
# - Port open/close
# - LOB applications
}
}
Download the Code
You can find the InstallAgent.json from Github at https://github.com/insidemscloud/OMSBookV 2 in the \Chapter 1 directory.
Installation via ARM Template
To Enable MS Monitoring Agent via ARM Template (Azure VMs only), follow the steps in "Enabling the Microsoft Monitoring Agent in Windows JSON Templates" on the Microsoft website at http://blogs.technet.com/b/manageabilityguys/archive/2015/11/19/enablingthe-microsoft-monitoring-agent-in-windows-json-templates.aspx.
Manually Configuring the Microsoft Monitoring Agent
Use the following information to enable an agent to communicate directly with the OMS service. After you have configured the agent, it will register with the agent service and will download the necessary configuration information and management packs that contain solution information.
After data is collected from computers monitored by the agent, the number of computers monitored will appear in the OMS portal in the Connected Sources tab in Settings under Attach Servers Directly (64 bit). For any computer that sends data, you can view its data and assessment information in the OMS portal.
You can also disable the agent if needed or you enable it using the command line or script.
To configure the agent, perform the following steps:
- After you've installed the Microsoft Monitoring Agent, open Control Panel.
- Open Microsoft Monitoring Agent and then click the 'Azure Log Analytics (OMS)' tab.
- Select Connect to OMS.
- In the Workspace ID box, paste the Workspace ID from the OMS portal.
- In the Account Key box, paste the Primary Key from the OMS portal and then click OK.
To disable/remove the agent, perform the following steps:
- After installing the agent, open Control Panel.
- Open Microsoft Monitoring Agent and then click the 'Azure Log Analytics (OMS)'tab.
- Highlight the workspace you wish to disable and click Remove.
To enable the agent using the commend line, use PowerShell, as shown here.
$healthServiceSettings = New-Object -ComObject
'AgentConfigManager.MgmtSvcCfg'
$healthServiceSettings.EnableAzureOperationalInsights('workspacename',
'workspacekey')
$healthServiceSettings.ReloadConfiguration()
Configure proxy and firewall settings (optional)
To configure proxy settings for the Microsoft Monitoring Agent, launch the Microsoft Monitoring Agent applet in the Control Panel and perform the following steps
- Open Control Panel.
- Open Microsoft Monitoring Agent.
- Click the Proxy Settings tab, shown in Figure 22.

FIGURE 22. PROXY SETTINGS FOR MICROSOFT MONITORING AGENT
- Select Use a proxy server and type the URL and port number if one is needed, similar to the example shown. If your proxy server requires authentication, type the username and password to access the proxy server.
Configure the agent via PowerShell
Use the following script to set the proxy settings for each agent that connects directly to servers.
param(
$ProxyDomainName="http://proxy.contoso.com:80",
$cred=(Get-Credential)
)
# First we get the health service configuration object. We need to determine if we have the right update rollup with the API we need. If not, no need to run the rest of the script.
$healthServiceSettings = New-Object -ComObject
'AgentConfigManager.MgmtSvcCfg'
$proxyMethod = $healthServiceSettings | Get-Member -Name 'SetProxyInfo'
if (!$proxyMethod)
{
Write-Output 'Health Service proxy API not present, will not update settings.'
return
}
Write-Output "Clearing proxy settings."
$healthServiceSettings.SetProxyInfo('', '', '')
$ProxyUserName = $cred.username;
Write-Output "Setting Proxy to ${ProxyDomainName} with proxy username of (${ProxyUserName})."
$healthServiceSettings.SetProxyInfo($ProxyDomainName,
$ProxyUserName, $cred.GetNetworkCredential().password)
Download the Code
You can find the Get-AgentProxy.ps1 from Github at https://github.com/insidemscloud/OMSBookV 2 in the \Chapter 1 directory.
Onboarding Linux Systems
The OMS Agent for Linux is the easiest way to collect Syslog events, Performance metrics, Container data, as well as Nagios and Zabbix alerts. The agent is a light, open and modular agent built on proven open source components. The core of the agent uses an existing open source data aggregator called FluentD. FluentD has hundreds of existing plugins, which will make it easy for you to add new data sources. In fact, for the collection of performance counters, Microsoft wrote a plugin for the OMI provider used for System Center today.
Supported Systems
The following are the Linux distributions supported by OMS.
| Distribution | Supported Versions |
| Amazon Linux |
|
| CentOS |
|
| Debian GNU/Linux |
|
| Oracle Linux |
|
| Red Hat Enterprise Linux |
|
| Suse Linux Enterprise Server |
|
| Ubuntu Serer |
|
TABLE 1. LINUX DISTRIBUTIONS SUPPORTED BY OMS
After installing the OMS agent for Linux packages, the following additional system-wide configuration changes are applied. These artifacts are removed when the omsagent package is uninstalled.
- New user. A non-privileged user named omsagent is created. This is the identity under which the omsagent daemon runs.
- Sudo configuration. A sudoers "include" file is created at
/etc/sudoers.d/omsagent This authorizes omsagent to restart the syslog and omsagent daemons. If sudo "include" directives are not supported in the installed version of sudo, these entries will be written to /etc/sudoers.
- Syslog configuration. The syslog configuration is modified to forward a subset of events to the agent.
Tools for Linux Management
If you are not a full time Linux administrator, simply knowing which client-side tools you should use from your Windows administrator workstation to connect to Linux systems to complete the necessary tasks can be a big help. Therefore, we will quickly cover a few of our favorite tools to ensure you have sufficient guidance as you configure Linux systems to forward data to OMS.
Below are descriptions of a few tools and the tasks for which they will be helpful to you.
Connecting to a server via Secure Shell (SSH) session. SSH is the Linux command line equivalent of Remote Desktop. For SSH connections, the free and open source tool Putty is a great fit. Putty enables you to make SSH connections to any system that supports telnet or SSH.
Putty, also allows you to save those sessions for one-click connection later, much like Microsoft's RDP Connection Manager for Windows remote desktop sessions. Session configuration details are pictured in Figure 25.

FIGURE 23. PUTTY SESSIONS SCREEN
You can read more and download Putty free at http://www.putty.org/
Copying Files to Linux Systems. For systems without Internet access, downloading the Linux agent directly will not be possible. In these situations, you will need to copy the Linux agent to the target system via the secure copy protocol (SCP) or secure file transfer (sftp) procotol. The perfect open source (and free) tool for this task is WinSCP.
WinSCP provides a GUI experience for copying files from your Windows desktop or server operating system to a target Linux system, as pictured in Figure 26.

FIGURE 24. WINSCP SESSIONS SCREEN
You can download WinSCP at https://winscp.net/eng/download.php
Editing files. You will need to edit a least one configuration file in the process of configuring the Linux agent. You could actually browse to that file using WinSCP, or you could use the Vi editor, a Linux command line editor. You can find a Vi command reference at http://www.ks.uiuc.edu/Training/Tutorials/Reference/virefcard.pdf.
Requirements
The following are the requirements for the Linux agent for all supported Linux distributions. These prerequisites should be in place prior to installing the agent.
| Required package | Description | Minimum version |
| Glibc | GNU C library | 2.5-12 |
| Openssl | OpenSSL Libraries | 0.9.8b or 1.0 |
| Curl | cURL web client | 7.15.5 |
| Python-ctypes | ||
| PAM | Pluggable authentication modules |
TABLE 2. OMS DATA TYPES AND FIELD
Note: Either rsyslog or syslog-ng are required to collect syslog messages. The default syslog daemon on version 5 of Red Hat Enterprise Linux, CentOS, and Oracle Linux version (sysklog) is not supported for syslog event collection. To collect syslog data from this version of these distributions, the rsyslog daemon should be installed and configured to replace sysklog. Step-by-step instructions are available at https://access.redhat.com/solutions/54363.
Installation Files
The OMS agent for Linux includes multiple packages. However, if you want to see these packages, you have to extract the bundle. To extract these, run the shell bundle with the --extract parameter.
| Package | Version | Description |
| omsagent | 1.0.0 | The Operations Management Suite Agent for Linux |
| omsconfig | 1.1.0 | Configuration agent for the OMS Agent |
| omi | 1.0.8.3 | Open Management Infrastructure (OMI) - a lightweight CIM Server |
| scx | 1.6.2 | OMI CIM Providers for operating system performance metrics |
| apache-cimprov | 1.0.0 | Apache HTTP Server performance monitoring provider for OMI. Only installed if Apache HTTP Server is detected. |
| mysql-cimprov | 1.0.0 | MySQL Server performance monitoring provider for OMI. Only installed if MySQL/MariaDB server is detected. |
| docker-cimprov | 0.1.0 | Docker provider for OMI. Only installed if Docker is detected. |
TABLE 3. COMPONENTS IN THE LINUX AGENT SHELL BUNDLE
Installation Steps
To install the Linux agent, perform the following steps:
- Transfer the appropriate bundle (x86 or x64) to your Linux computer, using SCP, SFTP or wget.
- Install the bundle by using the --install or --upgrade argument.
Note: Use the --upgrade argument if any existing packages are installed, as would be the case if the system Center Operations Manager agent for Linux were already installed. To onboard to Operations Management Suite during installation, provide the -w <WorkspaceID> and -s <Shared Key> parameters.
If you want to download the agent directly using wget, run the following command (actually a single line):
wget https://github.com/MSFTOSSMgmt/OMS-Agent-forLinux/releases/download/1.4.0-12/omsagent-1.4.0-12.universal.x64.sh
To install the agent, run the following command, replacing the placeholders with your OMS workspace ID and shared key (also a single line).
sudo sh ./omsagent-1.4.0-12.universal.x64.sh --install –w <workspaceid> -s <shared key>
Multi-homing the Linux agent. You can also multi-home the OMS version of the Linux agent to SCOM. Since you cannot onboard Linux agents via SCOM, you must use the OMS version of the OMI agent if you also want your Linux servers to be monitored by SCOM.
Installing Agent and Onboarding Later
You do not have to configure the agent right away. You can actually install the agent without configuring it completely, using the commands below.
sudo sh ./omsagent-1.4.0-12.universal.x64.sh --install
Run the omsadmin.sh command supplying the workspace id and key for your workspace. This command must be run as root (with sudo elevation) or run as the created omsagent user:
cd /opt/microsoft/omsagent/bin
sudo ./omsadmin.sh -w <WorkspaceID> -s <Shared Key>
You can use this together with the 'onboarding use a file' method (described in the section 'Onboarding Using a File'), to perform configuration when the time is right.
Onboarding Using a File
As mentioned above, onboarding with a file enables you to onboard an agent that has been pre-installed, but not configured.
- Create the file /etc/omsagent-onboard.conf, using the following command syntax. The file must be writable for the user omsagent.
sudo su omsagent vi /etc/omsagent-onboard.conf
- Insert the following lines in the file with your Workspace ID and Shared
Key: WORKSPACE_ID=<WorkspaceID> SHARED_KEY=<Shared Key>
- Restart the omsagent using the following command syntax.
sudo service omsagent restart
- The agent will process the file and startup. The file will be deleted on successful onboarding.
Proxy Settings on Linux Agents
Communication between the agent and OMS services can use an HTTP or HTTPS proxy server. Both anonymous and basic authentication (username/password) proxies are supported.
The proxy server can be specified during installation or directly in a file (at any point).
If specifying the proxy at agent install
When you run the /omsagent.. shell script, you will pass proxy info using -p
http://<proxy user>:<proxy password>@<proxy address>:<proxy port>.
If specifying in a file
The proxy configuration is set in these files:
/etc/opt/microsoft/omsagent/proxy.conf and
/etc/opt/microsoft/omsagent/conf/proxy.conf. These files can be directly created or edited but must be readable by the omsagent user. Both files must be updated should the proxy configuration change.
Detailed instructions for configuring proxy settings for the OMS Linux agent are available in "Configure the agent for use with an HTTP proxy server" at https://github.com/Microsoft/OMS-Agent-forLinux/blob/master/docs/OMS-Agent-for-Linux.md#configuring-theagent-for-use-with-an-http-proxy-server .
Multi-homing the Linux Agent with SCOM and OMS
If you discover a Linux computer with SCOM and then upgrade to the OMS agent, nothing further is required. However, if you install the OMS agent and then want to discover it with SCOM, you need to enable the agent to listen on TCP port 1270.
To enable the OMS Agent for Linux to communicate with SCOM, perform the following steps:
- Edit the file /etc/opt/omi/conf/omiserver.conf
- Ensure that the line beginning with httpsport= defines the port (1270 by default). For example, httpsport=1270
- Restart the OMI server using the following command: sudo /opt/omi/bin/service_control restart
Removing Previous Versions
If you installed an earlier version of the agent, such as that offered during the public preview. The syntax for uninstalling the agent varies by distribution, CentOS Linux, Oracle Linux, RHEL, SLES
sudo rpm -e omsagent scx omi
sudo rm -f /etc/opt/microsoft/omsagent/conf/omsagent.conf
Debian, Ubuntu
dpkg -P omsagent scx omi
sudo rm -f /etc/opt/microsoft/omsagent/conf/omsagent.conf
Integration with Cross-Platform Monitoring Systems
OMS also offers integration with some third party, cross-platform monitoring systems, enabling alert collection from these systems for visualization, alerting and potentially auto-remediation in OMS.
Currently, OMS offers alert collection from two popular open source monitoring systems: Nagios and Zabbix. Configuration steps for collecting alerts from Nagios and Zabbix are detailed in this section.
Configuring Nagios Alert Collection
Nagios is an open-source computer-software application, monitors systems, networks and infrastructure. Nagios offers monitoring and alerting services for servers, switches, applications, and services.
- To collect alerts from a Nagios server, the following configuration changes must be made:
Grant the user omsagent read access to the Nagios log file
(i.e. /var/log/nagios/nagios.log). Assuming the nagios.log file is owned by the group nagios, you can add the user omsagent to the nagios group.
sudo usermod –a -G nagios omsagent
- Modify the omsagent.conf configuration file
(/etc/opt/microsoft/omsagent/conf/omsagent.conf). Ensure the following entries are present and not commented out:
<source>
type tail
#Update path to point to your nagios.log path /var/log/nagios/nagios.log
format none tag oms.nagios
</source>
<filter oms.nagios> type filter_nagios_log
</filter>
- Restart the omsagent daemon using the following command syntax.
Sudo service omsagent restart
Configuring Zabbix Alert Collection
Zabbix is an enterprise open source monitoring solution for networks and applications. It is designed to monitor and track the status of various network services, servers, and other network hardware. Zabbix uses MySQL, PostgreSQL, SQLite, Oracle or IBM DB2 to store data.
To collect alerts from a Zabbix server, you will perform similar steps to those for Nagios above, except you will need to specify a Zabbix user and password in clear text in the omsagent.conf file. This is not ideal, but we recommend that you create the user and grant only permissions to monitor. For details on how to configure users and permissions in Zabbix, check the Zabbix product documentation at https://www.zabbix.com/documentation/2.0/manual/config/users_and_usergroups/permi ssions.
An example section of the omsagent.conf configuration file /etc/opt/microsoft/omsagent/conf/omsagent.conf for Zabbix looks similar to the following example:
<source>
type zabbix_alerts run_interval 1m
tag oms.zabbix
zabbix_url http://localhost/zabbix/api_jsonrpc.php zabbix_username Admin zabbix_password zabbix </source>
Troubleshooting Onboarding Issues
The issues you may commonly encounter when onboarding agents will vary between Windows and Linux. Details on where to find authoritative troubleshooting guidance are provided here.
Troubleshooting Windows Agent Onboarding
For the Windows platform, steps, procedures, and troubleshooting tips for both integrated Operations Manager attach mode clients and Direct Agent access in Microsoft Operations Management Suite (OMS) is detailed in "how to troubleshoot Operations Management Suite onboarding issues" on the Microsoft website at https://support.microsoft.com/en-us/help/3126513/how-to-troubleshoot-operationsmanagement-suite-onboarding-issues .
Troubleshooting Linux Onboarding
Steps, procedures, and troubleshooting tips for agent onboarding for the Linux platform are detailed in "Troubleshooting Guide for OMS Agent for Linux" on the Microsoft website at https://github.com/Microsoft/OMS-Agent-forLinux/blob/master/docs/Troubleshooting.md .
Onboarding for Azure Storage Analytics
OMS now includes a number of solutions that rely on ingestion of Azure Diagnostic Logs into OMS. The procedure for configuring ingestion varies based on the Azure service the solution is targeting.
These solutions are covered in detail in "Chapter 9 – Azure and Office 365 Solutions".
Summary
In this chapter, we have discussed the fundamentals of the OMS platform, as well as the onboarding and initial agent configuration process. As you can see, OMS opens some exciting new possibilities for managing your infrastructure and applications in a hybrid world, where the lines between cloud and data center and blurred. With updates coming on a cloud cadence, the story is sure to get even more interesting over time.