SQL Server 2014 Dev\Test Scenarios Hands-On Lab
Overview
Develop and Test are key areas where CSP Partners have an opportunity to not only reduce costs, but also significantly improve time to market, as a SQL Server instance in a Microsoft Azure Virtual Machine can be provisioned in minutes, versus days/weeks on-premises depending on resource availability and hardware procurement policy. In addition, you can now have a consistent application lifecycle management policy from on-premises to Microsoft Azure as well as secure, redundant source code. The best part is if a CSP end customer's Development/Test project is successful and approved for production, they can choose to continue to run on Microsoft Azure or in their hosted environment or even back on-premises based on one's choice, as the partner only pays for what is used. This not only reduces CAPEX, but also removes barriers to faster Dev/Test cycles, which can lead to faster innovation. The primary purpose of this lab is to help Partners quickly understand the key scenarios that will help them deliver Dev\Test solutions tailored to their customers.
Prerequisites
It is assumed that you already have gone through the 'Hybrid Networking' lab and have established connectivity between on-premises / local network and Azure. Having the "Hybrid Networking" environment setup is key since this procedure depends on the underlying infrastructure components. Some of the critical components this procedure depends on are outlined below.
Key Infrastructure Dependencies outlined in the "Hybrid Networking" lab:
- On-premises Domain Controller with all appropriate accounts need to be setup
- Domain Name Identified
- DC operational
- Microsoft Azure Prescription exists and has been provisioned with the right networks
- Network Name Identified
- Local Network Provisioned
- Network & Subnets Defined
- VPN / RRAS – Site to Site configuration has been built and is operational
- VPN Operational status is online
- S2S configuration completed
- RRAS configured and Operational
- All components reachable (check using ping, or via remote access)
- Microsoft Azure Pack has been downloaded and installed - If you do not have one in the on-premises network, create one following the steps at http://technet.microsoft.com/en-us/library/dn296439.aspx. For lab purposes, it is recommended to install SQL Server on the same server (you will need to install SQL Server before configuring the WAP Configuration Site)
You should have something like following when you look at the network configuration on Microsoft Azure.

You should have the following once you have successfully setup your Site-to-Site configuration.

SCENARIO ONE: Create SQL VM on Azure using SQL VM Image
Estimated Time to Complete: 30 minutes
- Sign in to the CSP Tenant's Microsoft Azure Management Portal (http://portal.azure.com) with the logon credentials
- Select Virtual Machines located on the left side navigation panel on the Microsoft Azure Management Portal page
- Click the +ADD button located on the top navigation bar and search for SQL Server 2014 Enterprise on Windows Server 2012 R2 and then select it from the list and select Create From Gallery.
- On the Virtual Machine Configuration page Basic, complete the fields as follows:
- Server Name – NetBIOS friendly name that will be assigned to the computing resource
- New User Name: Choose a secure local Administrator user account to provision.
- New Password and Confirm Password fields: Choose and confirm a new local Administrator password.
- Location – Accept or update the location needed to build the VM in
Click the OK button to continue.
- On the Virtual Machine Configuration page 3, complete the fields as follows:
- Standalone Virtual Machine: Selected
- Cloud Service DNS Name: If the default name is not available, give a different name.
- Region/Affinity Group/Virtual Network: Select HYD-Network – the Virtual Network defined in prior lab.- Resource Group: Ensure that the new VM is put into the Resource Group that has the Site-to-Site Configured.
- Virtual Network Subnets: Select DevTest (10.0.1.32/27)

- Size – Select the appropriate Server Size and click Select.

- Now configure the settings by ensuring that the new VM is set to use the right Subnet. Also remove the Network Security Group since it is not used and then select OK as shown.

- Update SQL Server Settings if needed. Simply review the default settings and select OK as shown.

- Review Summary and select OK to build as shown.

- The following screen will appear, indicating that the new VM is being provisioned.

- Once the VM has been created you can see it listed and Running by selecting the Virtual Machine icon on the left validation that shows all VM and their status.
Note: The new VM has not been added to the on-premises Domain so you will need to log onto it and do that next if needed.
From this point on we will be using the previously created VM called AZSQL01 moving forward. It was already created using the above procedure.
- On the virtual machine Dashboard page for AZSQL01, make note of the Internal IP Address displayed on this page located on the right-side of the page. This IP address should be listed as 10.1.1.xx and it will inherit the DNS IP already defined as 10.0.0.1 when the Site-to-Site was configured (separate procedure).
- Remote into the virtual machine using the internal IP address from on-premises network and perform the following.
- Open SQL Server 2014 Management Studio and ensure that SQL mixed mode authentication is enabled
- Connect to the SQL Server 2014 default instance using your Windows Account.
- Right click on your SQL Server instance and select Properties.
- On Security page, ensure that SQL Server and Windows Authentication Mode is selected and press OK.
Note: You might see a warning to restart the service. We will be doing that later.
- Open SQL Instance > Security > Logins
- Right click on login sa and select Properties.
- On General page, change Password and Confirm Password with a new password.
- On Status page, ensure that Login is enabled.
- Open SQL Server 2014 Configuration Manager and restart SQL Server Services
- Select SQL Server Services
- Select SQL Server Instance with service type SQL Server
- Right click and select Restart
- Open SQL Server 2014 Management Studio and login using SQL Server Authentication Mode
- Connect to the SQL Server 2014 default instance SQL Server Authentication
- In order to allow on-premises WAP server to connect to the SQL Server, you will need to add an Inbound Rule for the SQL Server requests in the Windows Firewall. To do this, open Windows Firewall with Advanced Security from Administrative Tools.
- Select Inbound Rules node, right-click it and select New Rule to open the New Inbound Rule Wizard.
- In the Rule Type page, select Port and click Next.
- Protocols and Ports page, leave TCP selected, select Specific local ports, and set its value to 1433. Click Next to continue.
- In the Action page, make sure that Allow the connection is selected and click Next.
- In the Profile page, select Domain and Private and click Next.
- In the Name page, set the Inbound Rule's Name to SQLServerRule and click Finish
- Close Windows Firewall with Advanced Security window.
- Using the Server Manager tool, join this server to the contoso.local domain and restart the server to complete the domain join operation.
Post Conditions
A new virtual machine has been provisioned based on the supplied Windows Server 2012 R2 OS, SQL Server 2014 virtual machine template as shown in Figure 1.

Figure 1 DevTestSQL01 Virtual Machine create from On-premises WAP in Window Azure
After the server restarts, connect to SQL Server Instance on this machine from WAP Server on-premises using SQL Server Authentication.

Figure 2 SQL Management Studio 2014 with connection to Microsoft Azure virtual machine WAP01 database instance
SCENARIO TWO: Enabling Self Service of Dev\Test DBAAS offering from WAP
Estimated Time to Complete: 30 minutes
- Logon to WAP Server
- Connect to WAP Admin Portal (https://localhost:30091)
- Select SQL Servers located on the side navigation panel
- Click the +ADD A NEW SQL SERVER button located on the bottom navigation bar and

- Enter the Azure SQL Server that will be leverages for Dev\Test Environment as follows:

- Here is the outcome will look like and now create a new plan that will leverage this new resource in Azure.

- Select Plans located on the side navigation panel

- Click plan name SQL DevTest on plans tab page

- On the SQL DevTest plan dashboard page, click SQL Servers in plan services and then click the arrow pointed to the right to move forward.

- Select the Check Mark to continue with the final step in creating the plan.
Note: We will not be using add-ons for this procedure.

- Here is what the final outcome will look like.

- On the bottom application bar click Change Access | Public | Yes – This will enable any with access to the Portal to leverage the new Plan created.

- Now let's create a single user in the Administrator portal for [email protected] as shown below.

- Complete the details for the new User as follows:

- Once it is created you will see the following screen.

- Connect to WAP Tenant Portal (https://localhost:30081)
- Login using an existing tenant account or else create a new tenant from the SIGN UP tab
- Click the +NEW button located on the bottom navigation bar and select My Account | Add Subscription
- On Choose a plan page select SQL DevTest and click OK button
- Click the +NEW button located on the bottom navigation bar and select SQL Server Databases | Create Database
- On database settings page
- Name: testdb001
- Subscription: SQL DevTest (might show up if you had other subscriptions with SQL Service)
- Edition: DevTest - On database credentials page
- Admin Name: testdb001
- Password: new password
- Password Confirmation: new passwordClick OK button
- Select SQL Server Databases located on the side navigation panel and you should see testdb001 in active state
Post Condition
From SQL management studio, you can see the test database created on DevTestSQL01
Note: As you can see, DbaaS based on SQL VMs running on Azure are managed the same way as on-premises SQL Servers in Microsoft Azure Pack. This will generate the usage information for SQL Server Service similar to on-premises SQL Servers. Usage information are updated based on a daily frequency and you can see them in WAP Management Database (SELECT * FROM [Microsoft.MgmtSvc.Usage].[usage].[Records])

Figure 3 Usage records displayed through the Management Services
Figure 3 shows execution against the management service database usage table and returns usage records. The process described above demonstrates the opportunity to support multiple development and test scenarios.
SCENARIO THREE: Manual backup\restore using Azure Blob Storage
How to backup and restore a single SQL 2014 on-premises DB to\from Azure Blob Storage offering manually.
Back-up unique customer DB to customer Storage Container
- Sign into the customer's tenant site provisioned directly or via Partner Center Portal using the Partner Center Portal to jump there. Then select browse and then select storage account.
- Verify if the existing storage was provisioned using the recommended automation scripts identified in this document and if not continue to step 3 below. If it exists you can capture the details for the Resource Group, Storage Account and container. If you already have this detail you can skip to step
- Click the +Add button located and select Create a new storage account and also identify a Resource Group that should be created. Ensure you also identify the proper location to put the resource group in.
- Name: newstoracct1 (lower case only and must contain at least 1 number)
- Resource Group
Name: newresgrp (lower case only and must contain at least 1 number)
- Location / Affinity Group: West US (Same region as where you created Virtual Network) – If multiple regions are involved it is recommended that you modify the region as appropriate.Click Create button
- After the new storage has finished creating (it may take couple of minutes), click on the name (Blobs) of the new storage name displayed under the services section of the tenants portal.
- Click on containers section on the right navigation on view the available containers.
- Click on Create a Container link on the top of the page (+containers).
- On New Container wizard page
- Name: dbbackups
- Access: PrivateClick on Create button
- Click on Storage Account tab on the left navigation area.
- Click on view All Settings right above the services area to view the storage account settings and then select Access Keys.
- Record the details for the storage account name and Key1 (access key) and Connection String (Key1).
- Your done setting things for manual backup in the tenants portal.azure.com site.
- Log on to SQL Server
Note: In real scenarios, DB server for source database will be different. For lab purposes, we are treating SQL server to be the on-premises database server.
- Download Adventure Works 2014 Full Database Backup.zip from https://msftdbprodsamples.codeplex.com/releases/view/125550
- Extract zip file to a local folder on the SQL Server
- Open SQL Server 2014 Management Studio and restore AdventureWorks2014 database
- Connect to the SQL Server 2014 default instance using your Windows Account.
- Navigate to Databases node
- Right click Databases and select Restore Database.
- On Restore Database wizard General Page, select Device and click on …
- Choose File for backup media type on select backup devices wizard.
- Click Add button and choose the extracted AdventureWorks2014.bak file and press OK button.
- Click OK button on select backup devices wizard.
- Click OK button on Restore Database wizard.
- Click OK button on success message wizard.
- Right click Databases and select Refresh.
- Post Condition: Ensure that AdventureWorks2014 is listed a child node for Databases.
- Backup AdventureWorks2014 database to blob storage from SQL Server
- Click New Query button on SQL Management Studio (Ctrl + N)
- Execute the following query from the query window after replacing variables with values applicable to your environment
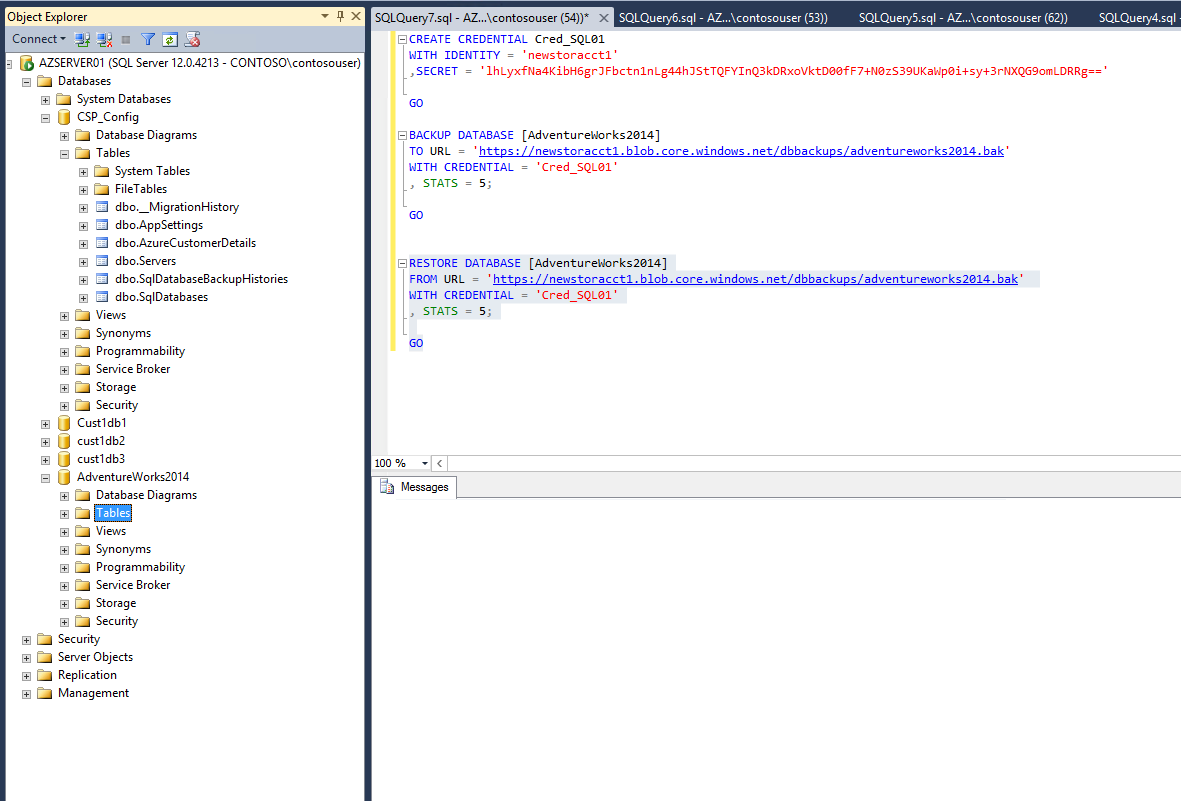
CREATE CREDENTIAL Cred_SQL01
WITH IDENTITY = '<STORAGE_ACCOUNT_NAME>'
,SECRET = '<PRIMARY_ACCESS_KEY>'
GO
Example:
CREATE CREDENTIAL Cred_SQL01
WITH IDENTITY = 'newstoracct1'
,SECRET = 'lhLyxfNa4KibH6grJFbctn1nLg44hJStTQFYInQ3kDRxoVktD00fF7+N0zS39UKaWp0i+sy+3rNXQG9omLDRRg=='
GO
- Execute the following query from the query window after replacing variables with values applicable to your environment to back up the database to blob storage
BACKUP DATABASE [AdventureWorks2014]
TO URL = 'https://<STORAGE_ACCOUNT_NAME>.blob.core.windows.net/dbbackups/AdventureWorks2014.bak'
WITH CREDENTIAL = 'Cred_SQL01' , STATS = 5;
GO
Example:
BACKUP
DATABASE [AdventureWorks2014]
TO URL = 'https://newstoracct1.blob.core.windows.net/dbbackups/adventureworks2014.bak'
WITH CREDENTIAL = 'Cred_SQL01' , STATS = 5;
GO
Results in the Tenant Site:

Post Condition
Based on your bandwidth, you will see backup message something like below:
5 percent processed.
10 percent processed.
15 percent processed.
20 percent processed.
25 percent processed.
30 percent processed.
35 percent processed.
40 percent processed.
45 percent processed.
50 percent processed.
55 percent processed.
60 percent processed.
65 percent processed.
70 percent processed.
75 percent processed.
80 percent processed.
85 percent processed.
90 percent processed.
95 percent processed.
Processed 24272 pages for database 'AdventureWorks2014', file 'AdventureWorks2014_Data' on file 1.
100 percent processed.
Processed 3 pages for database 'AdventureWorks2014', file 'AdventureWorks2014_Log' on file 1.
BACKUP DATABASE successfully processed 24275 pages in 5.217 seconds (36.350 MB/sec).
Restore database from blob storage
Prerequisite: Ensure you have the Storage Account Name, Storage Device URL and Primary Key associated to the existing Container.
- Logon
to SQL Server
- Open SQL Server 2014 Management Studio
- Click New Query button on SQL Management Studio (Ctrl + N)
- Execute the following query from the query window after replacing variables with values applicable to your environment
CREATE
CREDENTIAL Cred_SQL01
WITH IDENTITY = '<STORAGE_ACCOUNT_NAME>' ,SECRET = '<PRIMARY_ACCESS_KEY>'
GO
- Execute the following query from the query window after replacing variables with values applicable to your environment to restore the database from blob storage
RESTORE DATABASE [AdventureWorks2014]
FROM URL = 'https://<STORAGE_ACCOUNT_NAME>.blob.core.windows.net/dbbackups/AdventureWorks2014.bak'
WITH CREDENTIAL = 'Cred_SQL01' , STATS = 5;
GO
- Right click Databases and select Refresh.
Post Condition
- Based on your bandwidth, you will see a restore message something like below
5 percent processed.
10 percent processed.
15 percent processed.
20 percent processed.
25 percent processed.
30 percent processed.
35 percent processed.
40 percent processed.
45 percent processed.
50 percent processed.
55 percent processed.
60 percent processed.
65 percent processed.
70 percent processed.
75 percent processed.
80 percent processed.
85 percent processed.
90 percent processed.
95 percent processed.
100 percent processed.
Processed 24272 pages for database 'AdventureWorks2014', file 'AdventureWorks2014_Data' on file 1.
Processed 3 pages for database 'AdventureWorks2014', file 'AdventureWorks2014_Log' on file 1.
RESTORE DATABASE successfully processed 24275 pages in 13.072 seconds (14.507 MB/sec).
- Ensure that AdventureWorks2014 is listed a child node for Databases.
- Verify that the database has been restored.
This completes this process.
Appendix A – Working with CSP Partner Center portal
Create new customer using CSP Partner Center portal
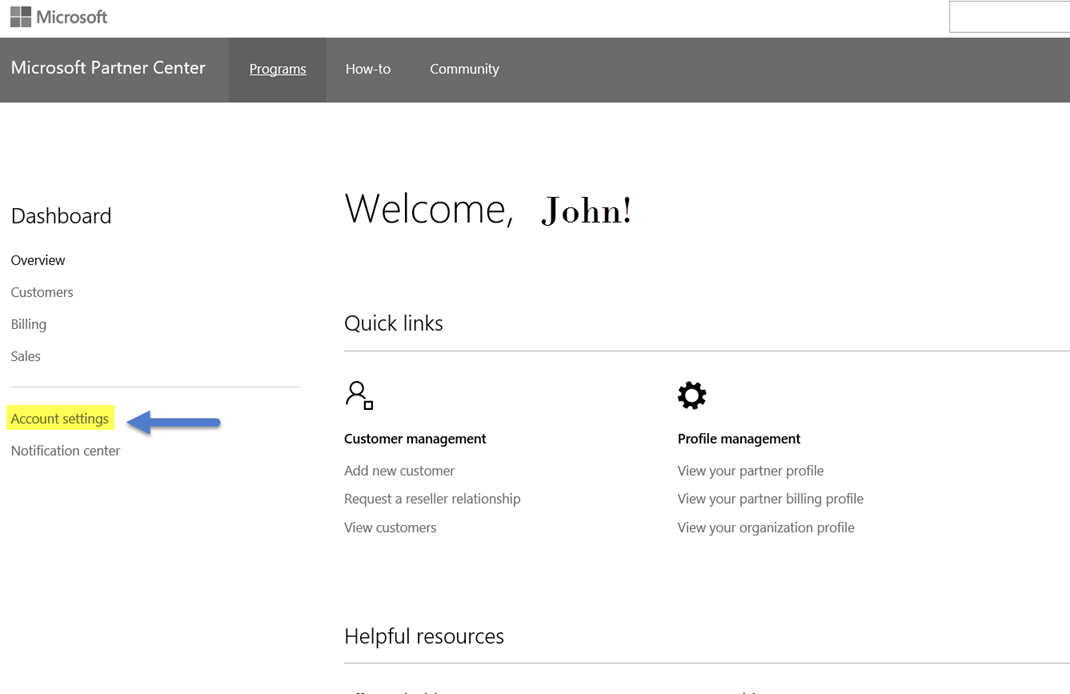
- Go to https://partnercenter.microsoft.com and sign-on into the site using your CSP subscription assigned
- Once signed on, you will see your Welcome Page with your CSP details. Once there, you can manually add a new customer, request a relationship, view customers, Add new Users, View Users, View your organizational profile.

- Capture the Microsoft ID in note pad for later use then return to previous screen by selecting "overview" on the left side.

- Now you want to provision the API by selecting the "Account Settings" text as shown below.

Create a new app with default settings by selecting the Register App

- You will now see the created API information you will need and need to capture it for later use. Ensure you capture the key since it is only shown once and cannot be viewed later for security reasons. Note: If you forget to do this you can always unregister the app and then recreate it which will give you a new key.

- Because you are using your production account, you are able to create an "Integration Sandbox" which can be used for testing as shown on the left. We are using a production environment for this documentation. If a Sandbox approach is needed, please refer to Appendix C for guidance.
Appendix B – Using Sandbox environment
Since we realize that some customers may want to leverage a Sandbox environment for testing the following guidance is provided.
Below you see where to setup the Integration sandbox.
- Once setup it now shows done. Now simply select done and it takes you back to the home screen.

- Log into the Sandbox you just created using the account you provisioned.
- You have completed setup of the Sandbox environment.
Select API settings and register an app for the Integration Sandbox environment

- Capture all of the details for this API settings

- Now you want to allow the account access the Graph API (AD Mechanism that allows you to connect to Azure AD). First, verify what users have access and if the account does not exist go ahead and create it by selecting User Management as shown.

Below you will see the permissions established for the "amServiceaccount". Only select the Admin Agent which will give the right level of permissions needed to use the guidance scripts in this document.


- Now we need to ensure the Partner Center Portal is linked to the CSP PARTNERS Azure subscription. Go to the Azure Management Portal and log in and select Active Directory from the left column. Then select New as shown below…

- Select "Active Directory" then "Directory" then "Custom Create" and finally "Create and manage a Microsoft Azure AD Directory"

- Since we are linking the Partner Center Portal which has accounts and users to the CSP PARTNERS Windows Azure AD we select "Use existing directory". Then select the toggle box as show below and click the check mark.

- You will then be asked to log into your Partner Center Portal using the creds you already established.


- Next you will see that the Organization is found and the global user in the Partner Center Portal and you can now select "Continue" to link it.

- Next you will see it has successfully added the user and select to sign out.

- Now go and log back into the Azure Management Portal and look at the Active Directory section and you should now see the new Integration Sandbox domain.

- Then select it to go view the details

- Then Select the Application to view published apps

- Then select the Show "Applications my company owns" from the drop down

- Now select the application listed for the Partner Center API and view the details that come up and select Configure

- Once in the Configuration section updated the Sign-on URL as shown below.

- Now update the read\write permissions as shown


Then save settings and you are ready to continue implementing an automated solution as identified in section 3 above.
Appendix C – Backing up SQL Server 2014 with Encryption
Procedure and guidance for creating an encrypted backup are covered here:
- Create an Encrypted Backup Describes the basic steps required to create an encrypted backup
- SQL Server Managed Backup to Windows Azure - Retention and Storage Settings Describes the basic steps required to configure SQL Server Managed Backup to Windows Azure with the encryption options specified.
- Extensible Key Management Using Azure Key Vault (SQL Server) Provides an example of creating an encrypted backup protected by keys in the Azure Key Vault.